Showing posts with label cult nails. Show all posts

13 June 2016

Born Pretty Store Review | Sparkling Flower Gems

Hello my dears! I haven't posted in nearly two weeks! I am so sorry... I have been working a lot lately, and I broke one of my nails D: it's all patched up and I have some pretty, sunny-looking nails for you today featuring these beautiful flower gemstones from Born Pretty Store!

(click to enlarge)

Click the jump to see more!

26 January 2016

Australia Day 2016: Chevron Vinyls

Hello! Back again (after some travelling and some illness) just in time for some Australia Day nails :D

(click to enlarge!)

To achieve these, I used my chevron striping tape from Born Pretty Store, along with a couple of polishes! Read on...

16 November 2015

Spring Pastels | Lemon Yellow & Pink Butterflies

Hello! Yep, I'm still here. There are so many things happening in my life right now--I know I'm not updating very frequently--but I haven't given up :)

It's quite a warm spring here in sunny Queensland, so I did these bright, cheerful nails to match!

(click to enlarge)

05 June 2015

Travelling with Bling | Black, Gold, & Gemsplosion

G'day my dears! I just got back from a spontaneous trip up north to see a friend for a few days (once I finally recovered from the awful flu-ish thing I had). Any time I travel, I like to do extra-nice nails for the occasion, since 1) it just adds to the fun, and 2) in the airports and such you're often passing money and documents around, so it gives you lots of opportunities to show off your hands :D

If you follow me on social media (check the links on the right!), you'll already have gotten a peek at these black and gold tips with a super-blingy accent nail!


21 May 2015

Matching Nails & Dress: Red, White, and Black

Hello! I'm finally getting better, woo! I'm always amazed (in a horrified kind of way) how much mucous one head can produce...

On a less gross note, I went to a wedding recently and wore a new dress, and decided to do a set of matching nails to go with it :)


I really love how these look, especially with the outfit! Read on to see :)

15 April 2015

Pink Ombre with Gold Glittery Tips

Hello! I've had a busy week of meetings and interviews and lots of rushing around. But tomorrow is my birthday, so I will have a great mani up to celebrate! In the meantime, you have one more day to enter my giveaway on Instagram! In celebration of one year there, as well as my birthday, I am giving away two of my favourite polishes--Essie Set in Stones and Max Factor Fantasy Fire! Entry and rules can all be found here, so go check it out!

Anyway, today I wanted something simple, chic, but with a touch of glitz. I filed a bit of my length down and then did a pink ombre with gold glittery tips!


29 September 2014

#31DC2014 - Day 29 - Inspired by the SUPERNATURAL

Hello my beauties! Time for probably the weirdest prompt of the 31-day challenge... "inspired by the supernatural".


I had to think about this one for a while, and at first I thought I'd do something based on the video for Katy Perry's ET/Supernatural song. I did watch it, and it did inspire the basic colour scheme, but I ended up doing Alienware nails!


If I were a PC gamer (I'm a console peasant, come at me bro), I'd lust after Alienware computers more than I already do. For those of you who don't know, they're the name in gaming rigs. And the little alien face I recreated on my index finger is their logo :)

I applied three thin coats of Cult Nails Deal With It on the small finger and the thumb, then taped off a stripe near the tip and covered it with Wet 'N Wild Black Creme. This is meant to mimic the look of their gaming laptops, which are black but have a metallic neon strip of colour around the outside. I should have used matte topcoat over the black, as their machines are generally matte. Oh well.

Black Creme was the base for the other three nails, and I used white acrylic paint to create the alien face. For the galaxy nails, I sponged on the white paint as well as Deal With It and Soulstice Spa Kona, a light icy/aqua blue. I added a bit of the glitters from Orly Mermaid Tale (green holo hexes) and OPI Pirouette My Whistle (white hexes and silver microglitters). Finally, more of the white acrylic paint to add a few stars, and Seche Vite topcoat finished them all off. I'm quite happy with the finished look!


Boo, this one came out a bit blurry. But you can see the warm glowy quality of Deal With It. I love this polish.

I hope you like these! I'm not even a huge Katy Perry fan, but I've had that song stuck in my head for hours after watching the video earlier. I did this all for you, my dear reader, so you'd better appreciate it ;) hehe. See you tomorrow for more! xoxo

16 September 2014

#31DC2014 - Day 16 - GEOMETRIC nails

G'day and welcome (back)! It's day 16 of the 31-Day Challenge. This day has historically been "tribal", but that's been changed this year to the less-controversial, more fun, and easier-to-interpret "geometric". Really, the fundamental idea is the same. Geometric shapes in your design. But... I went with a more literal interpretation of the theme...

Indoors with flash

Haha! Actual geometry on my nails. Fun, eh?

I started with two coats of Cult Nails Falling Hard, a beautiful pink creme. I knew I wanted a matte base for my sketches, and matt-ified shimmers are très awesome, so I topped the pink with L'Oreal #802 The True Diamond, one of their "Magic Top Coat" polishes. It's SUCH a pretty combo--here's what those two looked like together before I went any further:

Outdoors in sun... so sparkly!

As much as I loved that look, I had to press on with my vision, so I added a coat of OPI Matte topcoat and let it dry completely. Finally, I grabbed a black fineline Sharpie and started drawing everything I could remember from my geometry classes in school.

The thing about Sharpies is that you really only get one try--I didn't want to attempt cleaning up with rubbing alcohol and risk messing up the base--so the sine wave is a little uneven and my cone's a wee bit wobbly. But overall, I'm happy with it!

One more in sun, with Falling Hard in hand

These really take me back! Geometry was actually one of the classes I enjoyed. Feels like forever ago.


*nods* :D

Righty-o, hope you enjoyed these! See you tomorrow! xoxo

05 August 2014

Skittle with Cult Nails: It's A New Day Collection

Hello my dears!

Back in April, I pre-ordered the It's A New Day collection from Cult Nails. It's a beautiful spring-themed set of three creme/jelly polishes, plus a special stamping plate co-designed with Marta from ChitChatNails. How cool is that? Marta is the reason I know of Cult Nails, and I know I'm not the only one! Her love for this brand has created lots of new Culties, so I think it's only fitting she got to collaborate with Maria on this.

Why am I only just reviewing these? Well, long story. Basically I had the polishes shipped to my best friend in the US, because it was much cheaper, and he was sending a box here to Australia for my birthday anyway, so we decided he could just pop this in as well. But he got really sick and was in the hospital and wasn't able to send me the package for a while. It finally arrived the other day, just in time for spring down under! (And he's doing just fine now--way better news!) Thank you, Jeff :)

Anyway, without further ado, my It's A New Day manicure:


09 March 2014

Leopard-chaun Nails

Hiya!

Time for me to start on some cute green designs for St. Patrick's Day! The first is one that I have had in mind for a while--at least the basic idea. I have been ill since I got back from holiday, but I didnt let that stop me from manicure time...

As you can see, it's a gradual shift from leopard to zebra, and I thought doing it all in green would be a great start to the series. Animal print is so cute on nails, isn't it?

The base colour is the bottle I'm holding--Cult Nails Deal With It. Nice limey neon shimmery green with a strong gold flash. This is one of 5 shades in the Untamed (aka Coco's Colors) collection released a couple of summers ago. Coco is the daughter of Cult Nails' creator Maria, and she was only 13 at the time she came up with these awesome polishes! I nearly went with Zoya Midori, but chose this at the last second. Midori is very similar to this, but a bit more subdued, both in hue and courseness of shimmer. I wanted bright and punchy, and Deal With It did not disappoint.

The dark green for the spots and stripes is China Glaze Glittering Garland, and the middle of the spots is China Glaze Paper Chasing. I used a dotting tool and striper brush to achieve this look.

I love how Paper Chasing has the same sort of gold flash as Deal With It. Perfect combo!

In lower light. Glittering Garland still glitters happily :D
As I was lying in bed coughing and mustering up the energy to write this post, I was thinking of how this looked like something a leprechaun would ride. "A leprechaun's pet leopard... oh my gawd, it's a leopardchaun. Is this a thing? I AM ABOUT TO MAKE IT A THING." I jumped up that second, grabbed some black and gold paints, and did an accent on the ring finger:

Black acrylic paint and Revlon #925 Gold Coin, to be exact.
How cute is that?? A "traditional" strap and buckle you might find on a leprechaun's hat.
Sealed in with two coats of KBShimmer Clearly On Top.


I'm still giggling about this. Leopardchaun. Because if there's one thing I love more than a good pun, it's a bad pun.

Do you like this monochromatic animal print look as much as I do? Let me know in the comments! (I recently switched over to Disqus for my comment system, so I hope this makes it easier for people to chime in. I love hearing from you guys!)

Tune in next time for more St. Paddy's nails! xoxo

31 January 2014

SH Scarab + Simple Rhinestone Accents = pretty!

Hiya! Just a quick post this time. I'm kind of cheating today, but I just couldn't bear the thought of taking off Scarab yet, nor of covering it up very much, so I added some simple accent stones for a quick mini-post.


The centre bronze stone is from a wheel I got from Cult Nails, and the small crystals on the sides of it are random 1mm ones from a craft store. I took inspiration from the name of the polish, and the bronzey colour scarabs and June-bugs tend to have alongside their lovely green and teal hues.

Pic with my phone case, because it matches, and it's super pretty :D


I tried to make up for my "cheating" with a pretty water droplet photo! I got this idea because duochromes look lovely underwater, plus I couldn't stop staring at my nails in the shower today, lol.

I need to do this kind of shot more often *_*

I promise that's all of this colour! Next post will be a kickoff of my Valentines Day designs :D I noticed a lot of bloggers and YouTubers have already started with these, but I just can't start wearing hearts and romantic designs until February. So...


JK, I promise it won't all be disgusting ;)  see you next time! xoxo

25 September 2013

Bling! Silver + Holo Glitter + Rainbow Rhinestones

Hi, friends! Today I have another blingy, sparkly, crazy nail design that does my blog title proud. I'm glad I got it done and photographed last week, because today it's been grey and drizzly. I'm so annoyed... my Lacquer Lust Birthstone Collection polishes just arrived, but I can't swatch them yet! I got three of these beautiful shades--Diamond (my birthstone!), Tanzanite, and Peridot--but I can't do justice to their sparkling, stunning, holographic beauty without the sunshine. I'll get them up here soon!

For now, here's some chunkier shinyness!

Grab your sunglasses :D

Yay! The base for these babies is a combination of two Wet N' Wild Fergie Collection polishes. First, two coats of one of my favourite metallic silver polishes: Going Platinum. It's definitely shiny silver, but has tiny golden microglitter in as well! It makes for a warm-silver/cool-gold, truly platinum look. It's SO shiny.

Then I topped it with the other Fergie polish I have: New Years Kiss. It's made an appearance here before when I did a similar manicure for New Years 2012. Densely-packed silver microglitter with holographic silver bars. Yummy! Just look at it in the bottle below:

You should probably click to fullview this. Drooooool... See all those colours? HOLO MAGIC :D

I love how much depth that glitter topper provides. So shiny and sparkly.

Then I just added slow-drying clear polish to each nail, grabbed an orange stick, and started whacking on random rhinestones from a wheel I got at Cult Nails. (They do not seem to have any in stock at the time of this writing, sorry! It's just random colours and sizes.) Once they were all on and the clearcoat dried, I carefully sealed them in with Seche Vite.

asfdjkl;   SO PRETTY. Look at the middle nail! That stone on the left is a teal-green, like a darker version of the large one on the index finger--but it looks purple here except around the edges! I could stare at this pic all day *_*
one more... shining in the sun and catching light with every slight movement :)

As you can imagine, I had a blast wearing these, and they got lots of attention! Would you wear blingy nails like this, or is it too crazy for you?

Thanks for stopping by today. I'll see you next time! xoxo

29 August 2013

Alphabet Challenge: W is for... Wet N' Wild Water Marble

Hello, my dear readers :) Welcome to day 23 of the Alphabet Challenge, and the letter W! Getting this post up on a Wednesday to boot. I totally did that on purpose...

Lots of wild stuff going on here!

Couple of layers going on with this! First I laid down a base of two coats of Wet N' Wild French White, which is (as you might guess) a plain white creme polish. Over that, I dabbed two coats of China Glaze Glitz N' Pieces. This is an awesome chunky silver and black glitter combination--they did a whole collection of black-and-<insert colour> glitters called Bitz N' Pieces. The whole collection can be seen swatched here over white over at Beauty Junkies Unite. I didn't get a pic at this stage, but it looked exactly like her swatch of it, at the bottom of the post :)

I wore that for a day, then decided I wanted to kick it up a notch. I did a water marble with Wet N' Wild Black Creme and a cheap clear polish (no name, but a regular slow-drying clear) to get this look. The base shows through the clear and the black swirls really look cool! I first topcoated with Cult Nails Wicked Fast...

OK, they were super sparkly, but it's hard to tell here except on the small finger. The black looks nice and bold, though.

...but then I remembered how cool chunky glitters look with a matte topcoat, so I added a layer of the cleverly-named OPI Matte Top Coat.

The most fabulous zebra ever.

And just for fun (and because the design came out really cool on the thumb), here's a with-and-without-matte-topcoat shot of my thumb:

My entire thumb, nail and all, is the height of just my nail in these photos. MADNESS.

I hope you enjoyed this wonderful design for the letter W! ;) Have a lovely rest of your week and I'll see you next time! xoxo

16 May 2013

Alphabet Challenge: D is for... Darling Dots

Ahoy, me hearties! Now for my D manicure in the Alphabet Challenge. I did cute gradient dots!

:D

This is another look that I have seen before and always wanted to try. I think this was the perfect time to do it--and I really like how they came out. It looked so cool from a distance!

The base polish is two coats of Color Club Daisy Does It, a true-yellow glassflecked beauty. It's made an appearance here before, and those pics were way more colour-accurate--check it out here! I really like it a lot.

I used a small dotting tool to create the dots in Sinful Colors Dream On (fuschia, but showed up more reddish-pink over the yellow), Cult Nails Flushed (purple, doesn't start with D unfortunately but it was the only colour that worked for the mid-tone!), and Maybelline Color Show Denim Dash (blue). Sealed it all in with Cult Nails Wicked Fast topcoat.

Indoors with flash. They matched this Mellow Mushroom club card pretty well, so I had to pose with it :D

Outdoors in the sun. So glowy and delicious. Denim Dash is really pretty. I must wear it more prominently soon.

That's all for now, my dears ;) Have a fantastic wrap-up to your week! xoxo

27 December 2012

Christmas Day Bling: Lights on a Tree

(greatly preferred over snakes on a plane)

Hi, friends! I hope everyone had a joyous and restful holiday. I had a nice time with family and friends over the weekend--although I had to spend most of Christmas Day driving, yuck! However, I did take along nail supplies just for my special holiday manicure. I wanted it to look kind of like strings of lights on a Christmas tree, but in a more blingy, elegant, yet abstract fashion...

(ew, slightly stained nails. Can't even see that in real life! Nonetheless, I felt very Christmasy!)

I just painted the French tips with China Glaze Glittering Garland, a very dark green (almost looks black at times) mostly opaque jelly base with those shining green and golden glassflecks. A nice festive shade from the Let It Snow: Holiday 2011 collection :D

The rhinestones are from a wheel of assorted stones from Cult Nails; I just swiped on a slow-drying clear polish and placed them one by one with an orange stick. Took a bit of time, but I think the results are well worth it! Topped off with Seche Vite to seal them in place.

They blend right into the Christmas tree! So shiny and colourful.

And with a shiny ornament.

Only a couple more days until the weekend! I need to catch up on rest! LOL... See you all next time :) xoxo

29 October 2012

Halloween: Bats and Spiderwebs!

Hello errrbody! Today I'm going to give the challenge a miss and show you a couple of Halloween-inspired manicures I've worn lately! I love Halloween--yummy candy, fun spooky things like bats and ghosts, the colours, and dressing up in costume is really fun! And, of course, the chance to use some of my Halloween nail stamping plates! Warning, this is sort of a longer post, and has more pics than usual since I'm showing you two designs in one :)

The first one is inspired by this video by JaeMarie2008 on YouTube! She's got lots of cute designs, but this one really stuck out to me, because I super love bats! I think they're so adorable, even though most people seem to think they're gross or scary. I've always dreamed of having a pet bat that would sit on my shoulder and follow me around and stuff, like a parrot. Or a falcon. And I could hand-feed him fruits and berries and insects, and it would be the cutest thing evaaarrrr!

*ahem* Anyway. Right. Onto the nails:

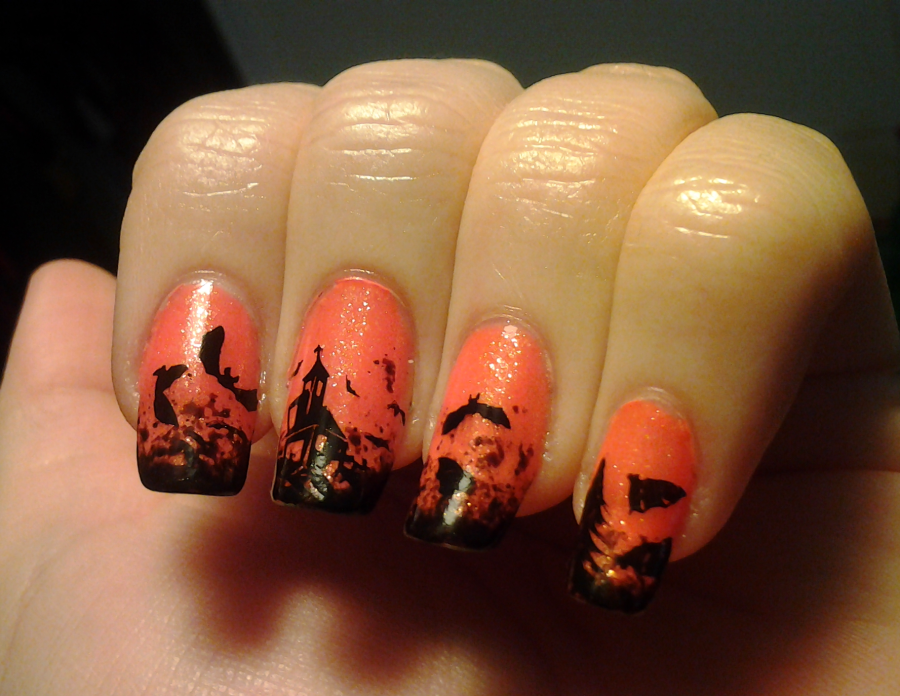
Bats! Haunted house! Scary tree! Orange shimmer! :D

Spooky yet cute! I started with two coats of Orly Melt Your Popsicle, which is actually a very neon orange that came out this summer. It's super bright and fun, but I wanted to make it a little more Halloween orange, plus add shimmer, so I added a coat of Zoya Gabrielle. Gabrielle is a very sheer orange polish with tiny orange and yellowy-orange glassfleck shimmers. It's really gorgeous, but would take a LOT of coats to wear alone. I like layering it over things :D

I then grabbed some black polish (Soulstice Spa's Gotham, to be precise--it seemed appropriate for this mani!) and sponged a bit on the tips with a little piece of an old washing-up/kitchen sponge. Then I used black Konad special stamping polish to stamp on the some images from a couple of Bundle Monster plates--the bats are on plate BM13, and the haunted house is on BM-305. I then used black Stripe Rite striping polish to draw on a few more smaller bats freehand, and some spooky tree silhouettes. Finished it all with Cult Nails Wicked Fast topcoat.

A whole Halloweeny haunted forest scene at my fingertips!

Managed to get a pic of both hands, thanks to some creative holding of my tablet and the "delayed shutter" feature. Word up to that. Also, the orange looks more colour-accurate here, it's not as melony as it looks in the first two pics.


The second design is darker--silver spiderwebs on dark purple:

Forgive the messy cuticles. I'll explain :P

First, a quick moan about the purple: this is Cult Nails Spontaneous, which I fell in love with at first sight and HAD to buy when it first came out. Yummy dark grapey purple with sparse bright purple microglitter? Yes please! And it really is a beautiful polish, but oh my lord, it is a nightmare to work with. Cult Nails polishes are generally absolutely perfect to apply, nice creamy formulas, but this? Ugh. Not sure if I got a bad bottle, or if this colour just didn't work the same. It's thick and meh and would be bald in some places and thick and clumpy in others, no matter how carefully I applied it. I normally really enjoy painting my nails, but I was so fed up with it after finally getting this to look right that it took a while before I came back to them and added the webs. This is like 3 or 4 coats of Spontaneous, coats where I'm dabbing in some places and removing excess in others and ARGH.

...Buuutttt I did eventually come around, and used Sally Hansen Silver Sweep to stamp on the spiderweb image from plate BM13, just in random places on the nails. I absolutely loathe spiders, and didn't want to add any of them to the design, but these pretty silver webs over the purple were both delicate and spooky :) Topped it off with Orly Sec 'N Dry topcoat.

Yeah, I was so fed up by the time I got to this stage I didn't even bother trying to get the cuticles perfect. This was the best I could do. It just would not cooperate. But, look how bright and shiny the webs are!

With flash, so you can see just how magnificently shiny these are :D They were flashing and catching the light every time I moved my hands!

Whew, long post! That's all for now, though. I'm going to post my artwork-inspired nails soon, and then hopefully get another Halloween design or two in before the 31st.

See you next time--hope the start of your week is delightful! xoxo

07 September 2012

Challenge Day #9: RAINBOW nails

I AM SO SUPER EXCITED ABOUT THIS ONE!

I love bright happy colours, and this... this is the first one I've done in a while that really came out loads better than I expected. I had so many ideas for rainbow day, it was hard to decide what to do. I knew I wanted a nice smooth rainbow instead of stark lines. Decided to go with a gradient French tip, then just kept adding things, and... well, LOOKIE:

Colourful! Glittery! It's a party on my fingertips :D The purple on the thumb and pinky finger is more actually purple in real life than it shows up on camera here. It looks royal-blue, but it's really a rich grapey purple.

I started with a basic white French done in Sally Hansen Xtreme Wear in White On. I didn't make this perfect, just sort of slapped it on, I didn't want this to be exact. I used the white base for two reasons: to make the colours really stand out, and to serve as a guideline for the next step. I then used approximately a crap ton of colours for the rainbow gradient. This wasn't perfect either--I just sort of swiped the polish in from the sides with very little on the brush and tried to blend them together. For the rainbow, I used... *deep breath* Soulstice Spa's Buenos Aires (red creme), China Glaze's Ruby Pumps (red shimmer), Sally Hansen Xtreme Wear Sun Kissed (orange creme), Zoya Gabrielle (orange shimmer), Sally Hansen Xtreme Wear Mellow Yellow (yellow creme), Essies As Gold As It Gets (yellow/gold shimmer), Cult Nails Deal With It (light green shimmery), Zoya Ivanka (darker green shimmer), Essie Bikini So Teeny (light blue shimmery), Maybelline Color Show in Denim Dash (dark blue shimmery), Sinful Colors 5106 Lang Lang (purple semi-shimmery), and Max Factor Fantasy Fire (magic, really, but we'll say also purple shimmer, atop Lang Lang). Whew!

:D

Then, because clearly that wasn't already enough, I added a coat of China Glaze Fairy Dust, the most lovely rainbow microglitter ever, over the entire nail. At this point, I said "woo hey, this looks like a fun party on my nails!" I thought some confetti would be appropriate, so I went for one of my few indie polishes, Lush Lacquer Salt N Peppa, for the black and white glitter over the tips. Looks festive, right? FINALLY, a thick coat of Seche Vite to seal it all in. I loved this mani, and got so many compliments on it!

Shiny! *_* CANNOT GET ENOUGH PICS OF THIS ONE

Close up of the thumb. The purple still didn't want to photograph right, but this is a little closer.


I always try to get a fun/different-looking shot of each manicure I post here. Mario flashes rainbow colours when he's invincible, so I thought this was fitting!

I had so much fun with this one (in case you haven't noticed). Would you wear rainbow French tips?

See you all next time for the gradient day of the challenge! xoxo