Showing posts with label half-moon. Show all posts

03 February 2015

Half-Moon with AMAZING Indie Polish Glitter!

Hello lovely people!

I had a really fun day today. I got to hang out with Jessie from Nailed It NZ, who is on holiday right near me! I always jump at the chance to make/meet cool new friends--especially nail friends, and especially nail friends I've admired online for ages! (Nailmates. It's a thing. Starting right now.) And, not like I'm bragging or anything, but we're some pretty sexy people, especially when we've been rained on and sweating and roller-coastering all day:

that's me on the left, Jess on the right. Some joker in the middle. ;)

I didn't have a terribly long time to spend on my nail art beforehand, but I knew I had to have on something impressive. Perfect time to try my newest polish from Indie Polish!

*drooooooooooooooool*

26 September 2014

#31DC2014 - Day 25 - Inspired by FASHION

Bonjour! Day 25 of the challenge is "inspired by fashion". Here's my nail look!


I think I am fairly stylish in my own way, but I am not trendy or fashionable, and I do not care about designers and brands and such. So I did a simple Google image search for "fashion", and found inspiration on the very first page of results!

(image found on trendingtrendsnow.com)


This image is from Tumblr. I do not know how to Tumblr. I looked everywhere trying to find a source, but there is no artist name here and I couldn't even see who uploaded it. A Google image search was also fruitless. I am more than happy to give credit to the artist if I can figure out who it is! Any help from you lovely people on this topic would be very much appreciated! (Update: didn't find an artist, but traced most instances of it to the URL above, so I'm sticking with that!)

Anyway, I very much fell in love with the look on the far right, so I did half moons with Sally Hansen Xtreme Wear Mellow Yellow, and painted the rest of the nail white with Orly Pointe Blanche. Then I added vertical stripes with my black Stripe Rite polish. Finally, some pretty half-pearls along the line, and Seche Vite to top it all off.

Indoors with flash
Outdoors in sun (it's finally sunny again!)

I wore these out for cocktails with a friend (hi Suzy!) and, by total coincidence, my nails matched the decor in the place! I'd never been there before, but look at the pattern on the seats...

Grainy phone pic, but I couldn't NOT take one

So you know, maybe it was the strawberry-basil martini talking, but I felt pretty sophisticated. ;)

I hope you like these--I sure do! See you next time xoxo

18 September 2014

#31DC2014 - Day 18 - HALF-MOONS

Hallo! Day 18, half-moons. I decided to be all cheeky and literal with it again :D

ACTUAL MOONS, LOL

teehee! The background is Sally Hansen Xtreme Wear Black Out, just a nice standard black creme. The rest is painted on with acrylic paint and a small brush, and then topped with Seche Vite.

Indoors with flash

What do you think? The little stars are very minimalistic, even more so than they look in these super-close-up photos. Without the moons, it was actually a nice, simple, elegant look I might wear again sometime. But I adore the spacey feel of these :D

Outdoors in sun. To quote my best friend, "Sun pics of the moon? That doesn't sound right!" ;)

I could almost cheat and say these count as my galaxy nails for tomorrow too, but... nah. I have something fun in mind for those :D come back soon to see! xoxo

07 July 2014

Liquid Crystal Half-Moons

Hiya!

Today's design features one of my favourite glitter polishes, China Glaze Liquid Crystal (from the Prismatic collection). It's so bright and shiny and gorgeous!


28 March 2014

Lucky Royal George (aka Accidental Evil Eye)

Hello, my beauties!

I know, two updates in a row, right? But this is a special one. Today's post is my contribution for the Lacquer Legion's March theme! This month, the prompt is "Lucky". I like that the prompts are generally quite broad--it leads to so much diversity and creativity in the entries :)

I, in general, have a love/hate relationship with the concept of luck. I have met some wonderful people, had some amazing opportunities, been to so many places, and overall I feel very fortunate even though I am far from rich. However, I am not sure how much 'luck' really plays into that. I tend to believe things happen for a reason, we're part of a grander scheme, etc. When it comes to really "lucky" things, like winning contests/drawings; acquiring random events in games; escaping unscathed from klutzy incidents; not tripping, dropping, breaking, losing, dirtying, sitting on, knocking over, or spilling things, I have a really really really poor track record. (Let's just say "graceful" would never be on any top-ten lists of words that describe me.)

However, one time I did strike it lucky, and won a contest that scored me a bottle of Nubar's limited-edition commemorative polish celebrating the newest addition to Britain's royal family--Royal George Blue! (I did a swatch-and-review of it here.) It's the only polish I've ever won, so I decided the "lucky" prompt was the perfect time to pull this little bottle out again.

Outdoors in sun

11 March 2014

More St. Paddy's 20-fo-teen: Mallard Tartan Tips

Hello hellooo! Time for more St. Paddy's goodness:

Wow, these look so much better in person and at normal size >.>

Right! So... my idea was to do a tartan look with the colours of the Irish flag. I kind of succeeded. The base for these tips, in my favourite french-tip/half-moon hybrid (French moon?), is the bottle shown above--piCture pOlish Mallard. Such an awesome dark green with an olive shimmer plus copper and green flakies! The tartan pattern was painted with a thin striper brush and white acrylic paint, Sally Hansen Insta-Dri #460 Snappy Sorbet (the orange), and Stripe-Rite gold glitter.

I love Mallard, but I kind of wish I'd used a lighter, brighter green. Also a more true orange rather than Snappy Sorbet, which leans a bit coral, especially over a dark base. I like this look, but it doesn't scream Irish the way the image in my head did. I attempted to rectify this with a cute little shamrock on the middle fingers, which was done with a dotting tool, detail brush, and Essie Shake Your $$ Maker. It was cute, but I thought it needed more definition around the edges, so I attempted to do a sort of outline with a green Sharpie and managed to mess that up too. Argh! They looked neater before the last step, but I couldn't get it off, so I just gave up and topcoated with Seche Vite.

Smell that? It's the aroma of FAIL


I know the end product doesn't look too bad, really--just nothing like what I had in mind. Still, I'm glad I did this design. I love the tartan look, and definitely need the practice doing straight lines. My hands are fairly steady and vertical lines are usually okay, but horizontal ones are awful! Oh well. Every manicure can't be a favourite, now can it? :)

Come back next time and I'll have something nicer for ya. Thanks for reading! See you soon xoxo

02 June 2013

Alphabet Challenge: G is for... Gotham's Glittering Glowsticks

Good day!

Welcome to another installment of the Alphabet Challenge. Today's post is brought to you by the letter G. Another relatively simple look to create, but edgy and fun to wear. Check it out!

Dark half-moons make my nails look even longer, I think. :D

Who would have guessed neon yellow and warm gold would look so cool together?

I started with a white polish around the base of the nail, to make the neon really pop. The yellow is Orly Glowstick, which is such a bright highlighter-yellow. These pics don't do it justice; it's one of those colours that just doesn't photograph well. In real life they are eye-searing bright :D

I painted the rest of the nail with Soulstice Spa Gotham, a rich creamy black. I mostly used the brush that came with the polish, but around the edges I used a small brush to make the half-moon as smooth as possible. I wanted to use this colour combination for two reasons: 1) it just looks cool, 2) the yellow and black remind me of Batman, which went perfectly with the name Gotham!

For the thumb, I painted two coats of OPI Goldeneye, the best warm rich glassflecky gold on the planet. I then dabbed on Orly Sashay My Way--it's that warm gold chunky holo glitter from the Flash Glam collection. I initially didn't pick it up, but I'm very glad I came around to it eventually. It's really unique in my stash, with gold, very holographic large hexes and thin bars in a clear base. I used a makeup sponge to dab on two "coats". If you do it this way, most of the clear base sinks into the sponge, so you get a lot of glitter payoff without the polish getting thick on the nail. Fabulous!

Macro shotttt! Click to enlarge. Goldeneye is the perfect base for Sashay My Way, in my humble opinion. Looks disco-ball-esque! (Ignore the lobster-hands. The polish is colour-accurate.)

This manicure made me feel cool. I am not cool. But it was fun to pretend for a while :D

Hope you enjoyed this one. Have a lovely weekend, and I'll see you next time! xoxo

25 October 2012

Challenge Day #28: Inspired by a FLAG (and, whoops!)

So, oops!

In case anybody noticed, I sort of missed a day. I looked at the list wrong, and skipped the artwork day, #27! Yikes. I will do that one next time, and then get back on track. Only a few more challenge prompts left!

Since the start of this challenge, I've had all kinds of ideas for this prompt--maybe do all ten fingers with a different flag of countries I've been to, or do some really cool detailed flag over all nails making one big image when putting them together... But then I was laying in bed the other day not feeling so great, and staring at my nightstand, where I happen to have a flag I got the first time I ever went to a "foreign" (to me) country. And, being as obsessed with nail art as I am, as soon as my eyes gazed at the Brazilian flag sideways:

behold: a bandeira do Brasil.

..it immediately occurred to me that the top bit looked like a chevron french tip + a half moon, and that I was going to have to paint that shizz ASAP! So... I did.

Cut my nails, too, a bit shorter than I intended. D: But. Yay flags!

As you can see, I went with the basic colour scheme, but a bit brighter! Started with my pretty yellow polish, Confetti #008 Margarita Senorita, that I have mentioned before. I then freehanded the green chevron tips with Sinful Colors #198 Irish Green. It's a quite sheer polish--I had to use at least 3 coats even over the yellow base, so my tips are kind of thick. It's really pretty though! I then used a detail brush to paint on the blue half-moons with Pure Ice's Celestial, and then the white details with Orly Pointe Blanche. Sealed it in with a new topcoat I found, also by Orly, called Sec 'N Dry. So far I'm pretty impressed! It's another multi-layer, quick-dry topcoat. The formula is nice, the brush is good quality, and as you can see, it's quite shiny! Smeared my dots a bit, though. Maybe I didn't wait long enough for them to dry, however, so I won't count this topcoat out yet.

With the inspiration flag.


And another, because I liked this pic.

Hope you enjoyed these! Next time I'll get the artwork nails up, and then get back on schedule! Untli then, take care, and enjoy the rest of your week xoxo

01 October 2012

Challenge Day #18: HALF-MOONS

Hullo, my dear readers :D Welcome to day 18 of the challenge!

Half-moon manicures are so elegant. Fun fact: women of many cultures have been using various types of dyes and pigments to colour their nails for thousands of years, but this style apparently originated in the US in the 1920s. It seems that it was considered indecent at the time for a woman to have her entire nail painted, so she would leave a little half-circle near the base of the nail bare--the "half-moon" shape. The rest would be a red or pink shade, all that was available at the time, and then a coat of clear went over it for shine.

These days we're all finger-hussies covering our entire nail with a full range of colours and designs, but the half-moon manicure is still a timeless, classic, and lovely look. I took this opportunity to use a beautiful new polish, pay yet another tribute to The Nailasaurus, and get in my first autumn-colour-inspired mani this year!

:D

Whee! Sometimes the half-moon design is done with two colours, but I wanted to stick with the original nude base--plus, I didn't think this polish needed much accompaniment! I used paper hole-reinforcers (like these) to mark off the base of my nail, and then painted the rest with a polish from OPI's recent Germany collection: Every Month Is Oktoberfest. I just had to pick up this polish, for two reasons: 1) it's an absolute stunner--dark inky purpleish that has plummy-red shimmer in some lights, and sparkling brown in others!, and 2) the name. I mean, in my life, that's pretty much correct ;)

After applying two coats of polish, I removed the reinforcement stickers, leaving the base exposed. Because I did two coats, though, some of it had time to dry and stick to the little round stickers, so the line wasn't perfectly clear and crisp. (Pro tip--when using tape or stickers to mark off sections for painting, you need to remove them almost immediately after painting or that will happen!)

I decided I had to do something to cover that, and then remembered this post over at the aforementioned Nailasaurus' blog. A few months ago, I acquired some of the large glitters ('glequins', she calls them, a portmanteau of 'glitter' and 'sequins' -- I am not the only one who combines glitter with other words to make new ones!) that she so loves, and decided to try out her method. Decided on green, added a swipe of clear polish along the line, and used a toothpick to place them along the edge of the half-moon. That looked a little top-heavy on its own, so I added the single glitter near the base of the nail. I think it really brought the look together! Thick coat of Seche Vite to seal them in, and...

I just love the shimmer :D This is indoors with flash.

Indoors without flash--you can start to see more of the brown nature of Every Month Is Oktoberfest, plus the green glitters show up better here.

Outdoors in sunlight is where it really transforms! Rich chocolately glimmery glowy brown. LOVE.

I felt very sophisticated wearing these, and got a lot of compliments at work :) Sometimes, I am CLASSY*.

*Other times, not so much, but I won't be posting pics of that on here ;)

Haha! Hope you all enjoyed this look! See you next time for some GALAXY nails that I love a lot more than I thought I would! xoxo

11 August 2012

Challenge Day #3: YELLOW nails

Hello lovelies! Happy Friday :)

Today's challenge is yellow nails. When I think of yellow I always want to do the bumblebee nails... but everybody and their sister does that. Daffodils? Eh... easier with acrylic paints and I typically don't use those on nail art for myself. I was a bit uninspired until I remembered that I'd always wanted to do half-moon nails, but with sunshines! (Half-suns?) So I went for it... the process was interesting and it didn't turn out quite the way I'd imagined, but I still really like it!

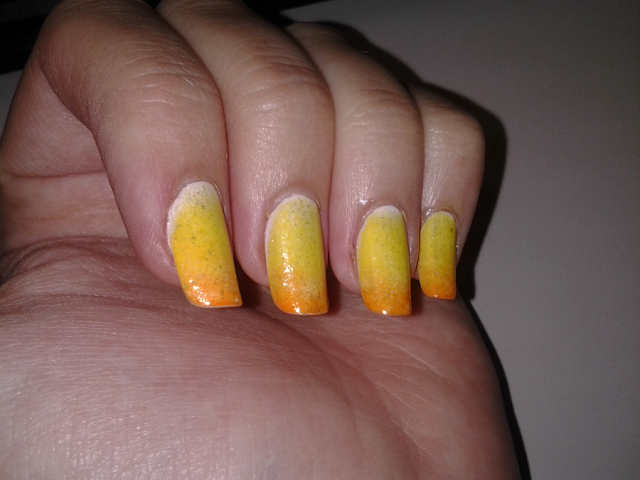
I wanted a yellow gradient, so I started using the Nailasaurus' famous gradient technique using 3 Sally Hansen X-Treme Wear colours: White On, Mellow Yellow, and the orange is Sun Kissed. I wanted some subtle but yellowy-golden shimmer, so I added a coat of Essie Good As Gold over it. I love that it's dense enough with tiny golden flakies and barely-there shimmer to be noticable, but the base is not tinted, and the white still looks white. At this point, my nails looked like this:

Terrible picture, but it's the best one I could get.
Check out the Nailasaurus at the link above, she's got mad gradient skills.

Then, I cut out little sun-shaped half-moons out of an old AAA sticker I found laying around. This bit was painstaking, but it was a slow day in the office (if any of my coworkers are reading this, um, just kidding?) and I got all ten done throughout the course of the day. I didn't think to get a photo of them until I was nearly finished, but here is what they looked like--9 used, one still waiting to be applied to my nail:

Holy ridic glare, Batman. Objects in photo appear larger than they really were.
I cut them to fit perfectly across my rather tiny nail beds.

Then, I painted a careful coat of Revlon Colorstay in 170-Coastal Surf over the areas that were still exposed. Can I just say how awesome this polish was for this design? Perfectly opaque in one coat, dried quickly after I'd removed the sticker, and the perfect sky-blue to be a backdrop for the suns. So pretty! Lastly, a medium-thick coat of good ol' Seche Vite for quick-drying, shine, and protection. Like I said before, it didn't turn out quite the way I had envisioned, but I love it anyway:

Suns shining in the sunshine. Aww.

What do you think of this sunny yellow design? At first I had the vague idea that it reminded me of something, but I couldn't think of what it was. After a day of wearing them and staring at them, it hit me. Good ol' Sunny D. Or Sunny Delight, as we called it back in my day.

Hope you all have a lovely sunny weekend! xoxo