Showing posts with label color club. Show all posts

17 February 2016

Better Late Than Never...! Valentine Holo Gradient

So, I'm like three days late on this, but... here are my Valentine's Day nails for this year!


I'm actually kind of sad about these! I used two holo polishes, but it decided to be rainy and grey when I was taking the photos, so I didn't get to show off their brilliance. However, I do like the pretty colours. I used Color Club Cosmic Fate, the bottle shown here, which is actually their peachy-orange Halo Hue. The red is one I made myself--LA Colors Aztec Orange (it is not orange) with a pinch of SpectraFlair added. I like how it made the other shade look more pink somehow. I swear it really is the one in the bottle pictured!

Blurry flash shot inside, since it was the only way I could make the rainbows come out
The heart glitters are from a Nicole by OPI polish called Love Your Life, and I pretty much ever only use it around this time of year, haha.

Topped with Seche Vite, of course.


It's a shame I didn't get to show off the holo to its fullest extent--it was lovely!--but, dat gradient. The red one is just a wee bit sheer, enough to make a beautiful, seamless blend.

I hope you liked these! See you next time :) xoxo

30 November 2015

Holo At Ya Girl

hollaaaaaaaa

heya! Today I have some hot holo-on-holo action... can you handle it?! :D

click to enlarge... drool-rag at the ready!

21 July 2015

I Survived (Although A Few Nails Did Not)

G'day! I'm back from my trip, and although it was a crazy week of working hard and playing hard, I survived! I am sick yet again, and I managed to break THREE nails >.< but I'm back.

I did not get as many photos of my travelling mani as I'd hoped. Here is the one I got before things got all cray, and it really doesn't do it justice:

(Click to enlarge)

dat holo doe. It's Color Club Over The Moon with chevron-tips of Layla #01 Mercury Twilight, and some little stone accents of course. The colour scheme is one I've always liked, but I was particularly inspired by the recent Cinderella movie for it :)

I broke my index nail really badly, and then I still have that patch on the middle one from last week and a break on the other hand too. What can I say--it was quite a week. For the first time in a LONG time, I have properly short nails. I am not digging it.

horrible phone pic, activate!

I'm pretty bummed about this, but.. I plan to draw inspiration from the queen of shorties, The Nailasaurus! She rocks all kinds of awesome art with her signature length and shape, so I'm going to do a few tribute manis to her while waiting for them to grow out. Fortunately they do grow pretty quickly.

The other piece of good news is that I now have a Surface 3 device! Full HD screen and this sweet pen for having more fun with my editing (and probably hand-written and -drawn notes as well). I'll be tweaking the graphics and layout of the blog to reflect this, and hopefully have a more quality site for you.

Sorry for the bad post today! I almost didn't bother since these are such meh pics, but I didn't want to totally disappear. Thanks for your patience, and I hope to see you soon with some pretty nail art :) xoxo

20 April 2015

Shimmery Rainbow Birthday Marble!

Hel-lo! Man, what an insanely busy few days! My birthday was the 16th, and as you guys know, I love rainbows and sparkles. I bought a brightly-coloured rainbow dress to wear for my special day, and did these shimmery marbled nails to go with it!


These didn't come out quite the way I expected, but I'm still quite pleased with them--especially the thumbnail! If I did it again I'd use a different orange, but I think they're still great. Read on for the deets!

15 April 2015

Pink Ombre with Gold Glittery Tips

Hello! I've had a busy week of meetings and interviews and lots of rushing around. But tomorrow is my birthday, so I will have a great mani up to celebrate! In the meantime, you have one more day to enter my giveaway on Instagram! In celebration of one year there, as well as my birthday, I am giving away two of my favourite polishes--Essie Set in Stones and Max Factor Fantasy Fire! Entry and rules can all be found here, so go check it out!

Anyway, today I wanted something simple, chic, but with a touch of glitz. I filed a bit of my length down and then did a pink ombre with gold glittery tips!


10 February 2015

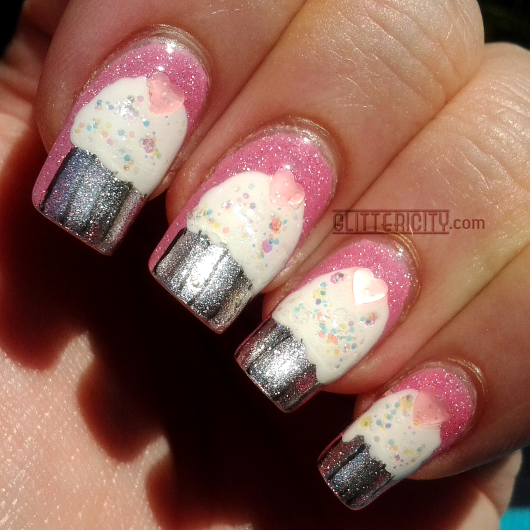
Valentine Cupcake Nails

Hiya!

Let the Valentine manis commence! Today I have some girly, sweet nails for you. That last bit being on the literal side :D


26 January 2015

Quick Shot: Australia Day Sponged Nails

Hiya! No time for a full post, but here's a quick look at my mani for Australia Day!


I used a plain white background, then sponged on shimmery yellow (Color Club Daisy Does It) and green (Zoya Logan) with a kitchen sponge, to get the dense patchy look you see here. Then I added two gold studs from Born Pretty Store to each nail, on one side. Finally, I topcoated with two layers of KBShimmer Clearly On Top.


I hope you like this quick but fun mani with the Australian national colours :D have a good one and I'll see you soon for more! xoxo

11 October 2014

Shimmery Marble-Accent Mani

Hallooooo :)

Before I get started--I want to quickly leave a link to a recent post on my Facebook page. If you're interested in any of the products I use and would like to get them for a very low price, or if you have any feedback for me, go check out that post! I'd love to hear your nail art requests, or other ideas for what you'd like to see on the site.

Now then, on to today's nails! I was recently inspired by this video on YouTube, and wanted to do a colourful design with water-marbled accent nails. But some things happened, and it ended up more random and skittley than I'd planned. I'll explain! ;)

Outdoors in sun

If you watched the video above, you have the basic idea of what I was trying to do: marble with three colours on the ring finger and thumb, then paint each of the other nails solidly with one of the shades in the marble. I wanted a nice shimmery design, so I chose China Glaze Blue Year's Eve (blue), Zoya Ivanka (green), and Color Club Daisy Does It (yellow), and the marbling itself went well!

But, as I was cleaning the excess polish off the water surface, preparing to take my marbled nails out of the cup, I accidentally touched the cotton swab I was using for this to my yellow middle nail, and a swirly blue and green blob was left behind. At first, I got all annoyed and thought I'd have to redo it... but then I realised that blue and green blob was pretty, so I swirled it around a little, and dabbed more splotches over the rest of the nail to make a speckly look. Cool, right?

Once that was done, I had to jazz up the other plain nails, so I pulled out coordinating blue, green, and yellow Born Pretty Store glitters and applied them to the areas you see. Finally, I topcoated with Seche Vite.

Indoors with flash
Outdoors in shade
The marble on the thumbs. Righty, y u so short for? I used a pale yellow creme as a base for the marble, so that's why the blue looks turquoise on the right hand. I used more drops of Blue Year's Eve when I got to the left hand so the colour would be more saturated :)
Outdoors in shade. And with a towel.

Speaking of Born Pretty Store, now is probably a good time to share some news! I'll be doing some product reviews for you soon, and I have been given a special code so that YOU can receive 10% off any order! They sell not only oodles of nail art supplies, but hair, makeup, and other beauty products too. The prices are great, and they even ship worldwide for free! Check them out at http://www.bornprettystore.com/ and use code CITYG10 for your discount sitewide! 

I hope you liked these. See you next time! xoxo

20 September 2014

#31DC2014 - Day 20 - WATER MARBLE

Helloooo :) Day 20 of the challenge--2/3 through it!--and it's all about one of my favourite nail art styles: water marbling!

Indoors with flash

This is actually a relatively simple one compared to my usual marbles--check out the tag on the right side to see more :) I usually do lots of colours and crazy intricate patterns, but for this I did a simple flower petal marble and just two polishes, both by Color Club. The creme is She's Sooo Glam, and the holo is Miss Bliss. Such a sweet girly look!

I learned everything I know about marbling from Colette and Beth, so if you want to know more about this technique, check them out! Colette, especially, does mostly marbles, and has so many good tips and creative ideas. I love both of those channels!

The fimo heart is from Born Pretty Store, and I topcoated these with Seche Vite.

Outdoors in sun...ish. Of course the day I use holo is the day it's not very sunny.
Another with a bit of sun. Cuticles look a little on the rough side here, sorry.

Since I wasn't able to get any blindingly beautiful full-sun photos today, here's another indoors to make up for it.


People seem to have pretty strong opinions about water marbling--they either love it or hate it. I think the result is SO gorgeous, and once you get the hang of it, it's actually a relatively quick way to get a lovely manicure. If you struggle with it, please check out the YouTube channels I mentioned above. You'll be a pro in no time! :)

See you tomorrow! xoxo

14 September 2014

#31DC2014 - Day 14 - FLOWERS

Hey hey! 14 days in, and it's flower day! I've already done flowers twice in this challenge... oh well, here we go again! :) This time I have little blue cornflowers!

Indoors with flash... and some water droplets, for extra pretty.

More one-stroke flowers! I've done this once before, and really need to more often. It's such an easy and beautiful technique.

The base is two coats of Color Club Cosmic Fate, the mangoey-orange Halo Hue. Soooo gorgeous :D I used blue and blue-mixed-with-white acrylic paints to create my little cornflowers, then plopped a matching blue rhinestone in the middle of each flower. I really love the finished look. Plus, I thought the gems would pop off with very little provocation, seeing how they are kind of "tall", but they all stayed on through a full day of work today. Fabulous! I'll blame the two coats of Seche Vite I put over them.

Outdoors in sun. A bit late in the day, so please excuse the warmth of the colours.

I was inspired by the pattern on my Born Pretty Store buffing block for this design. I almost didn't take a photo with it, because it's all used and scratchy and such. But I think it's important to show the inspiration for these things, so...

If only I'd added some mint coloured leaves...

So, there's my flower nails for day 14. Two weeks in! Join me tomorrow for some pretty delicate print nails :) xoxo

09 September 2014

#31DC2014 - Day 9 - RAINBOW nails

Today's manicure is for day 9 of the challenge, and it comes from somewhere over the rainbow. A glittery one :D

Outdoors in sun

The base is a coat of Color Club Beyond, which I felt was a great base for my glittery rainbow since it's full of rainbows on its own :D

The glitters are all from Born Pretty Store. I have the 12-pack of assorted colours, and used nine of them for this--red, orange, yellow, light green, emerald green, blue, dark blue, lavender, and pink. No violet or purple unfortunately, but I think it still works! Glitter-placement manis can be so relaxing. It's not even really as time-consuming as it looks! (It might be if I went for perfectly straight lines, but...)

Topped with Maya's Smoothing Coat for Glitters, and then Seche Vite.

Indoors with flash
Outdoors in shade
One more outdoors in sun. It was hard getting a shot that *didn't* have crazy reflective light streaks everywhere!

This is another one that I really hate to take off so soon. I'd totally wear this one for days if I could. But alas, time marches on, and the 31-day challenge does as well. So check back tomorrow for some gradient nails on day 10! xoxo

11 July 2014

Random Holoness with Color Club!

Hello! Guess who messed up the scheduling for this post and made it go out late?


Just kidding, it was me. :P

These nails are pretty weird, though. It started as "I want to wear some holo, I'll just grab the first one I see!" It turned out to be Color Club Kismet, their light limey-sagey green Halo Hue. And then...it got crazy.


07 July 2014

Liquid Crystal Half-Moons

Hiya!

Today's design features one of my favourite glitter polishes, China Glaze Liquid Crystal (from the Prismatic collection). It's so bright and shiny and gorgeous!


19 April 2014

Pastel Holo Gradient--Easter 2014

Hello my dears! Here's a Eastery pastel gradient mani... with a holographic twist, because you know me.

You down with G-City? Yeah, you know me.

22 March 2014

Diamond Holo Gradient

Bonjour, beautiful people!

I'm late getting this post up--eek! Had a late night last night and didn't get a chance to write this. I figured a late but good post was better than just slapping the pics up in a hurry. You deserve my best :D

Today I have a neutral gradient manicure that is anything but neutral, really ;)

Outdoors in sun

I love that this one would be demure and work-appropriate inside (especially if you left off the embellishments), but outdoors it explodes in rainbows!

I started with Lacquer Lust Diamond, shown above. Such a gorgeous creamy light-grey with white glassflecks and subtle linear holo! (I have a more in-depth swatch and review of this shade as well as a couple of her sisters here.) There was another polish in the collection called Opal, but opal stone is very much what I think of when I see this polish up close. It reminds me of this:

(image from http://headdlineslondonuk.files.wordpress.com)
 So stunning *_*

I sponged the tips with Color Club Beyond, a lovely strong black holo. I was so upset that I didn't get a bottle of the original OPI My Private Jet, until this came out. A great substitute in my opinion :)

Indoors with flash
As lovely as this looked alone, I wanted to make it even shinier, so I added a 1mm crystal in the middle near the cuticle. To each side of that, I placed a piece of silver hex glitter from Born Pretty Store, and then finally to the outsides of that, a piece of the slightly-smaller hex glitter from Essie Set in Stones (my favourite silver chunky glitter, and the one polish I'd choose to wear for the rest of my life if I had to pick one--I almost always have it on my toes).

Topcoated with Seche Vite.


The sun only came out for a brief moment, so most of these pics were snapped quickly when I dashed outside upon seeing it brighten up! Most of the time it looked like this, which was actually OK too--I love when a look can be equally pretty in dull conditions too:


I also took the opportunity to pose with this (very fake) diamond bracelet I have. It's gaudy and flashy and obnoxious and awesome.


I have a serious addiction to those shiny bits like you see on the ring finger. I cannot think of the official term for those, but I love them.

So there you have it. Neutral ≠ boring :D  thanks for stopping in today. See you next time! xoxo

23 February 2014

Nail Wheels for Art Show [pic-heavy!]

Hiya! Today's post will be a first for this blog, and I'm pretty excited about it! But first... *tosses hair* notice anything different? Hehe :) I've been playing with the blog layout and background. I love the blue glitter, and I think the lighter body colour in here will make the pics look better. What do you think?

Okay... *deep breath* here goes!
Last November, the office where I worked held an art show/craft fair. Quite a few of us have artistic hobbies--one lady makes scarves, another does jewellery and metalwork, one of my friends makes the most beautiful soaps, lotions, body products, etc, and yet another friend paints on canvas. There are so many talented people there and it was so much fun!

My contribution was designing some sets of false nails (and sold four of them!), but I also made these nail wheels just for display, and I've wanted to show them to you for a while:


This is a REALLY picture-heavy post (I'm talking like, 15 in total) ... so the rest are after the jump!

06 February 2014

Budding Romantic Rosebuds

Hello hello :) Today I am a bit tired after a long day, so this post will be short and sweet. But sweet it is, because I just love today's vintage rosebud look!

so sweet :)


The base colour, shown in the photographs, is China Glaze Budding Romance. I've had this one so long (it was part of their Spring 2013 Avant Garden Collection) and not worn it yet! It's that olivey, muddy, mossy, "ugly" green you either love or hate. I quite like it, and don't have anything else similar in my collection. The vintage look plus the name of the polish just begged for these sweet rosebuds to go on top! I've seen many ladies wear this look and many have shown tutorials as well, but the basic idea is to take three shades of the same hue, use the mid-tone to create a rough circle shape for each rose, then use the darker and lighter shades to make the squiggly C-shapes for the highlights and lowlights suggesting petals.

I used Zoya Jolene for the base of each rose, then Color Club She's Sooo Glam (lighter) and Revlon #350 Raspberry Rapture (darker, and also scented!) for the petals. The leaves are Orly Fresh, my favourite light limey grassy green.

Finished with a topcoat of Seche Vite.


I have to say, this one actually looks a lot better life-size than in these blown-up shots. The roses are much cuter and more delicate :)

Thanks for stopping by today! See you next time xoxo

04 February 2014

Miss Bliss on the Red Carpet

Hey there, sweet thang! I hope your week has started well :) Mine has, although the new house has had some work done since I've been here, and I've just been told they're coming back bright and early tomorrow to do even more. Hooray, waking up early is *awesome* :P buuuut the place should be lovely once it's all done!

Today I have a funky-yet-sweet look on my nails. Pink holo, red shatter, and some gems make a cute Valentiney mani!


This is a pic-heavy post! Sorry, you know I can't control myself around holos :D

14 October 2013

Sweet & Simple Sunday: Braid Your Nails!

...OK, not really. Because that would be weird.

Good day! Welcome to another Sweet & Simple Sunday, where I will show you how to create a unique and fun nail design--no special tools or crazy skills necessary! Just some nail polish and a bit of time. Today, grab three colours and get ready to create a fun braided look!

:)

I originally wore this look with three holo polishes (Color Club Beyond, Kismet, and Miss Bliss), and while it looked really pretty, it's so shiny and rainbowy that it was hard to show the design steps clearly! See?

I love it though :D

So, I have recreated with pastels to show you. Sometimes called a "fishtail" manicure, this braided look just consists of simple strokes with the brush that comes in the bottle. It is MUCH easier if your colours are opaque and cover each other in one coat (although it isn't necessary--only one of mine in this tutorial worked well for coverage... you just have to go over the stroke twice).

So here we go! I'm using Zoya Darcy (yellow), Color Club She's Sooo Glam (pink) and Sinful Colors Mint Apple (mint). Start out by painting one coat of your lightest colour as a base. If you need a second coat, go for it, but you really only have to concentrate at the base 1/4 or so of your nail. That's the only part that will actually be left showing. Allow that to dry, then make one diagonal stroke going in one direction at about 45 degrees with your second colour...

Looks Eastery, doesn't it?

...and once that dries, another going in the opposite direction a little farther down. It should so far look like this bottom image.

Let this dry before moving on. (Honestly, this is the part that takes the longest with this design. Waiting for each layer to dry. Do this manicure while you're sitting around watching your favourite TV program or sports team!) Then take your original colour--in my case, the yellow--and make another stroke parallel to the stroke you made with the second colour, right underneath it and overlapping the third. Continue going through in order...

Ta-da!
Once you get to the end, of course, let everything dry before sealing with a topcoat. This will smooth out the surface and prolong the life of your manicure.

This is definitely a more time-consuming design, so I suggest wearing it as an accent nail, and painting the rest of your nails with one of the shades you used in the braid. Or go crazy and wear all of the other colours on different nails :D Or, you know, go REALLY crazy and do it on all your fingers to really catch folks' eyes!

No matter how you decide to wear it, I hope you'll give this braided/fishtail look a try. Enjoy the rest of your weekend, and I'll see you next time! xoxo

07 October 2013

Sweet & Simple Sunday: Autumn-Inspired "Oil Painting" Brushstroke Nails!

Good day and welcome! Today we have another look that's simple to create, yet looks really cool! I've seen it around the internet (on Chalkboard Nails and Gorgeois that I can recall), called 'abstract brushstroke' or 'dry brush' nails. I think the effect is like an oil painting, so that's what I'm going with!

abstract pile of leaves?

You will need a handful of colours that look good together. I used five, but I think the more the merrier! (Gorgeois used twelve for her neon brushstroke mani!) I wanted an autumn colour palette, so I chose:

Zoya Nidhi (shimmery red)
OPI A Woman's Prague-ative (shimmery burnt orange, bottle shown above)
Color Club Daisy Does It (shimmery yellow)
OPI Every Month Is Oktoberfest (shimmery brown/dark purple)
Zoya Ivanka (shimmery green)

First, start by painting your nails fully with the lightest colour. I actually did not do this--I used a nude base--and the result was less warm than I wanted, with bare bits still showing. I don't mind too much, but I think it looks better with Daisy Does It as the base. See where I tested this on a nail wheel:

there IS a difference...

Then, just take your other polishes--start with darkest, wipe off most of the polish from the brush, and make a few quick, small strokes here and there on the nail. Repeat with the other colours, going from dark to the light again, overlapping them in places so you end up with a lot of different shades as they mix together! I took a few "progress pics"...


Repeat until you are satisfied with the coverage and colour balance. I had to go over the orange a few times, as it was the most sheer (yet I wanted it to be the main one!), but it shouldn't get too thick. Remember, you are only using a very small amount of polish at a time.

Once you are happy with it, time to clean up! As you can see, it gets a bit messy by the end. I used a cotton bud dipped into acetone to clean up around the edges, and then a small stiff brush to get in closer. This is just personal preference--I like a fairly clean cuticle. Seal with topcoat, and you're done! (I chose Seche Vite topcoat.)

Shiny!

I like how this has such a painterly effect. Reminds me of those heavily-textured oil paintings. :)

The thumb.. I like this one best.

I hope you enjoyed this post, and that you'll give the design a try! See you next time xoxo