Showing posts with label green. Show all posts

16 June 2016

Born Pretty Store Review | Glittery "Chameleon" Multichrome Polish

Greetings, polish-holics! I'm back with the final review for this batch of Born Pretty Store goodies--an absolutely stunning multichrome they've called "chameleon" polish. Look at this beauty!

(click to enlarge--this is worth it!)
JUST GAZE at those colours! I'm enthralled. See more details ahead!

13 June 2016

Born Pretty Store Review | Sparkling Flower Gems

Hello my dears! I haven't posted in nearly two weeks! I am so sorry... I have been working a lot lately, and I broke one of my nails D: it's all patched up and I have some pretty, sunny-looking nails for you today featuring these beautiful flower gemstones from Born Pretty Store!

(click to enlarge)

Click the jump to see more!

24 March 2016

Picture Polish Teal Gradient

Hello! Today I have a simple but pretty gradient design with two Picture Polish collab shades:

(click to enlarge)

As you can see, the gradient is with Dragonfly and Tail Feather. These are both lovely shimmery polishes, with PP's signature "bijou holo" going on. This only took two sponged coats to look opaque, although I did three to make sure the pics looked perfect.

The fimo flowers are from some canes I got ages ago from Born Pretty Store. And of course, it's topped with Seche Vite.


Anybody else getting a Twilight-book-cover vibe from this?

These polishes are fab! And both are still available on the Picture Polish website, although Tail Feather is being discontinued soon, so grab it while you can--it's discounted!

Thanks for reading today. See you next time! xoxo

02 February 2016

Ingress Skittle Mani | Enlightened Nails

Hey hey hey! Any of you out there play Ingress? If so, you'll get today's nails... and either love or hate them ;)

(click to enlarge)

26 January 2016

Australia Day 2016: Chevron Vinyls

Hello! Back again (after some travelling and some illness) just in time for some Australia Day nails :D

(click to enlarge!)

To achieve these, I used my chevron striping tape from Born Pretty Store, along with a couple of polishes! Read on...

04 October 2015

Aurora Leaves

Hello! Sorry I've been so epically lazy lately! I've been doing my nails, but just not had the motivation to get the photos edited and posted. After three years I guess I needed a little bit of a break :)

Back now though and happy to show you the first design I did upon my return to lovely Australia--and what better to celebrate than with an Aussie brand?


18 August 2015

Lime Foil Nails

Hello! Today I have a quick post about a quick mani. Nail foils are such an easy way to get an incredibly striking mani--as long as you aren't worried about lasting power. Big night out? Special occasion? It's perfect!


I laid down a base of a similar nail polish--Zoya Midori--and then applied Luau Lights, this stripey green foil from dollarnailart.com. It's gorgeous, even though my application wasn't entirely perfect. They gleam brilliantly from every direction!


(click to enlarge)

I took these photos without topcoat, because I still haven't found a good one that doesn't ruin the mirror-like finish. I applied Seche Vite before going out, which dulled them a bit but did at least ensure it stayed on for a few days.

This foil, along with tons of others, can be found at dollarnailart.com. They ship worldwide, and if you buy 6 or more rolls, you get a bottle of adhesive to apply them for free :D

Thanks for reading today! I'll have some proper art for you next time xoxo

15 March 2015

MUD Swatch & Review, Part 2

Good day! Today is the day of the wedding! By the time you read this, I'll have had: a very busy day of doing nails and getting ready, the privilege of attending my friend's ceremony, and several offerings from the open bar at the reception ;)

I have three more MUD polishes to show you today. Let's get to it!

03 February 2015

Half-Moon with AMAZING Indie Polish Glitter!

Hello lovely people!

I had a really fun day today. I got to hang out with Jessie from Nailed It NZ, who is on holiday right near me! I always jump at the chance to make/meet cool new friends--especially nail friends, and especially nail friends I've admired online for ages! (Nailmates. It's a thing. Starting right now.) And, not like I'm bragging or anything, but we're some pretty sexy people, especially when we've been rained on and sweating and roller-coastering all day:

that's me on the left, Jess on the right. Some joker in the middle. ;)

I didn't have a terribly long time to spend on my nail art beforehand, but I knew I had to have on something impressive. Perfect time to try my newest polish from Indie Polish!

*drooooooooooooooool*

26 January 2015

Quick Shot: Australia Day Sponged Nails

Hiya! No time for a full post, but here's a quick look at my mani for Australia Day!


I used a plain white background, then sponged on shimmery yellow (Color Club Daisy Does It) and green (Zoya Logan) with a kitchen sponge, to get the dense patchy look you see here. Then I added two gold studs from Born Pretty Store to each nail, on one side. Finally, I topcoated with two layers of KBShimmer Clearly On Top.


I hope you like this quick but fun mani with the Australian national colours :D have a good one and I'll see you soon for more! xoxo

13 January 2015

Packers Football Nails--FigTreeJewellery Custom Plate Review

Hiya!

If you follow me on social media, you may have seen a glimpse of the nails I wore the other day for the NFL Divisional Playoff games! Living in Australia means I had to get up at 4am to watch my Packers play. Worth it! It was a great game, and I was prepared, thanks to my new green stamping polish from Born Pretty Store, and my custom-made plate by the lovely Cassandra of FigTreeJewellery!


25 December 2014

Blingy Tree on Crackle

Merry Christmas, everyone! (Or Christmas Eve for some of you.) My second-to-last holiday mani features a tree made of rhinestones on a sparkly-crackle background!


The base is Ulta Snow White, topped with China Glaze Luxe And Lush, a big chunky iridescent flakie from their first Hunger Games collection. I think it makes a white base look all wintery and snowy :D

Once that dried, I added a coat of OPI Red Shatter, then Seche Vite topcoat. While that topcoat was wet, I made the little tree out of green rhinestones, then added a star glitter on top and a brown square stone below for the trunk. Cute, right? :D One more topcoat sealed that off and I'm good to go.


I'm still stuffed from a big Christmas lunch. What are you doing for festivities this year?

I'll squeeze in one more holiday mani before the day is totally over, so check back soon for that one. And have a wonderful day! xoxo

23 December 2014

Holiday Water Marble

Hi hi! Wow, Christmas is coming up fast! I suppose it's the hot weather here, but it still doesn't feel like Christmas to me. Maybe that's why I find myself running out of time! I'll have to post every day for the next few days to get all my holiday manicures up in time :)

Today I have a festive water marble topped with a very special seasonal polish from piCture pOlish called Holiday!


19 December 2014

Christmas Bows Feat. Dragonfly

Hiya! I'm super tired, so let's get right to it :) I have another Christmas mani for you, featuring another of my new piCture pOlish shades--Dragonfly by Lucy's Stash!

Outdoors in sun

06 December 2014

The Classic Christmas Lights Mani

Happy weekend, everyone! I hope yours is going wonderfully so far :D It's been rainy here the past couple of days, but I don't mind--I rather like the rain, plus it's a welcome reprieve from the hot summer weather.

For today's nails, the title says it all. Painting Christmas lights on your nails is not a unique idea, but it's one I really wanted to do. I did add my own unique touch, though--I used a matte base and lots of clear coat to make the bulbs really stand out and look like glass! Check it out:


19 October 2014

Firefly's Frisky Feathers

Hello hello :)

Today's mani is a pretty multichrome with some striping tape and glitter...


Click the jump to see all the ingredients for this gleaming look!

11 October 2014

Shimmery Marble-Accent Mani

Hallooooo :)

Before I get started--I want to quickly leave a link to a recent post on my Facebook page. If you're interested in any of the products I use and would like to get them for a very low price, or if you have any feedback for me, go check out that post! I'd love to hear your nail art requests, or other ideas for what you'd like to see on the site.

Now then, on to today's nails! I was recently inspired by this video on YouTube, and wanted to do a colourful design with water-marbled accent nails. But some things happened, and it ended up more random and skittley than I'd planned. I'll explain! ;)

Outdoors in sun

If you watched the video above, you have the basic idea of what I was trying to do: marble with three colours on the ring finger and thumb, then paint each of the other nails solidly with one of the shades in the marble. I wanted a nice shimmery design, so I chose China Glaze Blue Year's Eve (blue), Zoya Ivanka (green), and Color Club Daisy Does It (yellow), and the marbling itself went well!

But, as I was cleaning the excess polish off the water surface, preparing to take my marbled nails out of the cup, I accidentally touched the cotton swab I was using for this to my yellow middle nail, and a swirly blue and green blob was left behind. At first, I got all annoyed and thought I'd have to redo it... but then I realised that blue and green blob was pretty, so I swirled it around a little, and dabbed more splotches over the rest of the nail to make a speckly look. Cool, right?

Once that was done, I had to jazz up the other plain nails, so I pulled out coordinating blue, green, and yellow Born Pretty Store glitters and applied them to the areas you see. Finally, I topcoated with Seche Vite.

Indoors with flash
Outdoors in shade
The marble on the thumbs. Righty, y u so short for? I used a pale yellow creme as a base for the marble, so that's why the blue looks turquoise on the right hand. I used more drops of Blue Year's Eve when I got to the left hand so the colour would be more saturated :)
Outdoors in shade. And with a towel.

Speaking of Born Pretty Store, now is probably a good time to share some news! I'll be doing some product reviews for you soon, and I have been given a special code so that YOU can receive 10% off any order! They sell not only oodles of nail art supplies, but hair, makeup, and other beauty products too. The prices are great, and they even ship worldwide for free! Check them out at http://www.bornprettystore.com/ and use code CITYG10 for your discount sitewide! 

I hope you liked these. See you next time! xoxo

29 September 2014

#31DC2014 - Day 29 - Inspired by the SUPERNATURAL

Hello my beauties! Time for probably the weirdest prompt of the 31-day challenge... "inspired by the supernatural".


I had to think about this one for a while, and at first I thought I'd do something based on the video for Katy Perry's ET/Supernatural song. I did watch it, and it did inspire the basic colour scheme, but I ended up doing
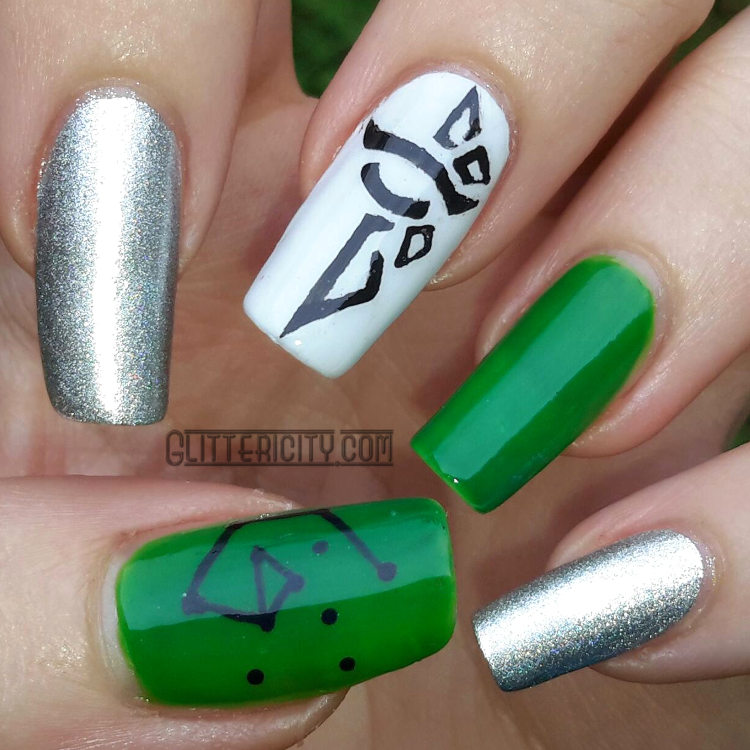
 Alienware nails!


If I were a PC gamer (I'm a console peasant, come at me bro), I'd lust after Alienware computers more than I already do. For those of you who don't know, they're the name in gaming rigs. And the little alien face I recreated on my index finger is their logo :)

I applied three thin coats of Cult Nails Deal With It on the small finger and the thumb, then taped off a stripe near the tip and covered it with Wet 'N Wild Black Creme. This is meant to mimic the look of their gaming laptops, which are black but have a metallic neon strip of colour around the outside. I should have used matte topcoat over the black, as their machines are generally matte. Oh well.

Black Creme was the base for the other three nails, and I used white acrylic paint to create the alien face. For the galaxy nails, I sponged on the white paint as well as Deal With It and Soulstice Spa Kona, a light icy/aqua blue. I added a bit of the glitters from Orly Mermaid Tale (green holo hexes) and OPI Pirouette My Whistle (white hexes and silver microglitters). Finally, more of the white acrylic paint to add a few stars, and Seche Vite topcoat finished them all off. I'm quite happy with the finished look!


Boo, this one came out a bit blurry. But you can see the warm glowy quality of Deal With It. I love this polish.

I hope you like these! I'm not even a huge Katy Perry fan, but I've had that song stuck in my head for hours after watching the video earlier. I did this all for you, my dear reader, so you'd better appreciate it ;) hehe. See you tomorrow for more! xoxo

27 September 2014

#31DC2014 - Day 27 - Inspired by ARTWORK

Yo, what's up? Day 27, and for my "artwork" prompt I took inspiration from street art!

Outdoors in cloudy overcasty light. I know it's spring, but I'm still not impressed, Sunshine State.

My perspective on graffiti has quite changed over the years. I used to consider it all vandalism and, while acknowledging that some of it takes talent, I just couldn't appreciate it. As an artist, I look back now and just think this perspective is silly. Some cities actually encourage it in some areas (hello, Hosier Lane!) to improve the look of plain walls or just as an attraction. Obviously, just 'tagging' does not take much thought or creativity, but well-crafted street art can be such a pleasure to see!

I don't feel like I'm very good at the style, but I had to give it a try. The base for this manicure is China Glaze Stone Cold, a dark matte-shimmer polish that looks very much like tarmac when dry. The white and black accents in this design are acrylic paint, and the colours are China Glaze Shocking Pink (Neon)China Glaze Pool Party (the more orangey one), Sinful Colors Neon Melon (green), and Orly Glowstick (yellow). I did my initials on the middle two nails, and then some random designs on the others--and a shooting star on the thumb, because yay stars.

I first topcoated with Seche Vite, and all shiny it looked like this:


But to return Stone Cold to its original appearance, and more realistically portray this type of art, I added Hard Candy Matte-ly In Love to finish it off.


As usual, my camera had no idea how to handle these neons. In real life, these colours are eye-searingly bright and awesome :D

What do you think about street art? xoxo