Showing posts with label nicole by opi. Show all posts

17 February 2016

Better Late Than Never...! Valentine Holo Gradient

So, I'm like three days late on this, but... here are my Valentine's Day nails for this year!


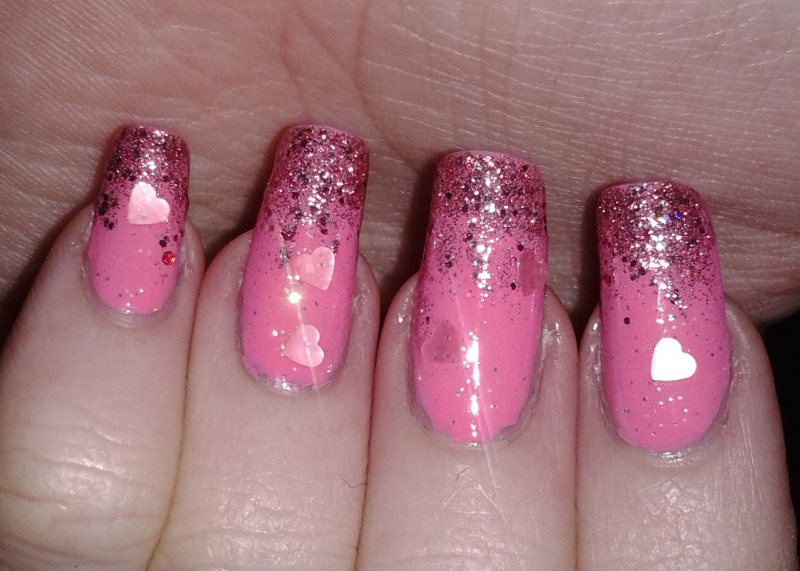
I'm actually kind of sad about these! I used two holo polishes, but it decided to be rainy and grey when I was taking the photos, so I didn't get to show off their brilliance. However, I do like the pretty colours. I used Color Club Cosmic Fate, the bottle shown here, which is actually their peachy-orange Halo Hue. The red is one I made myself--LA Colors Aztec Orange (it is not orange) with a pinch of SpectraFlair added. I like how it made the other shade look more pink somehow. I swear it really is the one in the bottle pictured!

Blurry flash shot inside, since it was the only way I could make the rainbows come out
The heart glitters are from a Nicole by OPI polish called Love Your Life, and I pretty much ever only use it around this time of year, haha.

Topped with Seche Vite, of course.


It's a shame I didn't get to show off the holo to its fullest extent--it was lovely!--but, dat gradient. The red one is just a wee bit sheer, enough to make a beautiful, seamless blend.

I hope you liked these! See you next time :) xoxo

10 February 2015

Valentine Cupcake Nails

Hiya!

Let the Valentine manis commence! Today I have some girly, sweet nails for you. That last bit being on the literal side :D


23 February 2014

Nail Wheels for Art Show [pic-heavy!]

Hiya! Today's post will be a first for this blog, and I'm pretty excited about it! But first... *tosses hair* notice anything different? Hehe :) I've been playing with the blog layout and background. I love the blue glitter, and I think the lighter body colour in here will make the pics look better. What do you think?

Okay... *deep breath* here goes!
Last November, the office where I worked held an art show/craft fair. Quite a few of us have artistic hobbies--one lady makes scarves, another does jewellery and metalwork, one of my friends makes the most beautiful soaps, lotions, body products, etc, and yet another friend paints on canvas. There are so many talented people there and it was so much fun!

My contribution was designing some sets of false nails (and sold four of them!), but I also made these nail wheels just for display, and I've wanted to show them to you for a while:


This is a REALLY picture-heavy post (I'm talking like, 15 in total) ... so the rest are after the jump!

28 April 2013

Alphabet Challenge: A is for...

A is for... alphabet? Well, that's kind of anticlimactically meta. Oh well.

Hello, boys and girls! Today, as promised, the start of a new challenge. I have decided to take one on that I've seen a few other bloggers do--the Alphabet Challenge! Basically, you do a manicure involving each letter of the alphabet in order. Some people use polishes whose names start with that letter, some do nail art somehow involving the letter, some are simply inspired by the letter and go more abstract with it. I'll be doing all of these, I'm sure! But my main goal is to use polishes that start with each letter, in hopes of using some shades I maybe don't pull off the shelf as often.

With that in mind, here is my A manicure and the kickoff of my first Alphabet Challenge:

SO BRIGHT

The bright orange polish is OPI A Roll in the Hague. Great pumpkiny orange, not quite as NEON as it appears in these pics, but kind of close. It's really nice.

The index and small nails have two coats of Nicole by OPI A Million Sparkles! It's a fun glitter with lots of tiny blue microglitters, small blue bars, small gold/silver hexes (it's hard to tell which... its either warm silver or cool gold...), and medium pink bars. It's pretty dense and in retrospect I should have just done two or three coats of it alone instead of putting the orange down first. However, the base colour peeking out didn't really show up as much in person and it looked pretty nice.

I then decided to tie the "accent nails" in with those little rings--I bought the pack of assorted-coloured rings at a craft store a long time ago and have never used them until now. They're, I suppose, meant for jewelry-making or perhaps tiny chainmail--LOL. The thumb is done the same way as the two middle nails here, but I didn't get a good photo of it for some reason. :o

Shining in the sun :)

Close-up so you can see 1) how closely it matches this cool pair of pants I have, and 2) a good macro-ish shot of the glitter. Click to enlarge to see it more clearly--you can identify all the four types of glitter in this pic.

So, thus begins my Alphabet Challenge! I'll be interrupting it a couple of times to show off my birthday polishes, but so far getting good manicures and photography conditions just isn't working out :( One is a fun magnetic set which I'm playing around with but haven't mastered well enough to do them justice, and the other is a beautiful collecton of holos--but it's been grey and cloudy every time I've had the chance and I want to swatch them when the sun is out! Keep an eye out for those, though, as well as the next 25 alphabet-inspired designs! xoxo

11 February 2013

Valentine Nail Design #1: Pink, glitter, and hearts!

Well, hello there my lovelies! Time for a Valentine/February-ish design! I actually wore this right before the Polish Days mani, but saved it for now. I'll have at least one more lovey-dovey design up before Thursday. I've never been one to really get into this holiday--if you need a designated holiday to show your love, you're doing it wrong!--but flowers and candies and cute heart things are never something I'd complain about :D I actually can't remember the last time I had a SO for Valentines Day, but I've always instead thought of it as a nice reminder to give a big ol' hug to all the people in your life you care about--friends, family, etc.

Anywayyzzzzzz, without further ado, some ridiculously girly pink heart nails!

It's like Barbie and Hello Kitty puked on my fingertips.

Bubblegum-candyfloss-pink, glitter, and hearts. All the ingredients are there :D

I started with Revlon #280 Bubbly. Absolutely perfect polish, this one! Went on easily, covered in one coat (it may have been a wee bit thin at the tips, but I knew I was adding the glitter so I didn't care), and is the definition of a sweet girly pink. I then used China Glaze Material Girl to add the glitter gradient. I've used this one before for looks like this... it's a really nice polish with pink microglitter and small hexes, then larger holographic pink hexes! You can see one on my small finger, especially, that looks amusingly like a tiny red rhinestone. After seeing that, it occurred to me that some little red stones would have went really well with this! But alas, that's just one of the holo hexes being all crazy on cam.

Bubbly and Material Girl alone. I wore it this way first, and just got the idea for the rest later...

I then remembered having picked up this random Nicole by OPI shade called Love Your Life. It's a pale-pink-almost-clear base with small iridescent glitter (think China Glaze Snowglobe) and these big satiny heart-shaped glitters. Application wasn't too bad--I had to fish a bit for the glitters, and I was picky about where I wanted to put them, but it wasn't too bad at all!

d'aww, how cute. I don't care if this manicure looks like it should be on a 12 year old, I'm rockin' it!

Hope you liked this one... see you next time! xoxo