Showing posts with label dots. Show all posts

01 March 2016

(Almost) Monochrome Dotticure

Well, it's been far too long since I posted! Have had zero motivation to edit pics and write posts lately D: but I've still been painting my nails and getting photos! I'll get caught up... one day...

Today I have a dotticure for you, inspired by Simply Nailogical on YouTube. Specifically, a comment left on this video by Nat the Otaku (hehe, love the username) suggesting an alternate colour combination. I don't think Cristine will ever do this one since she doesn't like plain creme polishes much--so I did it instead!


I started with plain nails, wearing only a base coat, and just used a dotting tool to cover these with five polishes: Zoya Purity (white), Soulstice Spa Manchester (light grey), Essence Movie Star (dark grey), China Glaze Liquid Leather (black), and Revlon #480 Revlon Red (red... obvs).

A little time-consuming, but easy-peasy! Once the nails were pretty much totally covered, I let them dry and then topped with Seche Vite for their protection. I intentionally left little bits of naked nail peeking out here and there--I like how it looks when the light shines through them from behind.


I know these aren't the greatest photos--by the time I looked at them full-size and realised this, the design had already chipped too much to re-take, so... oh well. They look great IRL :D

Thanks for the inspiration, random YouTube commenter! This would look really cool in rainbow colours, too... or glitter placement... or contrasting finishes...

See you next time! xoxo

13 January 2015

Packers Football Nails--FigTreeJewellery Custom Plate Review

Hiya!

If you follow me on social media, you may have seen a glimpse of the nails I wore the other day for the NFL Divisional Playoff games! Living in Australia means I had to get up at 4am to watch my Packers play. Worth it! It was a great game, and I was prepared, thanks to my new green stamping polish from Born Pretty Store, and my custom-made plate by the lovely Cassandra of FigTreeJewellery!


05 January 2015

My Take on the 2015 Colour Of The Year -- Marsala

Hello and welcome! To start off 2015 I've been giving my nails a wee bit of a break. I can't leave 'em alone for too long, but I've been trying to take extra care of them the past few days with oil and such rather than doing lots of painting.

However, I decided it was time I jumped on the Pantone Colour Of The Year bandwagon, which is something I've never paid much attention to in the past. I like exploring different nail shades and art styles without much consideration for the current trends or seasons. But the colour they have chosen for 2015 is Marsala, which I can best describe as an earthy, muted wine/taupe hybrid. It's not the type of shade I normally wear, and as such, I don't have any polishes that are an exact match. A chance to go for something outside my usual? Right on! So I went with the closest option in my stash--OPI Lost On Lombard--and did a chevron-tip look :)


26 December 2014

My 2014 Christmas Day Nails -- Sprigs of Holly

Hello everyone! I hope you had a wonderful Christmas (or a terrific Thursday, if you don't celebrate it). I experienced my first Aussie Christmas, got some awesome Black Milk leggings, and discovered the magic that is Cadbury Roses. On a related note, I will need to spend some extra time in the gym soon...

I meant to get these posted before, but between Blogger having some issues and me being a bit ill (I know, great timing) I'm only just now getting them up!


14 December 2014

Freya's Cats' (Toys)

Good day, lovely! Let the Christmas manis continue :D

I've done some baubles/garland over another one of my newest piCture pOlishes--Freya's Cats!


(And, if you've ever had cats, you know that pretty hanging Christmas decorations are there to be played with and destroyed, hence the title of this post!)


Onwards!

24 September 2014

#31DC2014 - Day 23 - Inspired by a MOVIE

Hiya! Day 23 of the challenge calls for nails inspired by a movie. I am not a big movie person, but I work with someone who really likes the minions from Despicable Me (hi Sam!), and while it's not the most original idea (I'm aware that everyone and their grandmother has done minion nails), I really wanted to paint them. So I did!

Indoors with flash
 I used Zoya Darcy (yellow) and Cover Girl Vio-last (purple) for the bodies. The denim coveralls are done with--what else?--Denim Dash by Maybelline. China Glaze Icicle is the silver for the goggles, and Layla Hologram Effect #16 Coffee Love is the brown for the eyes. (I thought this holo brown was perfect for capturing the multifaceted look of an eye, and I was right!) The rest is acrylic paint and a bit of patience ;) Topped with KBShimmer Clearly On Top, and then, for the above photo, I drew on the hair with Sharpies!


We haven't had a lot of sun lately, so these overcasty photos will have to do.

I hope you liked these! I really had fun with them, especially the derpy purple one and his wonky teeth :D See you soon for more! xoxo

11 September 2014

#31DC2014 - Day 11 - DOTS

Hullo darlings!

Today's design came out differently than I expected... a bit more subtle... but I like it! I'm calling it Blueberry Fizz.

Outdoors in sun

The base is Revlon Cobalt, from their Chroma Chameleon line of colour-shifters. I then created dots with piCture pOlish Aurora, a shimmery multichrome that also has shifting glitters. I made larger dots near the cuticle and got smaller as I moved towards the tip. I thought it would show up a bit more prominently than it did, but I still think it looks like blueberry soda :D

Outdoors in shade

Outdoors in sun

I didn't topcoat, because I wanted to preserve the bubbly, textured look. It isn't the usual "polka-dotted" look, but I'm digging it!

See you tomorrow! xoxo

07 September 2014

#31DC2014 - Day 6 - PURPLE nails

Hiya! I went out last night and got back late and didn't get this post up in time! Oopsie! So I'll get two up today to make up for it and get back on track. Here's my purple manicure for day 6 of the 31-day challenge!


(I know, I know. Two tone-on-tone flower manis in a row? I didn't mean to, it just kinda happened. I'll explain!)

The base is OPI Dutch 'Ya Just Love OPI? Yes, yes I do. This warm, shimmery plum covered in two coats and looks beautiful! I can't believe I didn't think I needed this before when the Holland collection first came out. I found it recently and am so glad I snapped it up this time around!

DYJLOPI? glimmering in the sunlight :)

The flowers are actually stamp-decals (there are heaps of tutorials on this out there, but here's one). I make mine on a plastic baggie rather than on the stamper, because I don't want to wait for each one to dry when I'm doing a full set. I made them a while ago and had been waiting for the right time to use them. That's how I ended up with two similar manis back to back! In this case I knew for a few days I wanted to use these for purple day, and yesterday it was more that I started with just the ombre and then found the stickers later, and... yeah. Oops. But anyway, the stamp is from Red Angel plate RA-109, and I filled them in with Zoya Caitlin (lighter, dusty purple) and Orly Charged Up (darker purple). The dots aren't part of the stamp--I just popped them on to add some more detail to the design. I adhered the decals with a layer of Seche Vite, and topped them off with another coat.

Indoors with flash

Hope you liked these! I'll have my black & white nails up next! xoxo

01 September 2014

#31DC2014 - Day 1 - RED nails

Hiya everyone! It's the first of September, and that means it's 31-Day Challenge time! Two years ago I started this blog off with this challenge, and now I'm doing it again. This time I'm doing it at the same time many other bloggers do it, and I'm also going to try and keep up the pace. That's right--I'll be doing a new mani every day this month! At least, that's the goal.

Day 1 of the challenge is all about the colour red. I chose a classic, pinup-inspired look, with a bit of a twist.

Outdoors in sun
I've applied French tips with this glorious red we all know and love--China Glaze Ruby Pumps. A deep red jelly with a beautiful glowing shimmer, it's opaque in two coats and looks great on absolutely every skin tone and nail length!

The white dots are done with a dotting tool and white acrylic paint, and the studs on the accent nail are from Born Pretty Store.

Topped with KBShimmer Clearly On Top.

Indoors with flash

It's not too late to join in! The list of prompts is here:

(credit to Chalkboard Nails for the image)

so feel free to follow along! Use the hashtag #31DC2014 to share your manis with us on all your favourite social media sites.

See you tomorrow! xoxo

16 August 2014

Mosheen the Rebel

Hiya! Wanna see the last two Zoyas from my birthday box? Say hello to Rebel and Mosheen!


23 July 2014

Mint Apple Blossoms

Hullo! Today's manicure was partially inspired by the names of one of the polishes... but mostly because I really wanted to paint flowers :)

And I just happen to have a tea towel that matches it perfectly--what are the odds?

11 July 2014

Random Holoness with Color Club!

Hello! Guess who messed up the scheduling for this post and made it go out late?


Just kidding, it was me. :P

These nails are pretty weird, though. It started as "I want to wear some holo, I'll just grab the first one I see!" It turned out to be Color Club Kismet, their light limey-sagey green Halo Hue. And then...it got crazy.


07 July 2014

Liquid Crystal Half-Moons

Hiya!

Today's design features one of my favourite glitter polishes, China Glaze Liquid Crystal (from the Prismatic collection). It's so bright and shiny and gorgeous!


03 July 2014

Happy "Good Time To Be In North America" Week!

Hiya! Happy Canada Day & Happy July 4th! The USA and Canada are so close together, and so are their big celebration days, so I decided to combine them into one fabulous red, white, and blue manicure:

Outdoors in shade

13 June 2014

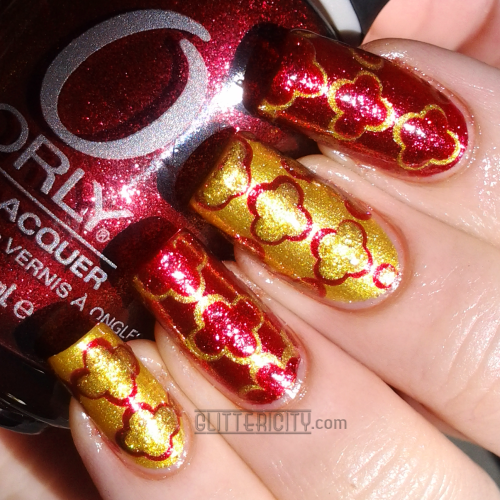
Red & Gold Quatrefoil Nails

Helloooo!

Lately, I've been seeing a lot of quatrefoil nails--they seem to be a new trend! Fairly easy to do and very elegant-looking, I've mostly spotted them on Instagram, but I first saw a tutorial for this look on YouTube. Simplichic did a great video with easy nail designs, and this is one of them, so credit to her for the inspiration! She used black and gold, but I love red and gold together, so that's the combo I chose for mine:


08 April 2014

Stripey Half-Moon: Inspired By a Towel

Bonjour!

So... I have this towel. It has stripes.


I decided to paint my nails to match this towel. Because I can.

I am still getting the hang of my lightbox.

25 February 2014

Simple Nail Art over Zoya Nidhi

Hallo, me lovelies!

Today's design is one I found that I wore a few months ago and forgot to show you!

 It was around Christmas, so I used this gorgeous glassflecky red base colour: Zoya Nidhi.


Nidhi is absolutely one of my favourite polishes ever, and definitely my fav red. Smooth buttery formula, dazzling glassflecky shimmers that change from red to gold to pink to blue, and a one-coater if you're careful with application! Classic shade but with that little spark that sets it apart from the rest. Gawgeous! I applaud you, Zoya.


I *had* to get a pic with this neat red clip-in hair extension! Me so edgy.

The black and white dots are done with acrylic paint, in a sort of half-circle pattern around one side of the nail. For some sparkle I plopped a 3mm crystal in the middle.


It isn't my favourite design ever, but I liked it well enough, if for no other reason than that delightful base colour.

Sorry for the short post! I got sunburned today, and just sitting in this chair is requiring me to hold myself up rather gingerly at an odd angle. Ha. I hope it's better tomorrow--I have a big swatch-and-review post to get up for you, plus some packing to do... More about that later ;) see you then! xoxo

21 February 2014

Distressed Dots & Hearts

Hullo everyone!

Today I have a cute manicure featuring glittery red dots and hearts on a distressed pink and white background :D

(click to enlarge for a crisper image!)


"But A-maaan-daaaaaa," I hear you whine, "Valentine's Day is over, you said no more cutesy romantic stuff!" Well, you're correct. However, I was recently contacted by PR for River Island to see if I might like to enter their latest competition--the We Heart Nail Art: Blogger Challenge! The theme is Valentine's Day, and the winner will receive a £150/180€ River Island gift code to be redeemed at www.riverisland.com... plus a feature on the River Island blog with a tutorial of the design!

I could have entered any of my previous manis, but I wanted to create something new. I decided to go for a design that's cute and fun, yet easy to recreate--so if my tutorial is chosen, people will be able to get the same look without too much frustration. With that in mind, I painted all nails white (Sally Hansen Xtreme Wear White On), let it dry, and then used a bit of wadded-up cling-wrap to dab on some bubblegum-pink (Revlon #280 Bubbly.. such a cute pink creme!) creating the distressed, splattered look. To complete the background and add some sparkle, I brushed on a coat of Sally Hansen Diamond Shine #150 Glass Slipper--a gorgeous white-glassfleck topper. This not only makes it glittery, but helps blend the background together just a tiny bit, so the pink doesn't stand out as harshly against the white.


Then for the fun part! With a small dotting tool and China Glaze Ruby Pumps (the stunning red-jelly-glitter you see above), I created a pattern of dots on all nails except for the middle one. There, I used a larger dotting tool to draw the heart shape--just dab once for the top of the heart, pull down to the middle, and repeat on the other side--and cleaned up the edges with a small brush to make it look neat.

Lastly, a generous coat of Seche Vite topcoat to protect the design and give it a glassy, glossy finish!


The design takes a bit of time, mostly because you need to wait for each layer to at least mostly dry before going on to the next one, but no steps are particularly difficult. And I think it's so cute! I like it at least as much as any of my other Valentine designs I did at the beginning of the month.. maybe even more :)

Ruby Pumps is so beautiful in the sunlight! I played with the brightness and contrast filters in this shot, just for fun :)


And one more--the background shows up well in this pic.


I saved the best news for last... the contest is still going on! It ends on the 24th (I heard about it a bit late myself), so if you want to enter, there's still time! Entry details are on this page, and the competition is open to bloggers in the UK, US, France, and Australia. So if you are interested, jump in! :)

Thanks for reading today! Have a lovely weekend, and I'll see you next time xoxo

18 November 2013

Sweet & Simple Sunday: Fall Flowers

Good day, my lovelies! Today is another Sweet & Simple design, and may be the last one for a while. I am moving soon and will not have a computer for most of the month of December while I get everything sorted out here and fly to another part of the world! So, posting will be rather sporadic until January. Please bear with me and my mini-hiatus! I'll have more time to spend on the blog once I get settled in my new home :)

At the moment, though, I have an easy but SO CUTE design for you. All you need are three polishes and something to make dots with. I chose an autumn-inspired colour palette for these cute fall flowers!

Mix up the colours to match any season, or any outfit!

Easy enough, eh? First choose your background colour. Mine is OPI Every Month Is Oktoberfest. Such a gorgeous brown/plummy shade :)


Next, choose your flower petal colour, and make dots in a circle of four or five per cluster, like so (mine are done with Sally Hansen Xtreme Wear Mellow Yellow):


Finally, choose a shade for the centres--I used Soulstice Spa's Buenos Aires--and put one dot in the middle of each cluster to finish off your flowers!


Make sure to let it dry for a while before adding your favourite topcoat! I didn't wait long enough on my right hand, and some of the red dots smeared a little :( It's still really cute though, especially at a normal viewing distance!

Please excuse the small finger off in the corner there. I broke that finger when I was a kid and it's been wonky ever since, lol.

Thanks for reading! Let me know if you try this design--I'd love to see it.

I'm sure I will post at least a time or two between now and January, but I know I'll be a busy girl getting things wrapped up here and transitioning to the new place. Take care, have a great holiday season, and I'll see you for a glitterier-than-ever 2014! xoxo