Showing posts with label halloween. Show all posts
31 October 2015
27 October 2014
The Lacquer Legion: #LLAfterDark
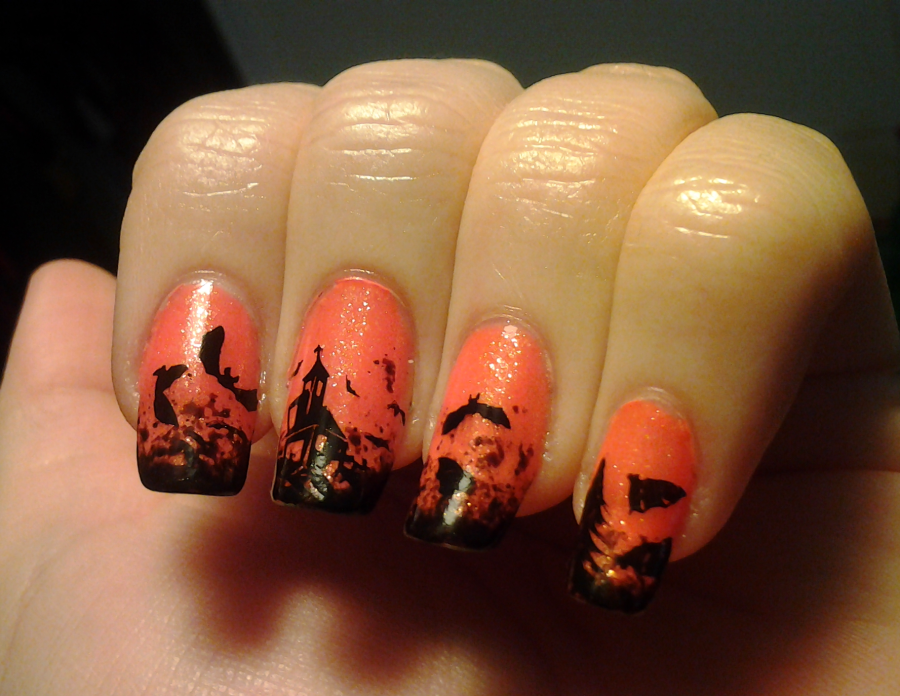
Hello, boys and ghouls (oh, that never gets old)! Time for a spooky Halloween-themed mani! The Lacquer Legion prompt this month was "after dark"... and I don't know about where you live, but after dark here is when the bats come around to nom all the mosquitos. I love bats! Some people are afraid of them, but I think they're cute--and I appreciate anything that eats up all the bugs :) So I decided to do a mani representing that brief moment at night when the moon is out, the last bit of sun is disappearing, and the bats start emerging :D
Click the jump to see more!
01 October 2014
#31DC2014 - Day 30 - Inspired by a TUTORIAL
Hello :) day 30 of the challenge, where we take inspiration from a tutorial. I watch so many talented ladies on YouTube, and follow so many awesome bloggers, it was really hard to choose one for this! But a recent video by ArcadiaNailArt caught my eye. She did three Halloween looks, and this second one called Vintage Vampire is so beautiful, I decided to use it!
I won't go into too many details of how I created this look--it's fairly simple, and you should watch her video to see it! But I used a striper brush and three China Glaze polishes for it--Adventure Red-y (red creme), Liquid Leather (black creme), and Ruby Pumps (red glitter). The pearls are both from different craft-store sets. :) Oh, and it's topcoated with KBShimmer Clearly On Top.
I am sorry to report that my hand burst into flames after I took the last photo. (Because... vampires... sunlight... yeah...)
I will bandage it all up and crank out one more pretty manicure for the last day of the challenge tomorrow! See you then! xoxo
I won't go into too many details of how I created this look--it's fairly simple, and you should watch her video to see it! But I used a striper brush and three China Glaze polishes for it--Adventure Red-y (red creme), Liquid Leather (black creme), and Ruby Pumps (red glitter). The pearls are both from different craft-store sets. :) Oh, and it's topcoated with KBShimmer Clearly On Top.
I am sorry to report that my hand burst into flames after I took the last photo. (Because... vampires... sunlight... yeah...)
I will bandage it all up and crank out one more pretty manicure for the last day of the challenge tomorrow! See you then! xoxo
02 November 2013
Halloween 2013 Mani #3: Glittery Tips & Kitty Skull
Hello my dears. Short and sweet post today to show you my Halloween Day nails :)
I think these are so cute :) I wanted something blingy, and I was inspired by this mani from Edith aka YummyNails... so I painted French tips with OPI A Woman's Prague-ative (the orange shimmery polish shown in the photo above) and then added some orange hex glitters from Born Pretty Store over them. This took quite a while to do--each piece was placed individually--but I think the result is worth it. They're so sparkly!
I then added a piece each of white and black striping tape (also from BPS) diagonally, as you see. Finally I added a cute cat-skull sticker to each middle finger. I don't know where these are from or what's the brand--I've had these laying around for aaaaggggesssss--but I really thought it would look cute in this design. I think the little skull design would be fairly simple to paint with a dotting tool, a small brush, and a bit of patience.
Topcoated with Seche Vite.
Hope you all had a safe and fun Halloween. I'm off to Green Bay this weekend to see the Packers play the Bears at Lambeau Field. I'm so excited! I will post a pic of my mani for the occasion when I return on Tuesday. Have a lovely weekend, and I'll see you then! xoxo
![]() |
| Click to enlarge :) |
I think these are so cute :) I wanted something blingy, and I was inspired by this mani from Edith aka YummyNails... so I painted French tips with OPI A Woman's Prague-ative (the orange shimmery polish shown in the photo above) and then added some orange hex glitters from Born Pretty Store over them. This took quite a while to do--each piece was placed individually--but I think the result is worth it. They're so sparkly!
I then added a piece each of white and black striping tape (also from BPS) diagonally, as you see. Finally I added a cute cat-skull sticker to each middle finger. I don't know where these are from or what's the brand--I've had these laying around for aaaaggggesssss--but I really thought it would look cute in this design. I think the little skull design would be fairly simple to paint with a dotting tool, a small brush, and a bit of patience.
Topcoated with Seche Vite.
![]() |
| Meow! |
![]() |
| I really love how they almost glow in this kind of lighting situation. :) |
Hope you all had a safe and fun Halloween. I'm off to Green Bay this weekend to see the Packers play the Bears at Lambeau Field. I'm so excited! I will post a pic of my mani for the occasion when I return on Tuesday. Have a lovely weekend, and I'll see you then! xoxo
30 October 2013
Halloween 2013 Mani #2: Marble Tiiiimmeee
Hi!
Today I have another Halloween design! I wanted to do a marble with Halloween-y colours. I thought of involving green or purple, then considered doing candy-corn colours, and finally decided on one with black, yellow, and orange. Here's how it turned out!
I swear that's orange. I think I should have used a lighter version. This looks more like a German-flag marble. Sind diese hübschen, Deutschen?
The three shades I used for this are Zoya Darcy (yellow), OPI A Roll in the Hague (orange), and Sally Hansen Xtreme Wear Black Out (black, shown in the photos). All these polishes work great for marbling. I used Darcy for my base and did random swirls in the water. I then topped it with a coat of INM Northern Lights for some sparkle.
When I'm marbling, I tend to draw the pattern in the water with the hand that I'm not working on, which often means that the design comes out a lot different on the left hand than the right. This time was no exception. This is the left hand:
... and this is the right:
Despite the fact that the orange looks more red, and therefore this isn't as Halloween-ish as I imagined, I still really like it! One more photo with them all together...
I'll have one more design for you on Thursday :) see you then! xoxo
Today I have another Halloween design! I wanted to do a marble with Halloween-y colours. I thought of involving green or purple, then considered doing candy-corn colours, and finally decided on one with black, yellow, and orange. Here's how it turned out!
![]() |
| swirlyyyy |
I swear that's orange. I think I should have used a lighter version. This looks more like a German-flag marble. Sind diese hübschen, Deutschen?
The three shades I used for this are Zoya Darcy (yellow), OPI A Roll in the Hague (orange), and Sally Hansen Xtreme Wear Black Out (black, shown in the photos). All these polishes work great for marbling. I used Darcy for my base and did random swirls in the water. I then topped it with a coat of INM Northern Lights for some sparkle.
When I'm marbling, I tend to draw the pattern in the water with the hand that I'm not working on, which often means that the design comes out a lot different on the left hand than the right. This time was no exception. This is the left hand:
![]() |
| detailed! pretty! |
... and this is the right:
![]() |
| I love how the thumb came out. Apologies for the weird angle, though. Right hand is not used to being photographed. This pose is more awkward than two naked guys connecting on Chatroulette. |
Despite the fact that the orange looks more red, and therefore this isn't as Halloween-ish as I imagined, I still really like it! One more photo with them all together...
![]() |
| all together now! With feeling! |
I'll have one more design for you on Thursday :) see you then! xoxo
29 October 2013
Glowy Ghost Nails!
Hel-loooooooooo
</Seinfeld>
Hi everyone! Today I have a cute Halloween manicure featuring some cool glow-in-the-dark polishes. I've had this idea for months and couldn't wait for the right time to wear it!
![]() |
| wooooooo |
Little ghosties! I started by painting my nails solid white (Sally Hansen Xtreme Wear White On), then two thin coats of a glow-in-the-dark polish I found at a Halloween shop! The brand seems to focus specifically on spooky shades--they are called Fright Night Cosmetics, the nail varnishes are called Claw Polish, and the bottles are shaped like coffins! Look how cool they are! The one I used is, of course, Ghostly Glow. It is relatively sheer and best worn over light colours. One coat probably would have been fine, but I used two to make sure it glowed as nicely as possible.
I then used black acrylic paint and a small brush to paint around the outline of the ghosts and fill in the outsides, then make their spooky little faces. Aren't they cute? :D
(Sealed in with Orly Sec 'N Dry topcoat.)
The glow polish works really well! This is always hard to capture with a camera, but I did fairly well...
![]() |
| hehehe, they look so neat. Tiny wee ghosties floating around in the dark :D |
Hope you liked this one! I'm having fun amusing myself with them :D I have two more Halloween looks to show you this week, so stay tuned! xoxo
02 November 2012
Moar Halloween!
*Jerry Seinfeld voice* Hel-lloooooooo!
So, I meant to post this yesterday, but oh well. Naughty blogger I am. Also meant to do a double-post with my "supernatural" nails, but I think I'm just going to make this one quick. I feel bad, but I'm working as usual tomorrow, then driving ~6 hours to go see my family and best friend for the weekend, then flying off to Holland next Wednesday for a week! So things are a little hectic around here!
However, I wanted to show you my Halloween Day nails. I dressed as Morticia Addams, the mother from the Addams Family, a great classic comic that was turned into a TV program, films, musical, etc. They're awesome! I went for a simple-yet-morbid manicure...
Creepy black nails with blood-red drippy tips! Woohoo :D Started with a base coat of Wet N' Wild Black Creme, the quintessential perfect one-coat black. Everybody in the nail-art world loves this one, and I can see why. Covers and applies perfectly, and stamps well too!
Then for the tips! I used a white base first, so the red would really pop, but in retrospect I don't think I really needed to. The red I used was the best blood-red-coloured polish I have, Adventure Red-y from China Glaze. I think its thick enough (in a good way--a rich, creamy, yummy opaque way) to have looked like this on its own, but I used Orly Pointe Blanche first to draw the drippy tips before going over them with the red. Both were done with my small detail brush.
Topped off with Seche Vite for super shininess :D
OK, sorry for super short post! I WILL get my supernatural challenge nails up before I take off next week, I promise! See you then xoxo
So, I meant to post this yesterday, but oh well. Naughty blogger I am. Also meant to do a double-post with my "supernatural" nails, but I think I'm just going to make this one quick. I feel bad, but I'm working as usual tomorrow, then driving ~6 hours to go see my family and best friend for the weekend, then flying off to Holland next Wednesday for a week! So things are a little hectic around here!
However, I wanted to show you my Halloween Day nails. I dressed as Morticia Addams, the mother from the Addams Family, a great classic comic that was turned into a TV program, films, musical, etc. They're awesome! I went for a simple-yet-morbid manicure...
![]() |
| I just love this photo. Click to enlarge :D |
Creepy black nails with blood-red drippy tips! Woohoo :D Started with a base coat of Wet N' Wild Black Creme, the quintessential perfect one-coat black. Everybody in the nail-art world loves this one, and I can see why. Covers and applies perfectly, and stamps well too!
Then for the tips! I used a white base first, so the red would really pop, but in retrospect I don't think I really needed to. The red I used was the best blood-red-coloured polish I have, Adventure Red-y from China Glaze. I think its thick enough (in a good way--a rich, creamy, yummy opaque way) to have looked like this on its own, but I used Orly Pointe Blanche first to draw the drippy tips before going over them with the red. Both were done with my small detail brush.
Topped off with Seche Vite for super shininess :D
![]() |
| Ooh, spooky spidery lace. The red, as you can see, was more subtle outside of direct lighting. Added to the creepiness! |
OK, sorry for super short post! I WILL get my supernatural challenge nails up before I take off next week, I promise! See you then xoxo
29 October 2012
Halloween: Bats and Spiderwebs!
Hello errrbody! Today I'm going to give the challenge a miss and show you a couple of Halloween-inspired manicures I've worn lately! I love Halloween--yummy candy, fun spooky things like bats and ghosts, the colours, and dressing up in costume is really fun! And, of course, the chance to use some of my Halloween nail stamping plates! Warning, this is sort of a longer post, and has more pics than usual since I'm showing you two designs in one :)
The first one is inspired by this video by JaeMarie2008 on YouTube! She's got lots of cute designs, but this one really stuck out to me, because I super love bats! I think they're so adorable, even though most people seem to think they're gross or scary. I've always dreamed of having a pet bat that would sit on my shoulder and follow me around and stuff, like a parrot. Or a falcon. And I could hand-feed him fruits and berries and insects, and it would be the cutest thing evaaarrrr!
*ahem* Anyway. Right. Onto the nails:
Spooky yet cute! I started with two coats of Orly Melt Your Popsicle, which is actually a very neon orange that came out this summer. It's super bright and fun, but I wanted to make it a little more Halloween orange, plus add shimmer, so I added a coat of Zoya Gabrielle. Gabrielle is a very sheer orange polish with tiny orange and yellowy-orange glassfleck shimmers. It's really gorgeous, but would take a LOT of coats to wear alone. I like layering it over things :D
I then grabbed some black polish (Soulstice Spa's Gotham, to be precise--it seemed appropriate for this mani!) and sponged a bit on the tips with a little piece of an old washing-up/kitchen sponge. Then I used black Konad special stamping polish to stamp on the some images from a couple of Bundle Monster plates--the bats are on plate BM13, and the haunted house is on BM-305. I then used black Stripe Rite striping polish to draw on a few more smaller bats freehand, and some spooky tree silhouettes. Finished it all with Cult Nails Wicked Fast topcoat.
The second design is darker--silver spiderwebs on dark purple:
First, a quick moan about the purple: this is Cult Nails Spontaneous, which I fell in love with at first sight and HAD to buy when it first came out. Yummy dark grapey purple with sparse bright purple microglitter? Yes please! And it really is a beautiful polish, but oh my lord, it is a nightmare to work with. Cult Nails polishes are generally absolutely perfect to apply, nice creamy formulas, but this? Ugh. Not sure if I got a bad bottle, or if this colour just didn't work the same. It's thick and meh and would be bald in some places and thick and clumpy in others, no matter how carefully I applied it. I normally really enjoy painting my nails, but I was so fed up with it after finally getting this to look right that it took a while before I came back to them and added the webs. This is like 3 or 4 coats of Spontaneous, coats where I'm dabbing in some places and removing excess in others and ARGH.
...Buuutttt I did eventually come around, and used Sally Hansen Silver Sweep to stamp on the spiderweb image from plate BM13, just in random places on the nails. I absolutely loathe spiders, and didn't want to add any of them to the design, but these pretty silver webs over the purple were both delicate and spooky :) Topped it off with Orly Sec 'N Dry topcoat.
Whew, long post! That's all for now, though. I'm going to post my artwork-inspired nails soon, and then hopefully get another Halloween design or two in before the 31st.
See you next time--hope the start of your week is delightful! xoxo
The first one is inspired by this video by JaeMarie2008 on YouTube! She's got lots of cute designs, but this one really stuck out to me, because I super love bats! I think they're so adorable, even though most people seem to think they're gross or scary. I've always dreamed of having a pet bat that would sit on my shoulder and follow me around and stuff, like a parrot. Or a falcon. And I could hand-feed him fruits and berries and insects, and it would be the cutest thing evaaarrrr!
*ahem* Anyway. Right. Onto the nails:
![]() |
| Bats! Haunted house! Scary tree! Orange shimmer! :D |
Spooky yet cute! I started with two coats of Orly Melt Your Popsicle, which is actually a very neon orange that came out this summer. It's super bright and fun, but I wanted to make it a little more Halloween orange, plus add shimmer, so I added a coat of Zoya Gabrielle. Gabrielle is a very sheer orange polish with tiny orange and yellowy-orange glassfleck shimmers. It's really gorgeous, but would take a LOT of coats to wear alone. I like layering it over things :D
I then grabbed some black polish (Soulstice Spa's Gotham, to be precise--it seemed appropriate for this mani!) and sponged a bit on the tips with a little piece of an old washing-up/kitchen sponge. Then I used black Konad special stamping polish to stamp on the some images from a couple of Bundle Monster plates--the bats are on plate BM13, and the haunted house is on BM-305. I then used black Stripe Rite striping polish to draw on a few more smaller bats freehand, and some spooky tree silhouettes. Finished it all with Cult Nails Wicked Fast topcoat.
![]() |
| A whole Halloweeny haunted forest scene at my fingertips! |
The second design is darker--silver spiderwebs on dark purple:
![]() |
| Forgive the messy cuticles. I'll explain :P |
First, a quick moan about the purple: this is Cult Nails Spontaneous, which I fell in love with at first sight and HAD to buy when it first came out. Yummy dark grapey purple with sparse bright purple microglitter? Yes please! And it really is a beautiful polish, but oh my lord, it is a nightmare to work with. Cult Nails polishes are generally absolutely perfect to apply, nice creamy formulas, but this? Ugh. Not sure if I got a bad bottle, or if this colour just didn't work the same. It's thick and meh and would be bald in some places and thick and clumpy in others, no matter how carefully I applied it. I normally really enjoy painting my nails, but I was so fed up with it after finally getting this to look right that it took a while before I came back to them and added the webs. This is like 3 or 4 coats of Spontaneous, coats where I'm dabbing in some places and removing excess in others and ARGH.
...Buuutttt I did eventually come around, and used Sally Hansen Silver Sweep to stamp on the spiderweb image from plate BM13, just in random places on the nails. I absolutely loathe spiders, and didn't want to add any of them to the design, but these pretty silver webs over the purple were both delicate and spooky :) Topped it off with Orly Sec 'N Dry topcoat.
![]() |
| With flash, so you can see just how magnificently shiny these are :D They were flashing and catching the light every time I moved my hands! |
Whew, long post! That's all for now, though. I'm going to post my artwork-inspired nails soon, and then hopefully get another Halloween design or two in before the 31st.
See you next time--hope the start of your week is delightful! xoxo
Subscribe to:
Posts (Atom)