Showing posts with label grey. Show all posts

01 March 2016

(Almost) Monochrome Dotticure

Well, it's been far too long since I posted! Have had zero motivation to edit pics and write posts lately D: but I've still been painting my nails and getting photos! I'll get caught up... one day...

Today I have a dotticure for you, inspired by Simply Nailogical on YouTube. Specifically, a comment left on this video by Nat the Otaku (hehe, love the username) suggesting an alternate colour combination. I don't think Cristine will ever do this one since she doesn't like plain creme polishes much--so I did it instead!


I started with plain nails, wearing only a base coat, and just used a dotting tool to cover these with five polishes: Zoya Purity (white), Soulstice Spa Manchester (light grey), Essence Movie Star (dark grey), China Glaze Liquid Leather (black), and Revlon #480 Revlon Red (red... obvs).

A little time-consuming, but easy-peasy! Once the nails were pretty much totally covered, I let them dry and then topped with Seche Vite for their protection. I intentionally left little bits of naked nail peeking out here and there--I like how it looks when the light shines through them from behind.


I know these aren't the greatest photos--by the time I looked at them full-size and realised this, the design had already chipped too much to re-take, so... oh well. They look great IRL :D

Thanks for the inspiration, random YouTube commenter! This would look really cool in rainbow colours, too... or glitter placement... or contrasting finishes...

See you next time! xoxo

09 July 2015

Born Pretty Store Review | Diamond Glitter Placement

G'day! Almost through my newest Born Pretty Store haul :D I'm going to fast-track these last two before I head off to a conference in Sydney next week! I'll of course do some special travelling nails, as I always do... But for today, I've got a design showcasing these diamond- (okay, rhombus, you nerd) shaped glitters :D


04 February 2015

Swatch & Review Time with Indie Polish (or, Slashers to Ashes)

Hello everyone! Today I'm very happy to be reviewing some polishes by the lovely and talented Tanya from Indie Polish! You've already seen the amazing Birthday Party in action, and it will definitely make another appearance soon :) but today I have two other beauties for you!


This is quite the pic-heavy post, so clickity-click to move... onward!

15 September 2014

#31DC2014 - Day 15 - DELICATE PRINT

Hellooooo!

Today is day 15 of the challenge, and we're doing pretty delicate nails. This has never been my strong suit. Take a look around--my style is much more bright, glittery, wacky, blingy; some would say "ridiculous", I say lots of fun :D But subtle and delicate is something I rarely do. So I took a deep breath, channeled my inner Marta and Sammy, and came up with this:

Outdoors in sun

I love Lacquer Lust Diamond for looks like this. It's soft and delicate and pretty while still being holo! Two coats covered nicely. The knotty-heart pattern is on Bundle Monster plate BM-406, and I stamped it with Konad white polish.

Then I added some tiny crystals, because I had to have some sparkle ;) Topped with Seche Vite.

Indoors with flash
Outdoors in shade
Another in sun--the bottle looks great in this one :)

Aside from the slight smudge on the index nail, I think these came out really nicely. It's fun to wear something more demure from time to time. Makes me feel posh and sophisticated.

See you tomorrow for a geometric design! xoxo

19 June 2014

Grey with Vintage Flowers

Hullo :)  late post today! Just got home from watching the State of Origin game--big rugby series in these parts. Going to post today's mani and then get to sleep!


06 May 2014

Water Marble with Zoya Shimmers & Soulstice Spa Cremes

WELL THAT TITLE WAS A MOUTHFUL, WASN'T IT

Hello! I couldn't think of a snappy title today. I'm actually not feeling very chatty at all... but I do have a new nail design to show you. I love water marbling, but I always tend to go for the same type of look--three shades of the same finish, random marble pattern. To step outside of this rut, I decided to do a 4-colour, 2-finish, flower-shaped marble with two of my favourite brands--Zoya and Soulstice Spa.


10 April 2014

Baby Pink & Grey Skittle

Aloha, boys and girls :)

The weather here in sunny Oz has started to get just a tiny bit cooler as autumn settles in. I feel like today's manicure sort of captures that idea, and I'll explain why!


22 March 2014

Diamond Holo Gradient

Bonjour, beautiful people!

I'm late getting this post up--eek! Had a late night last night and didn't get a chance to write this. I figured a late but good post was better than just slapping the pics up in a hurry. You deserve my best :D

Today I have a neutral gradient manicure that is anything but neutral, really ;)

Outdoors in sun

I love that this one would be demure and work-appropriate inside (especially if you left off the embellishments), but outdoors it explodes in rainbows!

I started with Lacquer Lust Diamond, shown above. Such a gorgeous creamy light-grey with white glassflecks and subtle linear holo! (I have a more in-depth swatch and review of this shade as well as a couple of her sisters here.) There was another polish in the collection called Opal, but opal stone is very much what I think of when I see this polish up close. It reminds me of this:

(image from http://headdlineslondonuk.files.wordpress.com)
 So stunning *_*

I sponged the tips with Color Club Beyond, a lovely strong black holo. I was so upset that I didn't get a bottle of the original OPI My Private Jet, until this came out. A great substitute in my opinion :)

Indoors with flash
As lovely as this looked alone, I wanted to make it even shinier, so I added a 1mm crystal in the middle near the cuticle. To each side of that, I placed a piece of silver hex glitter from Born Pretty Store, and then finally to the outsides of that, a piece of the slightly-smaller hex glitter from Essie Set in Stones (my favourite silver chunky glitter, and the one polish I'd choose to wear for the rest of my life if I had to pick one--I almost always have it on my toes).

Topcoated with Seche Vite.


The sun only came out for a brief moment, so most of these pics were snapped quickly when I dashed outside upon seeing it brighten up! Most of the time it looked like this, which was actually OK too--I love when a look can be equally pretty in dull conditions too:


I also took the opportunity to pose with this (very fake) diamond bracelet I have. It's gaudy and flashy and obnoxious and awesome.


I have a serious addiction to those shiny bits like you see on the ring finger. I cannot think of the official term for those, but I love them.

So there you have it. Neutral ≠ boring :D  thanks for stopping in today. See you next time! xoxo

02 October 2013

Lacquer Lust Birthstone Swatches: Tanzanite, Peridot, and Diamond

Hello hello! Today I'll be sharing with you three of the new Lacquer Lust Birthstone Collection polishes! These babies went on sale a couple of week ago and sold out within the hour, but yours truly took a late lunch and sat there refreshing like a madwoman at work, just waiting... and managed to get the three I wanted!


Unfortunately, one was lost in a tragic accident during swatching :( I'm absolutely gutted. I've never dropped and broken one of my polishes before, and of course the one time I do, it's a rare, irreplaceable, and gorgeous shade. But I did get a few pics beforehand.

This is a super picture-heavy post, so I added a page break. Click the jump to see the swatches!

15 August 2013

Alphabet Challenge: U is for... Umbrellas on a Rainy Day

Hello, beautiful people! How are U doing? :D

Yep, today's installment of the Alphabet Challenge features the letter U! It's reaching that part of summer where the heat and humidity give way in the afternoon to a nice, violent-but-short rainstorm. I just love watching storms, and painted this manicure inspired by them (as well as meeting the letter requirement):

Umbrella half-moon-ish mani!

I wanted the background to be reminiscent of a rainy day or cloudy sky, so I chose two of my very favourite polishes in the world--Soulstice Spa Manchester (light grey creme) and OPI Pirouette My Whistle (silver microglitter + white satin hexes). This is such a dreamy combo, and I wore it alone for a few days first...

So lovely and delicate :D

I wanted my umbrellas to have a cartoony look, so I took a small brush and black acrylic paint, and made the outlines of the whole shape to start:


Then used red to carefully fill in the panels of the umbrella...

Index finger is my favourite, middle is least >.< I wish I'd re-done that one, it's all straight and unrealistic compared to the others. But I didn't notice this until after topcoat.

...and topcoated with Seche Vite for shiny!


At this point the thumb was blank. I wasn't sure what to do... but then inspiration struck. Wellies!

Very close-up. This was so tiny in real life, I couldn't even do the other one!
We'll say it got stuck in a mud puddle.


So there U have it. Rainy umbrella nails :D  Hope you enjoyed today's post! Thanks for stopping by. See you next time! xoxo

08 July 2013

Alphabet Challenge: N is for... Nein! Neon-Dotted Tips

Good day, my friends! On this nice Sunday afternoon I have some N-inspired nails for you:

Nein! Nein! Nein! OK Fine, you can put dots on top of me

I just love neons in the summer :D Let's break it down!

The tips are OPI Nein! Nein! Nein! OK Fine! -- the bottle you see in the pic. Nice creamy dark grey, in which some say they swear they can see green tones. I can't... maybe my bottle is defective, or perhaps my brain is. Either way it's a nice grey, and two coats covered the tips quite well.

The neons I used for the dots are Sinful Colors Irish Green and Neon Melon (yellow), and China Glaze Shocking Pink (Neon). I used two sizes of dotting tool to create this look, putting down white dots first to make the neon pop against the dark background. I also used my black striper to line the tips, neatening them up--plus I liked the contrast; it makes it easy to see that the tips themselves are grey rather than black.

Finally, topcoated with NYC Matte Me Crazy. This is a bit less matte than some of the others I've seen... it's almost a wax-finish, which suits me fine. The other wax-finish topcoats I've looked at were fairly expensive, and this was $2.99! So I'll take it in a heartbeat.

Claw hands! Another pose with the bottle.

And one in the sun, which really shows off how bright the neons were compared to the rest :D

Neons make me look tan! *pose*

That's all for now, folks. I stayed away from holographics for a whole post! Next time we won't be so lucky... muahaha, I shall assault you with rainbows again :D see you then! xoxo

15 March 2013

St. Patrick's Mani #2: Holo Shamrocks!

Hiya! Happy Pi Day! (I'm kicking myself for not doing pi nails...)

Instead, today I will be showing you the second of three St. Paddy's manicures I'll have worn by the time the day actually comes around. (I'm doing a really cool shamrock water-marble for the 17th, based on a tutorial I found on YouTube. Stay tuned for that one!) This one features one of the 2013 Color Club Halo Hues, which, as I found out, work GREAT for stamping! Observe:

Wheee :)

Actually, this was one of the hardest-to-capture-on-cam manis I've ever done. The shamrocks, in low light, were a lot crisper and easier to see in real life. I started with an easy coat of China Glaze Stone Cold, that awesome suede-finish stone-grey I've featured here before. That dried quickly, and then I stamped the shamrocks from Bundle Monster plate #BM03 with Color Club Kismet, a lovely light-green linear holographic. I am so impressed with these Halo Hues, you guys, omg. The formula is just unprecedented for holos!

Anyway, at this point everything was still matte, and you could see the stamping pretty well, although the holo wasn't as impressive:

Matte--no flash

Matte with flash. You can see a wee bit of the holo, but not much.

So, I added a coat of Cult Nails Wicked Fast topcoat, and wooooo!

Can't see the shamrocks quite as well, but, shiny! This was the first time I'd worn Stone Cold with topcoat, and I was super impressed.

Indirect-but-still-bright light is where this mani photographs best. It's pretty impressive IRL in the sunlight, but the cam just couldn't show it! So this is the best pic I've got.

Hope you enjoyed this one! I will be away until Sunday night... have a safe and fun St. Patricks if you celebrate it, and a safe and fun weekend if you don't! xoxo

27 November 2012

Stone Cold Leopard

Hullo me lads and lassies :D Thanks to all who've stuck with me this long! Now that the challenge train has reached it's final stop, it's time to hop aboard the Amanda Express, where few ever leave, but all are entertained!

I have no idea where the previous sentence came from.

On to the nails, and a manicure I call Stone Cold Leopard! I'll explain why in a sec. But check it out--these were inspired by a pair of my socks!

Rawr :D

Yep, these grey socks with black and hot pink leopard print is one of my favourite pairs (although I have a lot of cute socks, including other funky animal-prints... maybe I'll showcase some others one day).

I used three China Glaze polishes for this look: first, the suede-finish dark grey polish from which the mani gets its name, Stone Cold. It was released with the Hunger Games collection. It's really great--covers opaque in one coat, and dries super fast (and in case you haven't noticed a pattern by now, these are always two of my favourite qualities in a polish). I wore it alone for a day at first, because it matched this sweater perfectly:

Pretty much made for each other, see?

I then used Liquid Leather and a toothpick to make some random blobby bits and C-shapes, leaving space for the pink in the centre of some of them:

I actually may have liked it better this way, before the pink was added. So cool!


And another pic of the same thing, with more flash, because I couldn't decide which I liked better. Get over it :D

Finally, I used Shocking Pink (Neon) to fill in the centre of the circular shapes:

Those little stringy things on the small finger weren't even noticeable in real life. O_o

I didn't use topcoat, because I loved the contrast of finishes--they were all a little different. Stone Cold has that great metallic-yet-matte suedey look, Liquid Leather is glossy, and Shocking Pink (as with most neons) dried with kind of what I believe is called a "satin" finish, at least in the Scotch Tape world. Ha.

With the inspirational sock. See, you can find artistic ideas anywhere!

Have you ever taken manicure inspiration from something a little... unusual? Look around and see what you can create! xoxo

08 October 2012

Challenge Day #21: Inspired by a COLOUR

Hello hello! Moving into the last portion of the challenge, today's prompt is "inspired by a colour". In itself, that's a bit vague, but many nail bloggers have interpreted this to mean a nail polish shade--taking inspiration from the sometimes really fun names that polishes have! I decided to go the same route, because one of my favourite polishes also has a special meaning to me!

The one I chose? Soulstice Spa's Manchester.

I always forget to show swatches of the base polish alone--I'm so excited to get to the nail art!--but this one is really great on its own. If you click here, you can see the swatches and review that the lovely Rebecca of Rebecca Likes Nails did for this polish, as well as two others by the same brand (all of which I own!).

Anyway, Manchester is not only the name of a great polish, but a city in England that holds a special place in my heart for being the hometown of one of my very best friends. (Love you Nomz!) Going with that idea, this manicure was born:

Outdoors in sun... which I know is ironic, it's the last thing you'd expect to see in Manchester ;) But, BLOG CONSISTENCY.

Whee! So, I started with a base of two coats of Manchester on all nails. It's such a beautiful creamy grey, I can't say enough good things about it. LOVE. I think I've raved about the quality and formula of it on here at least once before, so I'll skip that and get on to explaning each nail. I did each one with something I think of when I hear the word.

On the index finger, I used Essence Colour & Go #35 Movie Star to create a rain cloud, and Soulstice Spa's Monterey for the raindrops. It definitely rains a lot in Manchester (I do believe the polish is the colour of the sky there most of the time!).

For the middle finger, I represented probably the #1 thing Manchester is known for worldwide--it's major football club, Manchester United! (Oh, and some other team called Manchester City or something, but nobody except Carl supports them.) ;) I used Orly Pointe Blanche and Sally Hansen Xtreme Wear #24 Black Out for the ball.

On the ring finger, the Union Jack flag, of course. Done with Revlon Royal (the blue), Orly Pointe Blanche (white), and Revlon Colorstay #120 Red Carpet (red...duh).

And last, the pinky finger. Some hearts because I love my Nomz and her gorgeous family so much! (And you too, Tom, I haven't forgotten you!) The hearts were stamped with the same Revlon red polish as the flag, and the cute cascading hearts design from Konad plate m59. (More commonly known in the nail-art world as "the bow plate", but the bows are too big for my tiny midget nails!)

Indoors with flash. And pearls, for some reason. Maybe they reminded me of the Queen or something. Also, how cool that the red ended up being that plummy-wine colour when used in the thin stamping layer, eh?

And, with a poppy hair clip I got in one of the airports there. Either Manchester or Edinburgh, not sure. May re-post this pic on 5th November :D

That's all for today! Hope you liked this one. I'm about to start working on the next challenge now, "inspired by a song". So many options! Which one to choose? You'll have to wait and see... xoxo

05 October 2012

Challenge Day #20: WATER MARBLE

Hi everyone! Welcome to challenge day #20, water marbling! This is one of my favourite things to do, as I find it really easy (thanks to lots of practice and the awesome tutorials by Colette on YouTube--she is amazing, go check her channel and her blog, it will change your life) and it creates such a beautiful effect on the nails. I normally go nuts and marble them all, but for this I wanted to do something a bit special, so I marbled three nails on each hand and accented with some simple coordinating dots on the other two. Here is what I came up with:

Sort of inspired by Darkside. Only like two people who read this will have any clue what I'm talking about, but that's what I was staring at when I decided on colours!

Hooray! I started by painting all nails with that lovely dark grey you see there--one of the OPI Germany collection polishes called Nein! Nein! Nein! OK Fine! (I just love their polish names.) This one is widely described as a dark green-tinted grey, but try as I might, I just never did see the greenishness in this one. It seems more dark slate to me. But regardless, it's a really nice colour and it applied well.

I then used that polish as well as two others--China Glaze Icicle (silver) and Orly Snowcone (light blue)--to marble the pinky, ring, and thumb nails. With a dotting tool I made some simple matching dots on the index and middle fingers. I just love how shiny and glowy Icicle is! It's probably the richest, brightest silver foil I own, and I have quite a few silver polishes. Topped off with Cult Nails Wicked Fast topcoat.

Indoors with flash. Holding this cute little heart-shaped rose-scented sachet I got for Christmas last year. <3 The grey looks almost black here, doesn't it?

Outdoors in sunlight. Again, Icicle just radiates. LOOK AT IT. SHINY :D

Wouldn't be Glittericity without the "weird/fun" pic, would it? The colours were kind of similar to my wireless mouse, so I posed with it. Logitech has some of the best computer peripherals, and as you can see, they even come in pretty designs!

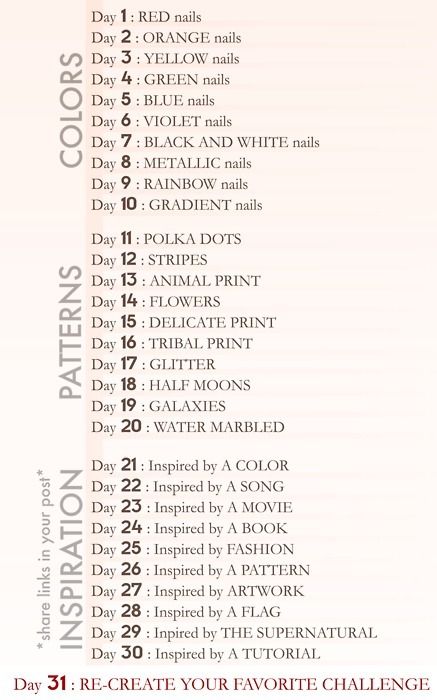
As always, I really hope you enjoyed today's post :) We are now 2/3 of the way through the challenge! Next time starts the third portion of the challenge and arguably the toughest: the "inspired by ________" section. As a reminder, here is the list of all the challenges:


I already have some fun ideas for this last third of the challenge, and I can't wait to share them with you! See you soon! xoxo

01 September 2012

Challenge Day #7: BLACK & WHITE nails

Wow, what a delay. So sorry! I ended up making an extra little detour trip, then getting stuck in Amsterdam an extra day due to this mess and I only just made it home super late last night. Still a bit jet-lagged. It's around 10pm here, but it feels like 5am O_O

Oh well, you didn't come here to listen to me go on about that, did you? TIME FOR BLACK AND WHITE NAILS. I actually love black & white together, I always decorate with that combination, wear it, etc. It's so clean and simple-yet-elegant, and is easily flavoured with just a bit of another colour, like a vase of red roses or a bright yellow hairband. For challenge day #7, though, I went with a monochrome look: black and white with some grey.

Posing with my Vera Wang giant-handbag-I-use-as-a-laptop-bag-because-I-hate-giant-handbags? Why yes.

Oddly enough, this design was inspired by my shower curtain. True story. The shower curtain looks like this:

Shiny. Yes, I do have to say that at least once per post. It seems to be my thing now.

I used four colours to make the background: China Glaze's Liquid Leather is the black, OPI's My Boyfriend Scales Walls is the white, Soulstice Spa's Manchester is the light grey, and Essence's Movie Star is the darker grey. I used tape to get the lines crisp. This took a while since you have to let the layers dry very thoroughly before adding the next one, but it got done in the end. I then used a toothpick dipped in the black and white polishes to create the dots. They don't look quite as nicely circular as the inspiration, but... my nails are much smaller than a shower curtain. That's my story, and I'm sticking to it :P Finished up with a topcoat of Seche Vite, and voilá:

I call this one "Close-Up With a Keyboard".

I quite liked wearing this look :) but as I said, I'm a sucker for black and white.

That's it for today. Next post will be metallic nails... and I promise it won't take me a week to get it up here! xoxo