Showing posts with label water marble. Show all posts

13 March 2016

Mocha Swirl Marble Nails

Water marbling! Some people hate it. I love it.

(click to enlarge)

I used three Zoya polishes--Purity (white), Chanelle (light brown), and Emilia (dark brown)--as well as OPI My Vampire Is Buff for this swirly marble. The latter polish doesn't even really show up, and if I could go back I'd probably skip it. But still, this came out so pretty! I was going for the latte-art look, but the dark brown made it look chocolatey, so I decided "mocha swirl" was a good compromise.


(click to enlarge)

These are such creamy, smooth polishes. It was really effortless to marble them--they behaved well in the water and the colours go beautifully together. I bought these polishes last year and only just got around to using them!


Do you like this water marble design? It makes me want a cappuccino...

Thanks for stopping by today! See you next time for more :) xoxo

05 January 2016

Sparkly, Swirly Water Marble

Hello! Time for my first post of 2016!

...Yeah, delayed, right? My computer has been playing up since August and I am finally doing something about it. I will get my NYE design posted ASAP, but it's been a struggle just to get this one together! I'm sending off the computer tomorrow and will make some arrangements in the meantime. What a way to start the year, eh?

Aaaaanyway... I've been itching to do a water marble lately, so I pulled out a handful of my favourite China Glaze polishes and got to it!

(click to enlarge)

The base, and one shown in this pic, is Liquid Crystal. Two coats is all that's needed for opacity, and it's very pretty--multichromatic, very sparkly, awesome! My camera actually had a hard time with how glittery and reflective it is.

The marble was done with Liquid Leather (black), Icicle (silver), and Rainbow (sheer translucent shimmer). You can't even see the silver, and in retrospect I would have skipped it in favour of more black stripes. Oh well--the final result is really cool, I think! I did a spiral/swirl pattern in the water and tried to centre that on each of my two middle nails. Added a diamante in the centre of each swirl, topped with Seche Vite, and that's it!


I really love the unintentional gradient look of the ring fingernail. I definitely need to do more marbles!

Thanks for reading today! Hopefully I can get my New Years Eve and final review item from my Born Pretty Store haul up very soon. See you next time! xoxo

20 April 2015

Shimmery Rainbow Birthday Marble!

Hel-lo! Man, what an insanely busy few days! My birthday was the 16th, and as you guys know, I love rainbows and sparkles. I bought a brightly-coloured rainbow dress to wear for my special day, and did these shimmery marbled nails to go with it!


These didn't come out quite the way I expected, but I'm still quite pleased with them--especially the thumbnail! If I did it again I'd use a different orange, but I think they're still great. Read on for the deets!

23 December 2014

Holiday Water Marble

Hi hi! Wow, Christmas is coming up fast! I suppose it's the hot weather here, but it still doesn't feel like Christmas to me. Maybe that's why I find myself running out of time! I'll have to post every day for the next few days to get all my holiday manicures up in time :)

Today I have a festive water marble topped with a very special seasonal polish from piCture pOlish called Holiday!


20 September 2014

#31DC2014 - Day 20 - WATER MARBLE

Helloooo :) Day 20 of the challenge--2/3 through it!--and it's all about one of my favourite nail art styles: water marbling!

Indoors with flash

This is actually a relatively simple one compared to my usual marbles--check out the tag on the right side to see more :) I usually do lots of colours and crazy intricate patterns, but for this I did a simple flower petal marble and just two polishes, both by Color Club. The creme is She's Sooo Glam, and the holo is Miss Bliss. Such a sweet girly look!

I learned everything I know about marbling from Colette and Beth, so if you want to know more about this technique, check them out! Colette, especially, does mostly marbles, and has so many good tips and creative ideas. I love both of those channels!

The fimo heart is from Born Pretty Store, and I topcoated these with Seche Vite.

Outdoors in sun...ish. Of course the day I use holo is the day it's not very sunny.
Another with a bit of sun. Cuticles look a little on the rough side here, sorry.

Since I wasn't able to get any blindingly beautiful full-sun photos today, here's another indoors to make up for it.


People seem to have pretty strong opinions about water marbling--they either love it or hate it. I think the result is SO gorgeous, and once you get the hang of it, it's actually a relatively quick way to get a lovely manicure. If you struggle with it, please check out the YouTube channels I mentioned above. You'll be a pro in no time! :)

See you tomorrow! xoxo

28 August 2014

Delush-ous Pastel Rainbow Marble

Hiya! today I am very happy to show off my latest polish haul! Well, kinda. I don't have swatches, because honestly, I find plain swatching to be boring. That's why you don't see many posts like that on here! But Cris from Let Them Have Polish! did a wonderful swatch set of the Essence of Summer collection by Delush Polish, and two things happened for me immediately: 1) I fell in love with them, and 2) I got an enormous urge to do a water marble with them. So I ordered, and they arrived a few days ago. You should really check out her swatches, as each shade is BEAUTIFUL and looks stunning alone. But here's what they look like together in a marble!


14 July 2014

EDC-Inspired Water Marble with Butterflies

Hello my beauties! And welcome to all my new viewers! I seem to have a recent jump in pageviews--I hope you like it here :) (I just miiiiight be doing a giveaway soon, so spread the word!)

For now, I want to show you some funky nails inspired by a really cool outfit my friend made for EDC this year!


06 May 2014

Water Marble with Zoya Shimmers & Soulstice Spa Cremes

WELL THAT TITLE WAS A MOUTHFUL, WASN'T IT

Hello! I couldn't think of a snappy title today. I'm actually not feeling very chatty at all... but I do have a new nail design to show you. I love water marbling, but I always tend to go for the same type of look--three shades of the same finish, random marble pattern. To step outside of this rut, I decided to do a 4-colour, 2-finish, flower-shaped marble with two of my favourite brands--Zoya and Soulstice Spa.


13 March 2014

Green & Yellow Shimmery Water Marble

Good day, lovely people! Today I have another green St. Paddy's-themed design for you. It had been ages since I did a water marble, and I decided now was the time to change that!


I wanted to do a marble with finer detail, thinner lines, so I used more drops of polish and more swirling it about with the toothpick. Over a white base I marbled Zoya Midori (light shimmery warm-sagey green), Zoya Darcy (the yellow), and the tealy-green you see in the photo--BYS Thank You Ma'am. It leans more warm and green than it appears here, and has an almost golden shimmer. Really nice polish!

Cleanup is so tough with marbles. I'd added cuticle cream and they still looked like this--yuck! But I included this pic anyway because I think the detail shows up best :)


I decided to not worry about the bubbles, of which as you can see I had quite a few. I think they kind of look like dots or shiny bits or the way stars might be made in a galaxy mani. Once it all dried, I added two thin coats of Essie As Gold As It Gets. I think the pretty mix of gold shimmer and small golden flakies really warmed up the look as well as adding the shine! Seche Vite tops it all off.

Indoors with flash--the greens blend together more in here. You can also see more of the true nature of Thank You Ma'am here.

The fine details in this marble mean that from a distance, the nails just look basically light green, with some weird streaky bits here and there. But I really like how they look once you peer closer!

One more, outdoors in shade. I like how a different colour seems to stand out in each lighting situation. Here, Darcy comes out to play! The golden flakes are also more apparent here.
I hope you liked this design! See you next time xoxo

30 October 2013

Halloween 2013 Mani #2: Marble Tiiiimmeee

Hi!

Today I have another Halloween design! I wanted to do a marble with Halloween-y colours. I thought of involving green or purple, then considered doing candy-corn colours, and finally decided on one with black, yellow, and orange. Here's how it turned out!

swirlyyyy

I swear that's orange. I think I should have used a lighter version. This looks more like a German-flag marble. Sind diese hübschen, Deutschen?

The three shades I used for this are Zoya Darcy (yellow), OPI A Roll in the Hague (orange), and Sally Hansen Xtreme Wear Black Out (black, shown in the photos). All these polishes work great for marbling. I used Darcy for my base and did random swirls in the water. I then topped it with a coat of INM Northern Lights for some sparkle.

When I'm marbling, I tend to draw the pattern in the water with the hand that I'm not working on, which often means that the design comes out a lot different on the left hand than the right. This time was no exception. This is the left hand:

detailed! pretty!

... and this is the right:

I love how the thumb came out. Apologies for the weird angle, though. Right hand is not used to being photographed. This pose is more awkward than two naked guys connecting on Chatroulette.

Despite the fact that the orange looks more red, and therefore this isn't as Halloween-ish as I imagined, I still really like it! One more photo with them all together...

all together now! With feeling!

I'll have one more design for you on Thursday :) see you then! xoxo

29 August 2013

Alphabet Challenge: W is for... Wet N' Wild Water Marble

Hello, my dear readers :) Welcome to day 23 of the Alphabet Challenge, and the letter W! Getting this post up on a Wednesday to boot. I totally did that on purpose...

Lots of wild stuff going on here!

Couple of layers going on with this! First I laid down a base of two coats of Wet N' Wild French White, which is (as you might guess) a plain white creme polish. Over that, I dabbed two coats of China Glaze Glitz N' Pieces. This is an awesome chunky silver and black glitter combination--they did a whole collection of black-and-<insert colour> glitters called Bitz N' Pieces. The whole collection can be seen swatched here over white over at Beauty Junkies Unite. I didn't get a pic at this stage, but it looked exactly like her swatch of it, at the bottom of the post :)

I wore that for a day, then decided I wanted to kick it up a notch. I did a water marble with Wet N' Wild Black Creme and a cheap clear polish (no name, but a regular slow-drying clear) to get this look. The base shows through the clear and the black swirls really look cool! I first topcoated with Cult Nails Wicked Fast...

OK, they were super sparkly, but it's hard to tell here except on the small finger. The black looks nice and bold, though.

...but then I remembered how cool chunky glitters look with a matte topcoat, so I added a layer of the cleverly-named OPI Matte Top Coat.

The most fabulous zebra ever.

And just for fun (and because the design came out really cool on the thumb), here's a with-and-without-matte-topcoat shot of my thumb:

My entire thumb, nail and all, is the height of just my nail in these photos. MADNESS.

I hope you enjoyed this wonderful design for the letter W! ;) Have a lovely rest of your week and I'll see you next time! xoxo

14 June 2013

Alphabet Challenge: I is for... I Don't Give Icicles in Rotterdam

Weird title is weird.

Good day! Wow, it's been a week since I posted. I have a good excuse this time, though: my car was hit! While I was sitting inside playing Xbox and minding my own business, even. :o  (Also a special visitor in town, and some international folks coming in for meetings and dinners at work... busy week!) So the last few days have been a whirlwind of work appointments and sorting out the car. But my dear KITT will be fine soon :D It's not too bad, just some damage to the rear bumper and one of the tail lights >.<

Anyway, you've waited this long, on to the nails! In keeping with the Alphabet Challenge, today's letter was I:

Icy?

There's sort of a funny story with the polishes I used for this one. I found the silver (China Glaze Icicle) and the light shimmery blue (OPI I Don't Give A Rotterdam!) first. I wanted to do a marble and stamp design like this, but needed a third colour. The darker blue went well with the others, but is a mini that came in a set and didn't have a name on the bottle. I decided this would be called OPI I Don't Know, and it would work for this challenge. Hilarious, right? :P

But then I did some thinking, remembered when I got it and which set it was in, and looked up the name. And wouldn't you know? It's called Into The Night (OPI Spider-Man Collection)! Happy coincidence that was!

Anyway, I marbled with those three colours on my small, middle, and index fingers. On my ring and thumb I painted two coats of Into The Night and then stamped the heart image from Red Angel plate #110 using Sally Hansen Xtreme Wear Silver Sweep. Yeah, it doesn't start with I, but it stamps more clearly than Icicle does. :P

The glitter is Confetti Ice Ice Baby. It's a gorgeous glitter that looks white-iridescent but flashes electric-blue, dark blue, even purpley-pink at times! I love it. And the name cracks me up xD

Finally, topped with NYC In A New York Minute. See, even my topcoat starts with I!

I rather like how this marble came out.

One showing off the thumb as well. The polishes are colour-accurate. My skin is not >.<

I really enjoyed how the colours and the marble all contributed to a frosty, icy look. Goes well with the polish names.

See you next time with a really special post for the letter J! xoxo

18 March 2013

St. Patrick's Mani #3: Shamrock Marble!

(Alternative title: MORE Holo Shamrocks??)

Hello and Happy St. Paddy's to all! Hope you've had a fun, safe, and lucky day :) As promised, I have a shamrock water marble design for today! It didn't turn out as well as I would have liked--only about three actually looked like shamrocks on my nail... But it was still pretty and was fun to wear for the celebrations last night!

:D

The tutorial I used is this one by Colette of My Simple Little Pleasures. I know I've linked to her before on here, and that's because she is THE queen of water marbling. I've watched every single one of her videos--they're fascinating and she's taught me so much! My shamrocks didn't turn out even remotely close to as nice as hers, but I still had fun creating and wearing this look. I used two colours like she did, except mine weren't cremes. The dark green is China Glaze Glittering Garland, and the light green is Color Club Kismet. I started with a base of Kismet as well, so the whole thing would have a holo look to it. For extra fun I added a coat of my little frankenpolish holo topcoat that I call Rainbowgasm (hint, it's INM Northern Lights + a pinch of SpectraFlair holographic powder) to tie it all together.

In strong direct light. I love how the middle nail came out. The others are kind of blobby and indistinguished.

The left thumbnail came out nicely too, aside from that bubble!

The next two you might want to click to enlarge...

I hadn't cleaned up my cuticles very well at this point, but I liked this shot. The pattern on the middle nail shows up clearly, and you can see both the linear and scattered holo sparkle that's going on with this!

And finally, a sorta-blurry one in the sunlight to show off that beautiful rainbow effect. I just love Kismet (and all the other Halo Hues) so much!

Hope you all enjoyed this one. Have a great start to your week! xoxo

16 January 2013

Pink Fairy Water Marble

Hiya everyone! I'm finally feeling mostly better! I decided to celebrate with a water marble, since it has been a little while since I did one and I really like them. I wanted a pink, feminine, pretty one--I bought my mother some flowers for her birthday, and they were all these gorgeous shades of pink and purple. It inspired me!

I think they look like fairy wings! *_*

It took a while, but I finally found three colours that would play nicely together in the water. Over a white base to help them stand out (can't remember which white polish, doesn't matter) I marbled three creme-finish colours: Orly Charged Up (grapey purple), Orly Frolic (fuchsia), and Revlon Pink Chiffon (baby pink). I topped it with China Glaze Fairy Dust for that lovely scattered holo sparkle before topcoating with Orly Sec 'N Dry.

I used this marbling technique to create a star shape in the water, although for my "regular" fingers I dipped two at a time, so the star wasn't obvious. Only on the thumbs, which I dipped alone, did I get the centre (and I LOVE how it looks!) on there. Other than a few bubbles, I think it came out perfectly!

Without flash, bit more colour-accurate.

They remind me of Life Savers CremeSaver candy in raspberry. Tiny image, but you get the idea. Yummy.

And since I was going for the girly thing, I went all out and posed with my cute bow necklace :D

Hope everyone's having a nice week so far! xoxo

21 November 2012

Challenge Day #31: Recreate Your Favourite Challenge

'Ello loves! Last day of the challenge! I have to admit that as much as I enjoyed it, I'll be happy to get back to doing my own thing :D This has been a great way to kick off the blog, though, and looking back it's hard to believe I've already done over 30 posts--feels like I just started! I hope you've enjoyed this little journey with me, and that you'll also like the nail designs I come up with unaided.

Anyway, day 31 implores us to re-create our favourite day of the challenge. 99% of the nail-art community will call me crazy for this, but the day I liked best (and one of my favourite nail-art techniques of all time) was the WATER-MARBLE day! I think it's a fun and simple (albeit messy) way to create such delicate, swirly, pretty designs. Some people seem to have trouble with it--I've either been really lucky so far, or I just don't care as much about perfection and making every nail look the same. I think the randomness is part of its charm!

That being said, today's was probably one of the worst ones I've ever done. Maybe I was lazy--and I don't think one of the polishes I chose was playing nicely in the water, it dried too fast or something. I was able to save it, though--it was a win, then a fail, and then a win again!

I'm calling this my honey-marble. Doesn't it look golden-delicious? :D

I started with one coat of a-england's original Holy Grail. Adina (the creator of this awesome brand) has changed the formula of Holy Grail--the new one is a cooler-toned, antique-looking gold with a very slight greenish shimmer that looks really neat! I will have to order that one as well. But this warmer honey-gold is the "old" formula and the only one I've managed to get my hands on thus far. I then used it along with China Glaze Liquid Leather to do a black and gold marble design. I've been wanting to do this colour combination for a while, but I think I'll have to give it another go sometime. It didn't really turn out like I expected. Actually, before I added the glitter, it looked AWFUL. I was staring morosely at my nails going "HOW DID THIS BECOME SUCH A MASSIVE FAIL?" I wish I'd gotten pics at that stage, because you wouldn't believe how much different it looked.

Well, I was going to take it off and do something else--but this stage, this "I've given up, it can't get any worse" stage can actually be the breakthrough point for art, because then you say "what the heck, I may as well try something random, what have I got to lose?" I grabbed this random nameless gold glitter polish and brushed it on, just for shiggles.

And suddenly, magic. There are two sizes of gold glitters in a clear base here, and they just... somehow... brought everything together! The marble looks better and the parts that aren't so hot are covered by shinyness. I was instantly delighted, and also, hungry. I think they look exactly like honeycombs. Want to nibble.

Without flash, so you can see the impact of the glitter!

It's going to sound pathetic to you guys, but the way such a simple step made such a huge positive difference actually made my day. My smile was as sunny as my glimmery fingertips :D

The rarely-seen right hand. Pose is awkward, but I think the design came out better (or at least more consistent) on this one. Although honestly, it looks way better IRL than any of these photos.

So, there's my final challenge prompt completed, and a little glimpse into the sometimes emotional roller coaster that creating art can be.

Tune in next time for some fun animal print nails, and then I'll start getting some fall and wintery designs up! :D xoxo

09 October 2012

Challenge Day #22: Inspired by a SONG

"...karma chameleon,
you come and go, you come and go.
lovin' would be easy if your colours were like my dreams,
red, gold and green; red, gold and green..."

Hi everyone! Today's challenge is to do nails inspired by a song. As you can see, I chose Karma Chameleon, a Culture Club song from the early '80s. I like this song for many reasons--it's catchy, it has a great meaning, it involves Boy George, and the nail design version practically invented itself!

Swirly! Shiny! Fun! :) (totally mis-lined-up the french tip with my actual nail line, ew. ignore that.)

Fun design idea aside for a second--seriously, the song has a great inspiration behind it. From the Wikipedia article on the song,
In an interview, Culture Club frontman Boy George explained: "The song is about the terrible fear of alienation that people have, the fear of standing up for one thing. It's about trying to suck up to everybody. Basically, if you aren't true, if you don't act like you feel, then you get Karma-justice, that's nature's way of paying you back."
So basically, just be yourself and forget about trying to please everyone. You never will anyway, and you certainly won't be truly happy yourself!

Oh man, this blog just got all preachy and inspirational. And educational. We better get on to the nail design before someone starts taking me seriously!

This look was pretty simple to do. I taped off the tips, and did a swirly, 70's-80's-ish water marble design with Revlon #680 Revlon Red, Revlon #571 Posh (the green), and China Glaze Champagne Bubbles (the gold). I then used Konad Special Polish White and Bundle Monster plate BM15 to stamp the little chameleon image. (OK, so I'm not sure it's actually supposed to be a chameleon specifically, but for the sake of this design it sounds better than "generic reptile and/or amphibian-esque thingy".)

A rare right-hand shot. Pros: I got the images placed better, and the french tip actually covered the whole visible nail line. Cons: My right hand does not know how to pose well, and the marble itself was not as clear. OH WELL. (Indoors with flash.)

Indoors, no flash. Couldn't get any good outdoor shots because it's been raining all day. I liked this pic, though. Posing with the iPod, because that's where the inspiration song lives. :D

Better pic with the iPod, so you can see the engraving I chose. \m/ Also I just love how the pattern came out on the index, middle, and ring fingers.

That's all for now! Next post will be a little break in the challenge--I just got a great new polish I have to show off, plus I'll be travelling for work the next 4 days, and I won't be able to change my nails. (Let's hope I survive.) But after that, I will get through the challenge ASAP--I have so many Halloween ideas to get to! Until then, take care and rock on! xoxo

05 October 2012

Challenge Day #20: WATER MARBLE

Hi everyone! Welcome to challenge day #20, water marbling! This is one of my favourite things to do, as I find it really easy (thanks to lots of practice and the awesome tutorials by Colette on YouTube--she is amazing, go check her channel and her blog, it will change your life) and it creates such a beautiful effect on the nails. I normally go nuts and marble them all, but for this I wanted to do something a bit special, so I marbled three nails on each hand and accented with some simple coordinating dots on the other two. Here is what I came up with:

Sort of inspired by Darkside. Only like two people who read this will have any clue what I'm talking about, but that's what I was staring at when I decided on colours!

Hooray! I started by painting all nails with that lovely dark grey you see there--one of the OPI Germany collection polishes called Nein! Nein! Nein! OK Fine! (I just love their polish names.) This one is widely described as a dark green-tinted grey, but try as I might, I just never did see the greenishness in this one. It seems more dark slate to me. But regardless, it's a really nice colour and it applied well.

I then used that polish as well as two others--China Glaze Icicle (silver) and Orly Snowcone (light blue)--to marble the pinky, ring, and thumb nails. With a dotting tool I made some simple matching dots on the index and middle fingers. I just love how shiny and glowy Icicle is! It's probably the richest, brightest silver foil I own, and I have quite a few silver polishes. Topped off with Cult Nails Wicked Fast topcoat.

Indoors with flash. Holding this cute little heart-shaped rose-scented sachet I got for Christmas last year. <3 The grey looks almost black here, doesn't it?

Outdoors in sunlight. Again, Icicle just radiates. LOOK AT IT. SHINY :D

Wouldn't be Glittericity without the "weird/fun" pic, would it? The colours were kind of similar to my wireless mouse, so I posed with it. Logitech has some of the best computer peripherals, and as you can see, they even come in pretty designs!

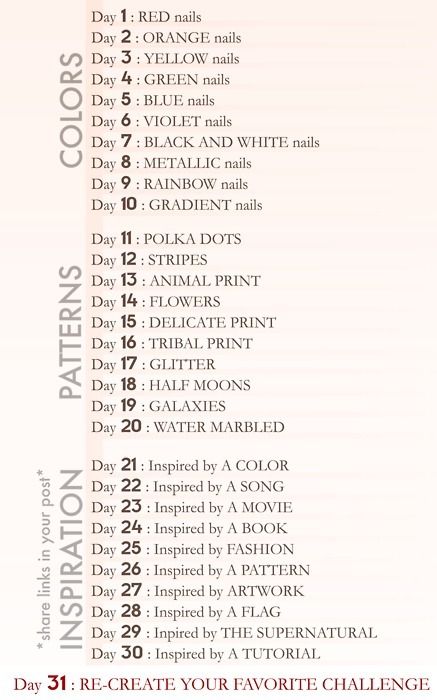
As always, I really hope you enjoyed today's post :) We are now 2/3 of the way through the challenge! Next time starts the third portion of the challenge and arguably the toughest: the "inspired by ________" section. As a reminder, here is the list of all the challenges:


I already have some fun ideas for this last third of the challenge, and I can't wait to share them with you! See you soon! xoxo