Showing posts with label sponging. Show all posts

20 July 2016

Vintage Gilded Nails

Hello again! Today I've got a classy, rustic-looking design using two shimmery, microflecked OPI polishes and a dash of striping tape.

(click to enlarge)

Seriously, click to enlarge that. The smaller preview does not do it justice *_*

Click to continue!

26 April 2016

Czech Out These Birds!

Good day! I hope your week has started off well. Mine has been a little stressful, so I decided to do a relaxing, calming nail design. :)

(click to enlarge)

I just love birds! I think they're beautiful, and can be so cute, and I've always been jealous of their ability to fly and go anywhere they want. I don't believe in reincarnation, but if it is a thing, I'd really like to be a bird next time around.
Click the jump to see how I did these :)

08 December 2015

Born Pretty Store Review | Floral Stencils

Good day! Just in time for the holidays, I have received a new set of products to review from Born Pretty Store! I have lots of festive, seasonal items which I will post about after this, but the one I was most excited to try is these floral nail stencils!

(click to enlarge)

Plus, Christmas means summer here in Australia, so these aren't out of place at all ;) Read on to see more!

28 April 2015

I Love London! | Born Pretty Store Stamping Plate Review

Good day! I have one more BPS stamping plate to show you today. It's all British-themed, so I used some appropriate colours and as many images from it as I could to create this cute mani!


10 April 2015

26 January 2015

Quick Shot: Australia Day Sponged Nails

Hiya! No time for a full post, but here's a quick look at my mani for Australia Day!


I used a plain white background, then sponged on shimmery yellow (Color Club Daisy Does It) and green (Zoya Logan) with a kitchen sponge, to get the dense patchy look you see here. Then I added two gold studs from Born Pretty Store to each nail, on one side. Finally, I topcoated with two layers of KBShimmer Clearly On Top.


I hope you like this quick but fun mani with the Australian national colours :D have a good one and I'll see you soon for more! xoxo

29 September 2014

#31DC2014 - Day 29 - Inspired by the SUPERNATURAL

Hello my beauties! Time for probably the weirdest prompt of the 31-day challenge... "inspired by the supernatural".


I had to think about this one for a while, and at first I thought I'd do something based on the video for Katy Perry's ET/Supernatural song. I did watch it, and it did inspire the basic colour scheme, but I ended up doing Alienware nails!


If I were a PC gamer (I'm a console peasant, come at me bro), I'd lust after Alienware computers more than I already do. For those of you who don't know, they're the name in gaming rigs. And the little alien face I recreated on my index finger is their logo :)

I applied three thin coats of Cult Nails Deal With It on the small finger and the thumb, then taped off a stripe near the tip and covered it with Wet 'N Wild Black Creme. This is meant to mimic the look of their gaming laptops, which are black but have a metallic neon strip of colour around the outside. I should have used matte topcoat over the black, as their machines are generally matte. Oh well.

Black Creme was the base for the other three nails, and I used white acrylic paint to create the alien face. For the galaxy nails, I sponged on the white paint as well as Deal With It and Soulstice Spa Kona, a light icy/aqua blue. I added a bit of the glitters from Orly Mermaid Tale (green holo hexes) and OPI Pirouette My Whistle (white hexes and silver microglitters). Finally, more of the white acrylic paint to add a few stars, and Seche Vite topcoat finished them all off. I'm quite happy with the finished look!


Boo, this one came out a bit blurry. But you can see the warm glowy quality of Deal With It. I love this polish.

I hope you like these! I'm not even a huge Katy Perry fan, but I've had that song stuck in my head for hours after watching the video earlier. I did this all for you, my dear reader, so you'd better appreciate it ;) hehe. See you tomorrow for more! xoxo

20 April 2014

Inverted Galaxy Mani

Hi everyone! Happy Easter!

Today's design is not overly Eastery, but it's an idea that involves pastels and glitter that I've wanted to try for a while--an "inverted-colour" galaxy manicure!


06 February 2013

February Polish Days: Mountains & Gradient Sunset Nails

Hiya everyone! Today is the next edition of Polish Days! The theme for February is "inspired by nature"--full prompt is as follows:
I don’t know about you, but with the snow we’re having in Norwich at the moment, I feel a little like mother nature is making all the rules. I love snow, but I’m not too keen when it stands a good chance of stopping me getting to a conference I’ve wanted to go to for three years running. So, whether you’re sweating your bollocks off in the Southern Hemisphere, getting snowed in or just willing spring to return, get inspired by nature for Februarys Polish Days.
One thing I am quite fond of, be it on nails or on canvas, is a gradient-sky look with a stark silhouetted shape in front of it. I've done paintings of this sort before, but not too many manicures. So, partially taking inspiration from this image for the colours, I created this:

Sunset, mountains, and birds. Ahhh... relaxing.

The gradient background was done with three colours: Orly Snowcone (cool sky blue), Sally Hansen Xtreme Wear Mellow Yellow (the yellow, obviously, and also the base colour I sponged this over), and Sally Hansen Xtreme Wear Sun Kissed (orange).

I did the mountains and birds with a small brush and some black acrylic paint, then topped it off with two coats of Cult Nails Wicked Fast. (I didn't notice it until I took these photos, but the topcoat smeared the black a bit on my middle and small nails.) :(

Smeary or not, I still really like this one! A few times today I gazed at it and could almost smell fresh mountain air... imagined sitting on a soft blanket atop freshly-mowed grass as the sun goes down, listening to the birds and drinking a nice cold one.

One more pic, because, sunset nails in the sunset light. Oooh, soooo meta.

Thanks for stopping by! Check out the rest of the Polish Days nature-inspired manis below! xoxo

29 October 2012

Halloween: Bats and Spiderwebs!

Hello errrbody! Today I'm going to give the challenge a miss and show you a couple of Halloween-inspired manicures I've worn lately! I love Halloween--yummy candy, fun spooky things like bats and ghosts, the colours, and dressing up in costume is really fun! And, of course, the chance to use some of my Halloween nail stamping plates! Warning, this is sort of a longer post, and has more pics than usual since I'm showing you two designs in one :)

The first one is inspired by this video by JaeMarie2008 on YouTube! She's got lots of cute designs, but this one really stuck out to me, because I super love bats! I think they're so adorable, even though most people seem to think they're gross or scary. I've always dreamed of having a pet bat that would sit on my shoulder and follow me around and stuff, like a parrot. Or a falcon. And I could hand-feed him fruits and berries and insects, and it would be the cutest thing evaaarrrr!

*ahem* Anyway. Right. Onto the nails:

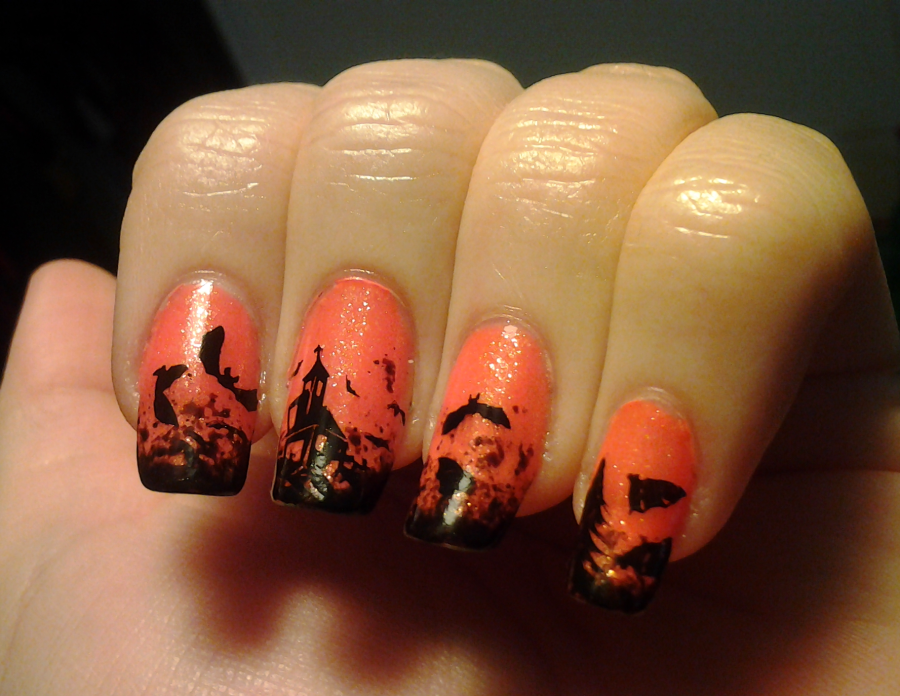
Bats! Haunted house! Scary tree! Orange shimmer! :D

Spooky yet cute! I started with two coats of Orly Melt Your Popsicle, which is actually a very neon orange that came out this summer. It's super bright and fun, but I wanted to make it a little more Halloween orange, plus add shimmer, so I added a coat of Zoya Gabrielle. Gabrielle is a very sheer orange polish with tiny orange and yellowy-orange glassfleck shimmers. It's really gorgeous, but would take a LOT of coats to wear alone. I like layering it over things :D

I then grabbed some black polish (Soulstice Spa's Gotham, to be precise--it seemed appropriate for this mani!) and sponged a bit on the tips with a little piece of an old washing-up/kitchen sponge. Then I used black Konad special stamping polish to stamp on the some images from a couple of Bundle Monster plates--the bats are on plate BM13, and the haunted house is on BM-305. I then used black Stripe Rite striping polish to draw on a few more smaller bats freehand, and some spooky tree silhouettes. Finished it all with Cult Nails Wicked Fast topcoat.

A whole Halloweeny haunted forest scene at my fingertips!

Managed to get a pic of both hands, thanks to some creative holding of my tablet and the "delayed shutter" feature. Word up to that. Also, the orange looks more colour-accurate here, it's not as melony as it looks in the first two pics.


The second design is darker--silver spiderwebs on dark purple:

Forgive the messy cuticles. I'll explain :P

First, a quick moan about the purple: this is Cult Nails Spontaneous, which I fell in love with at first sight and HAD to buy when it first came out. Yummy dark grapey purple with sparse bright purple microglitter? Yes please! And it really is a beautiful polish, but oh my lord, it is a nightmare to work with. Cult Nails polishes are generally absolutely perfect to apply, nice creamy formulas, but this? Ugh. Not sure if I got a bad bottle, or if this colour just didn't work the same. It's thick and meh and would be bald in some places and thick and clumpy in others, no matter how carefully I applied it. I normally really enjoy painting my nails, but I was so fed up with it after finally getting this to look right that it took a while before I came back to them and added the webs. This is like 3 or 4 coats of Spontaneous, coats where I'm dabbing in some places and removing excess in others and ARGH.

...Buuutttt I did eventually come around, and used Sally Hansen Silver Sweep to stamp on the spiderweb image from plate BM13, just in random places on the nails. I absolutely loathe spiders, and didn't want to add any of them to the design, but these pretty silver webs over the purple were both delicate and spooky :) Topped it off with Orly Sec 'N Dry topcoat.

Yeah, I was so fed up by the time I got to this stage I didn't even bother trying to get the cuticles perfect. This was the best I could do. It just would not cooperate. But, look how bright and shiny the webs are!

With flash, so you can see just how magnificently shiny these are :D They were flashing and catching the light every time I moved my hands!

Whew, long post! That's all for now, though. I'm going to post my artwork-inspired nails soon, and then hopefully get another Halloween design or two in before the 31st.

See you next time--hope the start of your week is delightful! xoxo

03 October 2012

Challenge Day #19: GALAXIES

Hallo, meine Freunde! Today is galaxy nails day! This is a deceptively easy look to create, and is so fun :) You pretty much cannot go wrong with the basic 'galaxy' look, although as usual I tried to spice it up a bit. As for the technique, I just went for it based on the many tutorials and pictures I've seen of the method over the years, but this step-by-step over on Beautylish explains it pretty well. I did the basic space/nebula/stars background and then tried to add in our very own spiral galaxy, the Milky Way. What do you think: nailed it or failed it?

Click to enlarge! (outdoors in sunlight)

I really enjoyed creating and wearing this, although I'm not sure if my original vision of having the spiral galaxy clearly showing there in the middle with the arms stretching out really came across. BUT WHATEVER.

I started with two coats of the lovely Blue Year's Eve by China Glaze. This is such a gorgeous polish on its own--I've got to remember to start swatching these alone or taking pics along the way--but you can see it a bit there on the top part of my ring finger. Shimmery deep glowy cerulean-blue. Yummy.

I then used a makeup sponge to dab on random patches of the following colours: China Glaze's Liquid Leather (black), Sinful Colors' #113 Dream On (fuchsia), Sally Hansen Xtreme Wear Mellow Yellow (creamy yellow) and then near the middle of the galaxy I used Sinful Colors' #56 Neon Melon, a bright highlighter yellow. At this point it was looking pretty messy, but the addition of the glitter polish really brings it together, so I added one coat of China Glaze Fairy Dust--one of my all-time favourite glitters ever. I took one slightly-out-of-focus shot so the rainbowy sparkle was really noticeable:

Star light, star bright, first star I see tonight... probably burned out millions of years ago, and isn't granting any wishes, because it's dead. Oooh, harsh reality. But, uh... still shiny!

After getting the background together, I used a toothpick and a white polish, Ulta's Snow White, to create the basic shape of the galaxy in the middle with dots, and then the spiral arms circling out. As I worked, the polish started to dry and get a bit tacky, and it left a little string between one dot and the next sometimes. I thought it looked like the way constellations are drawn out in the sky in diagrams, so this didn't bother me at all!

Finally, because I'm insane and always have to take it just a little too far, I used some clear polish to stick on a few large pieces of silvery-white glitter here and there--just one or two on each nail. Topped off with two coats of Seche Vite to seal everything in.

Indoors with flash. Sparkly! I really like the depth on my index and pinky fingers, with the blue and black. I kept staring at these and it felt like my fingertips were little round portals of a spaceship, gazing out into infinity. (AND BEYOND.) <3


The token "fun" shot, really just sharing because I love the index finger again in this one.

Well, that wraps it up for today. Do you like these? Would you wear spacey nails?

Join me next time for le water-marbling, which is super fun! Auf wiedersehen! xoxo