Showing posts with label a-england. Show all posts

13 June 2014

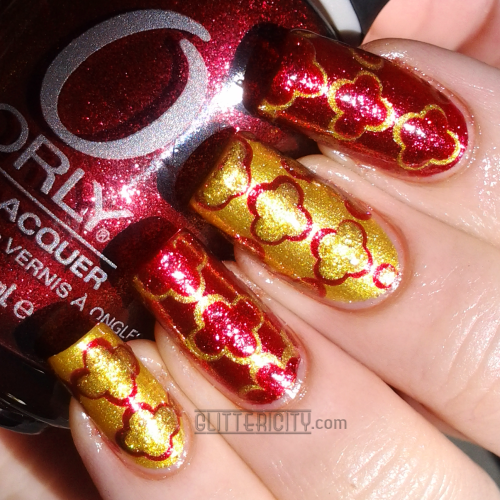
Red & Gold Quatrefoil Nails

Helloooo!

Lately, I've been seeing a lot of quatrefoil nails--they seem to be a new trend! Fairly easy to do and very elegant-looking, I've mostly spotted them on Instagram, but I first saw a tutorial for this look on YouTube. Simplichic did a great video with easy nail designs, and this is one of them, so credit to her for the inspiration! She used black and gold, but I love red and gold together, so that's the combo I chose for mine:


04 May 2014

May the Fourth Be With You! (Star Wars Day 2014)

Hiya! I know I just posted yesterday, but I couldn't not do a design for Star Wars Day! I thought of incorporating a galaxy mani into this, but ended up trying for one of those sorta-minimalist designs featuring iconic characters from the series.


19 February 2014

Glitzy Royal Leopard

G'day me lovelies!

Boy, it was a scorcher today. I am by no means insensitive to the frigid weather and flooding affecting my family and friends in the US and UK, but wow, it's been so hot and muggy. I like the warmth, but it's still taking some getting used to this Australian heat + humidity! I'll get there :)

The bright sun does have upsides: it's great for showing off glittery nails! I got the idea for a gold and purple leopard-print design the other day. "Royal," I thought, "majestic and posh and royal." The idea kicked around until this came out!


(Yes, if you noticed, I have given my nails quite a trim. The round look just wasn't doing it for me. I'm glad I gave it a try--they can look so nice!--but it just didn't work on my hands. Couldn't stand it! So I trimmed some of the length and filed them back to squares. Actually a bit more square than before. Going to try the other 'extreme' before settling back to my normal squoval shape.)

Aaaaanyway! For this look, I started with two coats of a-england Holy Grail (original formula), a rich warm champagney-yellow gold. Atop that, two coats of the polish above: Orly Lavish Bash. Such a pretty one! It's a clear base, I think. It may be very slightly gold-tinted. The glitters--which are tiny gold microglitters plus small gold holographic hexes and bars--are SO densely packed in that it's hard to tell! One coat is plenty, but I used two anyway, for good measure. Because there is no such thing as too much glitter.

The leopard spots are done with a small dotting tool and Sinful Colors Lang Lang, a lovely rich warm shimmery purple. It is definitely regal, and much more red-toned than it appears in these photos. Some shades just do not photograph well. The middle of the spots is Revlon #925 Gold Coin--my favourite gold foil polish. I wanted to fit with the colour scheme but still stand out, so this cooler-toned gold over the warm-gold base seemed just right.


The accent nail is two coats of the same purple, plus a coat of Max Factor Fantasy Fire, one of the most beloved and coveted polishes I know of! I treasure my little bottle and found another while out shopping recently, so now I even have a backup! Because of that, I felt better about using a generous coat to simultaneously deepen Lang Lang and brighten it up with those famous multichromatic sparkles. The single gold square rhinestone is from a wheel I got at Born Pretty Store.

It's all topcoated with Orly Sec 'N Dry for extra shine!

In shade -- I love the way the glitter looks in this shot *_*


My usual camera just couldn't capture the beautiful purple properly, but my phone did a decent job! It's not perfect, but it's much closer. Apologies for the quality, but the colour-accuracy makes up for it:

Fantasy Fire's amazing colour-changing pigment goes from red to green to blue to EVERYTHING
So, there you have it. The fanciest leopard the world. :D

I hope you enjoyed this one! See you next time xoxo

06 June 2013

Alphabet Challenge: H is for... Happy Holy Halo

Hallooooo! Today's manicure is based on the letter H. Let's get right to it!

Isn't it just.. heavenly? :D

Hooray for skittle manis :D

I used four polishes for this look, as well as those cool studs. Let's break it down!

Thumb: Two coats of a-england Holy Grail (original formula)

Index finger: Three coats of OPI Happy Anniversary!, a beautiful pearl-white polish. I used to dislike pearl polishes because it's all my grandmother ever wore. My grandmother is lovely, don't get me wrong, but it just got associated with 'old lady' in my mind. However, this is more shimmery and glassflecky rather than frosty, and at certain angles there are subtle flashes of baby blue and pink! It's really nice. Atop that I placed two gold square studs from this wheel from Born Pretty Store. (Can't wait to play more with these studs!)

Middle finger: Two coats of Holy Grail, glitter gradient tip with Orly Halo. More about that one in a minute...

Ring finger: Three coats of Happy Anniversary!, two dots of Halo, and one heart-shaped gold stud from this other BPS wheel. (and a par-triiiiidge in a pear treeeee)

Small finger: Two coats of Halo. Back to this polish! It is a great glitter! It is a dense mix of gold microglitter and small silver hex glitters. By dense, I mean really nicely dense--covers completely in two coats, has a nice thickness about it that isn't too gloppy but is really great for this type of polish. It's very elegant--I could see it being used for formal-event manicures.

Sealing it all in is Sally Hansen Insta-Dri #110 Clearly Quick topcoat.

Out in the sun. Look at them glow! *cue holy angel choir music*

I really love this soft white and gold combination! I think the 'angelic' colour scheme went well with the names of the polishes. Would you wear skittley, studded nails like these? xx

21 November 2012

Challenge Day #31: Recreate Your Favourite Challenge

'Ello loves! Last day of the challenge! I have to admit that as much as I enjoyed it, I'll be happy to get back to doing my own thing :D This has been a great way to kick off the blog, though, and looking back it's hard to believe I've already done over 30 posts--feels like I just started! I hope you've enjoyed this little journey with me, and that you'll also like the nail designs I come up with unaided.

Anyway, day 31 implores us to re-create our favourite day of the challenge. 99% of the nail-art community will call me crazy for this, but the day I liked best (and one of my favourite nail-art techniques of all time) was the WATER-MARBLE day! I think it's a fun and simple (albeit messy) way to create such delicate, swirly, pretty designs. Some people seem to have trouble with it--I've either been really lucky so far, or I just don't care as much about perfection and making every nail look the same. I think the randomness is part of its charm!

That being said, today's was probably one of the worst ones I've ever done. Maybe I was lazy--and I don't think one of the polishes I chose was playing nicely in the water, it dried too fast or something. I was able to save it, though--it was a win, then a fail, and then a win again!

I'm calling this my honey-marble. Doesn't it look golden-delicious? :D

I started with one coat of a-england's original Holy Grail. Adina (the creator of this awesome brand) has changed the formula of Holy Grail--the new one is a cooler-toned, antique-looking gold with a very slight greenish shimmer that looks really neat! I will have to order that one as well. But this warmer honey-gold is the "old" formula and the only one I've managed to get my hands on thus far. I then used it along with China Glaze Liquid Leather to do a black and gold marble design. I've been wanting to do this colour combination for a while, but I think I'll have to give it another go sometime. It didn't really turn out like I expected. Actually, before I added the glitter, it looked AWFUL. I was staring morosely at my nails going "HOW DID THIS BECOME SUCH A MASSIVE FAIL?" I wish I'd gotten pics at that stage, because you wouldn't believe how much different it looked.

Well, I was going to take it off and do something else--but this stage, this "I've given up, it can't get any worse" stage can actually be the breakthrough point for art, because then you say "what the heck, I may as well try something random, what have I got to lose?" I grabbed this random nameless gold glitter polish and brushed it on, just for shiggles.

And suddenly, magic. There are two sizes of gold glitters in a clear base here, and they just... somehow... brought everything together! The marble looks better and the parts that aren't so hot are covered by shinyness. I was instantly delighted, and also, hungry. I think they look exactly like honeycombs. Want to nibble.

Without flash, so you can see the impact of the glitter!

It's going to sound pathetic to you guys, but the way such a simple step made such a huge positive difference actually made my day. My smile was as sunny as my glimmery fingertips :D

The rarely-seen right hand. Pose is awkward, but I think the design came out better (or at least more consistent) on this one. Although honestly, it looks way better IRL than any of these photos.

So, there's my final challenge prompt completed, and a little glimpse into the sometimes emotional roller coaster that creating art can be.

Tune in next time for some fun animal print nails, and then I'll start getting some fall and wintery designs up! :D xoxo