Showing posts with label pink. Show all posts

28 July 2016

Pink Holo French Tips (aka: Menchiecure!)

Hello my friends!

I got a huge smile this week! A friend I've recently met through an online game (PS, it's Ingress, the Pokémon-Go-before-Pokémon Go-was-a-thing game) told me that he met a fan of this blog! So if you're reading this, hi Sam, and yes I will totally do your nails sometime if you like--hit me up :D

This week, I'm happy to be rocking a French manicure again. I love the style, but my nails are usually too stained for me to feel OK about it, at least not without some colour-correction (hint: the purple OPI Sheer Tint polish is excellent for cancelling out yellow tones!), but due to the mini-hiatus I took recently, my nails are pretty much back to normal. So I'm going to show you the gorgeous polish I picked up a while ago--Menchie The Cat, a collab with Starrily and Simply Nailogical!

(click to enlarge! DO IT)


Rest is after the jump, because as is usual with my holo manis, I took waaaaay too many pics!

31 May 2016

BPS Review | Colourful Feather Water Decals (plus, dry marble!)

Hello, my beautiful readers! Today I have a pretty design featuring some nice water decals from Born Pretty Store :)


These colourful feathers were sent to me to review for you today. Verdict? They're gorgeous! Click the jump to see more!

15 April 2016

09 March 2016

Sparkly Neon Zebra Leopard Gradient Awesomeness

Hiya!

I love these nails SO MUCH. The title of this post comes from the ridiculously long file name I gave these when saving to my computer :D


I did a variation of this on a nail wheel a long time ago, but wanted to stick with a more similar colour scheme. I am sorry to report that these photos don't do this justice at all--the neon is so bright in real life. But click the jump to see more!

17 February 2016

Better Late Than Never...! Valentine Holo Gradient

So, I'm like three days late on this, but... here are my Valentine's Day nails for this year!


I'm actually kind of sad about these! I used two holo polishes, but it decided to be rainy and grey when I was taking the photos, so I didn't get to show off their brilliance. However, I do like the pretty colours. I used Color Club Cosmic Fate, the bottle shown here, which is actually their peachy-orange Halo Hue. The red is one I made myself--LA Colors Aztec Orange (it is not orange) with a pinch of SpectraFlair added. I like how it made the other shade look more pink somehow. I swear it really is the one in the bottle pictured!

Blurry flash shot inside, since it was the only way I could make the rainbows come out
The heart glitters are from a Nicole by OPI polish called Love Your Life, and I pretty much ever only use it around this time of year, haha.

Topped with Seche Vite, of course.


It's a shame I didn't get to show off the holo to its fullest extent--it was lovely!--but, dat gradient. The red one is just a wee bit sheer, enough to make a beautiful, seamless blend.

I hope you liked these! See you next time :) xoxo

10 February 2016

Stripey Glitter Placement Nails

Hiya! Today, I wanted lots of flash and bling, so I did a glitter placement design!

(click to enlarge)
Fun fact... those glitters are supposed to be pink. They totally look orange. In my next mani you'll see an orange polish that ends up looking pink. FUNNY COINCIDENCES!

08 December 2015

Born Pretty Store Review | Floral Stencils

Good day! Just in time for the holidays, I have received a new set of products to review from Born Pretty Store! I have lots of festive, seasonal items which I will post about after this, but the one I was most excited to try is these floral nail stencils!

(click to enlarge)

Plus, Christmas means summer here in Australia, so these aren't out of place at all ;) Read on to see more!

16 November 2015

Spring Pastels | Lemon Yellow & Pink Butterflies

Hello! Yep, I'm still here. There are so many things happening in my life right now--I know I'm not updating very frequently--but I haven't given up :)

It's quite a warm spring here in sunny Queensland, so I did these bright, cheerful nails to match!

(click to enlarge)

24 August 2015

Delush-ous Princess Tips

Hola! I'm heading off on another trip tomorrow! This time I'll be in the US visiting friends and family for a few weeks. I have a post or two lined up, plus I plan to buy polish while I am there, so I should be able to show you a few things while I'm away :)

My nails are starting to grow out a little! In preparation for my trip I trimmed and filed them down again, able to get rid of the patches and tip I had on. You can see that they're all short again, but after this I can (hopefully...) grow them back out with no further dramas!

Today I have a design that just sort of happened... I didn't really have an idea in mind, but in the end I think it looks very princessy. Peach would wear these nails (especially with gold instead of silver accents)!


15 April 2015

Pink Ombre with Gold Glittery Tips

Hello! I've had a busy week of meetings and interviews and lots of rushing around. But tomorrow is my birthday, so I will have a great mani up to celebrate! In the meantime, you have one more day to enter my giveaway on Instagram! In celebration of one year there, as well as my birthday, I am giving away two of my favourite polishes--Essie Set in Stones and Max Factor Fantasy Fire! Entry and rules can all be found here, so go check it out!

Anyway, today I wanted something simple, chic, but with a touch of glitz. I filed a bit of my length down and then did a pink ombre with gold glittery tips!


29 March 2015

Sally Hansen & the Blackhearts (BPS Stamping Plate Review)

(with apologies to Joan Jett)

Hello again!

I am sick of being sick. :P

You know what's good for that, though? Rest, hot tea, and having more Born Pretty Store goodies delivered! A few days ago, I received handful of stamping plates and a really cool colour-changing polish :D I'll show you the polish next time! I haven't been stamping as much lately, so I wanted to get my hands on the plates first, and ended up with this little mani I almost called "Garden of Hearts".


19 February 2015

Indie Polish Swatch Time | 38

Hello everyone!

I'm going to make this post quick, because 1) I'm sick, boo; and 2) there's a cyclone coming this way! It shouldn't hit my area directly--it's mostly north of here--but we're already getting lots of rain, and it's just going to get worse over the next day or two. Floods might mean power outages or worse, so I want to get this up now!

I recently swatched a few Indie Polish goodies for you (here and here), but I have one more to show you today!


15 February 2015

Valentine's Day 2015 - Gradient Glittery Tips & Bows

Hello! Today, of course, I have my Valentine nails :)

This design is heavily inspired by one of my favourite YouTube artists--her channel is now called ArcadiaNailArt, but her old channel is IndigoNova1, and this video is beautiful. I used the same idea, but in seasonal colours, plus some handpainted bows!


10 February 2015

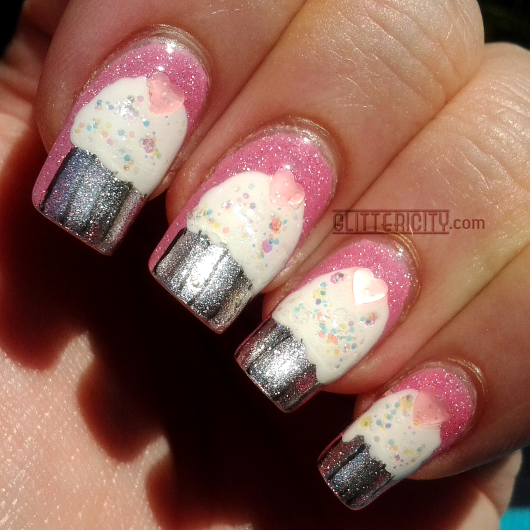
Valentine Cupcake Nails

Hiya!

Let the Valentine manis commence! Today I have some girly, sweet nails for you. That last bit being on the literal side :D


08 November 2014

A Rosy Review: Born Pretty Store Water Decals

Hello! The other day I received three lovely items from Born Pretty Store to review for you! The first one I wanted to try are these gorgeous floral water decals. I've never used water decals before, but it was so easy and they're beautiful!


Please click the jump to see more!

03 November 2014

Neon Lavish Bash

Hi everyone!

I feel like a broken record, but again, so sorry for long delays between posts! I went away to see a friend for a few days, and then came back and Halloween parties were in full swing :) I dressed as a vampire for one of them, and got a little carried away with the fake blood. My fingertips and cuticles are stained red! I have scrubbed with soap & water, acetone, oil... it's just going to take time to get them pretty again, and I can't take nice photos with them this way. (I did receive some more Born Pretty Store goodies, which I can't wait to share with you. It'll happen as soon as my hands don't look gross!)

In the meantime, I do have a simple mani for you--a neon + glitter-gradient combo that's been hanging out in the vault for just such an occasion :)


This is Indie Polish Neon Pink (my swatch is featured on her shop--yay!) with a gradient tip of Orly Lavish Bash. This gorgeous gold glitter lends itself perfectly to a gradient--building up gently with just the brush, not getting thick or lumpy at all. I love the holo hexes and bars!

I topped it with two thin coats of Seche Vite, for shine and smoothness.

Indoors with flash
Outdoors in overcast conditions
Outdoors after the sun peeked out ;)

I said it before, but the photos do not do this pink justice. It's SO bright and beautiful, and unlike a lot of neon polishes, it does not need a white base, and it dries shiny instead of matte and streaky like many neons! Such a unique formula.

Check out what Indie Polish is cooking up lately, and check back here soon! xoxo

01 October 2014

#31DC2014 - Day 31 - Honour Nails You Love!

Heya! We made it! The 31st and last day of the challenge--"honour nails you love"! I'm glad this is the last daily mani--I want to wear this one for a little while. It's a look by Robin Moses on YouTube, and I've watched the video so many times, I finally decided to recreate it!


I used OPI You Callin' Me A Lyre? and Revlon #911 Pink Chiffon to create a subtle gradient. Funny, I worked so meticulously to get it nice and smooth, and you can't even see it in the finished product.

I used the same technique Robin did (watch the video--she's brilliant!) with foil glue to paint on thin stripes, apply pink loose glitter (it's just in a big tube labelled "Glitter", and called Pink Ultra Fine. It's by a company called Glitterex), and then repeat the process applying the glue full strength at the tips.

I used Maya's Smoothing Coat for Glitters to seal in the sparkle, and while that was wet, added my gems. I tried to cluster them to create the "bursting" effect she talks about, but I don't think I did too well creating that look. Also, Robin concentrated the gems more towards the tips, whereas I took them all the way down to the base. I really like them, though! They're very flashy and sparkle with every move of my hands, and create disco balls on the walls when the sunlight hits them :D

Outdoors in sun before topcoat--I wasn't sure how they would look after topcoating, and wanted to get a photo in case I messed it up. Please excuse the messy cuticles. Look at that big sparkle!

Outdoors in shade, after topcoat.
I have three coats of Seche Vite sealing all this in. It's still bumpy, of course, but it feels solid and I think it will stay a while. My nails are so thick with all these layers they feel like fakes/acrylics, and it's weird. But so pretty!

Even in the dark, these gems manage to catch any stray light around and reflect it like mad :D

I also have glitter EVERYWHERE after doing these. I'm pretty sure I inhaled some, and will expel unicorn sneezes soon.

So that's it for the challenge! I hope you all enjoyed this little journey with me and the rest of the nail artists who participated. I'm going to take a short break now and enjoy wearing this mani for a few days. But don't worry, I won't be gone too long. See you soon! xoxo

27 September 2014

#31DC2014 - Day 27 - Inspired by ARTWORK

Yo, what's up? Day 27, and for my "artwork" prompt I took inspiration from street art!

Outdoors in cloudy overcasty light. I know it's spring, but I'm still not impressed, Sunshine State.

My perspective on graffiti has quite changed over the years. I used to consider it all vandalism and, while acknowledging that some of it takes talent, I just couldn't appreciate it. As an artist, I look back now and just think this perspective is silly. Some cities actually encourage it in some areas (hello, Hosier Lane!) to improve the look of plain walls or just as an attraction. Obviously, just 'tagging' does not take much thought or creativity, but well-crafted street art can be such a pleasure to see!

I don't feel like I'm very good at the style, but I had to give it a try. The base for this manicure is China Glaze Stone Cold, a dark matte-shimmer polish that looks very much like tarmac when dry. The white and black accents in this design are acrylic paint, and the colours are China Glaze Shocking Pink (Neon)China Glaze Pool Party (the more orangey one), Sinful Colors Neon Melon (green), and Orly Glowstick (yellow). I did my initials on the middle two nails, and then some random designs on the others--and a shooting star on the thumb, because yay stars.

I first topcoated with Seche Vite, and all shiny it looked like this:


But to return Stone Cold to its original appearance, and more realistically portray this type of art, I added Hard Candy Matte-ly In Love to finish it off.


As usual, my camera had no idea how to handle these neons. In real life, these colours are eye-searingly bright and awesome :D

What do you think about street art? xoxo

20 September 2014

#31DC2014 - Day 20 - WATER MARBLE

Helloooo :) Day 20 of the challenge--2/3 through it!--and it's all about one of my favourite nail art styles: water marbling!

Indoors with flash

This is actually a relatively simple one compared to my usual marbles--check out the tag on the right side to see more :) I usually do lots of colours and crazy intricate patterns, but for this I did a simple flower petal marble and just two polishes, both by Color Club. The creme is She's Sooo Glam, and the holo is Miss Bliss. Such a sweet girly look!

I learned everything I know about marbling from Colette and Beth, so if you want to know more about this technique, check them out! Colette, especially, does mostly marbles, and has so many good tips and creative ideas. I love both of those channels!

The fimo heart is from Born Pretty Store, and I topcoated these with Seche Vite.

Outdoors in sun...ish. Of course the day I use holo is the day it's not very sunny.
Another with a bit of sun. Cuticles look a little on the rough side here, sorry.

Since I wasn't able to get any blindingly beautiful full-sun photos today, here's another indoors to make up for it.


People seem to have pretty strong opinions about water marbling--they either love it or hate it. I think the result is SO gorgeous, and once you get the hang of it, it's actually a relatively quick way to get a lovely manicure. If you struggle with it, please check out the YouTube channels I mentioned above. You'll be a pro in no time! :)

See you tomorrow! xoxo

16 September 2014

#31DC2014 - Day 16 - GEOMETRIC nails

G'day and welcome (back)! It's day 16 of the 31-Day Challenge. This day has historically been "tribal", but that's been changed this year to the less-controversial, more fun, and easier-to-interpret "geometric". Really, the fundamental idea is the same. Geometric shapes in your design. But... I went with a more literal interpretation of the theme...

Indoors with flash

Haha! Actual geometry on my nails. Fun, eh?

I started with two coats of Cult Nails Falling Hard, a beautiful pink creme. I knew I wanted a matte base for my sketches, and matt-ified shimmers are très awesome, so I topped the pink with L'Oreal #802 The True Diamond, one of their "Magic Top Coat" polishes. It's SUCH a pretty combo--here's what those two looked like together before I went any further:

Outdoors in sun... so sparkly!

As much as I loved that look, I had to press on with my vision, so I added a coat of OPI Matte topcoat and let it dry completely. Finally, I grabbed a black fineline Sharpie and started drawing everything I could remember from my geometry classes in school.

The thing about Sharpies is that you really only get one try--I didn't want to attempt cleaning up with rubbing alcohol and risk messing up the base--so the sine wave is a little uneven and my cone's a wee bit wobbly. But overall, I'm happy with it!

One more in sun, with Falling Hard in hand

These really take me back! Geometry was actually one of the classes I enjoyed. Feels like forever ago.


*nods* :D

Righty-o, hope you enjoyed these! See you tomorrow! xoxo