Showing posts with label metallic. Show all posts

11 January 2016

Born Pretty Store Review | "Mirror Finish" Chrome Polish (AKA, Late NYE Post)

Hiiiiiiiiiiiiii :D

I'm finally able to show you my New Year's Eve nails, which also displays the last of my latest Born Pretty Store haul! I played around extensively with this Mirror Finish polish set, and I think I found the best way to wear it.


Click below for a full tutorial, review, advice, and, oh God, just SO many photos. I couldn't stop :D

17 September 2014

#31DC2014 - Day 17 - GLITTER nails

Hiya! Today is, obviously, one of my favourite days of the challenge. Glitter nails!

Outdoors in sun

"Oh look," I hear you say with a scoff, "she pulled out Essie Set in Stones again, big flippin' surprise." Well, you, my imaginary disdainful detractor, are wrong. This is OPI Crown Me Already! from the Miss Universe collection!

Indoors with flash

It's very similar to my beloved Essie LuxEffects topper, except that it has a lot more microglitters, and some slightly larger hexes as well--but the concept is the same. Bright, super-reflective glitter hexes in many sizes. It's beautiful! Also unlike the Essie, this one can easily each opacity on its own. I applied three thin coats for the density you see in these photos.

I couldn't just wear the polish alone, though. Come on, where's the challenge in that? ;) I added some assorted-shaped clear/silver stones from a pack called Ice Chips--isn't that cute?? I got them at a random craft store years ago. Might have been a Michaels.

I'm really annoyed with that large teardrop stone on my middle finger. When I added my two coats of Seche Vite to smooth all this out, that stone--and that one alone--reacted and went all cloudy. Why, I have no idea. I don't like to think that just that stone, or maybe just the ones in that size, were made of a different/cheaper material, but the evidence is pretty clear. Or not clear, as it were.

Outdoors in shade. So bright!!
Another in sunlight

I just love having bright glimmery nails like these. The kind that are dangerous when driving, because they're so distracting! The dense microglitters almost make for a metallic, foil-like finish. Beautiful.

I'm pleased with how easily the challenge is going this year. I took a long time to go through it the first time, but this has been really fun! The solidarity with other nail artists has helped--I look at the #31DC2014 posts every day on Instagram, Twitter, and Facebook. There are so many talented folks out there! See you tomorrow :) xoxo

08 September 2014

#31DC2014 - Day 8 - METALLIC nails

Hello and welcome to day 8 of the 31-Day Challenge! Today I am rockin' some foil nails for metallic day :D


This post is a bit more pic-heavy than my other challenge posts (so, more like my normal ones), so click below to continue and see them all!

25 September 2013

Bling! Silver + Holo Glitter + Rainbow Rhinestones

Hi, friends! Today I have another blingy, sparkly, crazy nail design that does my blog title proud. I'm glad I got it done and photographed last week, because today it's been grey and drizzly. I'm so annoyed... my Lacquer Lust Birthstone Collection polishes just arrived, but I can't swatch them yet! I got three of these beautiful shades--Diamond (my birthstone!), Tanzanite, and Peridot--but I can't do justice to their sparkling, stunning, holographic beauty without the sunshine. I'll get them up here soon!

For now, here's some chunkier shinyness!

Grab your sunglasses :D

Yay! The base for these babies is a combination of two Wet N' Wild Fergie Collection polishes. First, two coats of one of my favourite metallic silver polishes: Going Platinum. It's definitely shiny silver, but has tiny golden microglitter in as well! It makes for a warm-silver/cool-gold, truly platinum look. It's SO shiny.

Then I topped it with the other Fergie polish I have: New Years Kiss. It's made an appearance here before when I did a similar manicure for New Years 2012. Densely-packed silver microglitter with holographic silver bars. Yummy! Just look at it in the bottle below:

You should probably click to fullview this. Drooooool... See all those colours? HOLO MAGIC :D

I love how much depth that glitter topper provides. So shiny and sparkly.

Then I just added slow-drying clear polish to each nail, grabbed an orange stick, and started whacking on random rhinestones from a wheel I got at Cult Nails. (They do not seem to have any in stock at the time of this writing, sorry! It's just random colours and sizes.) Once they were all on and the clearcoat dried, I carefully sealed them in with Seche Vite.

asfdjkl;   SO PRETTY. Look at the middle nail! That stone on the left is a teal-green, like a darker version of the large one on the index finger--but it looks purple here except around the edges! I could stare at this pic all day *_*
one more... shining in the sun and catching light with every slight movement :)

As you can imagine, I had a blast wearing these, and they got lots of attention! Would you wear blingy nails like this, or is it too crazy for you?

Thanks for stopping by today. I'll see you next time! xoxo

09 August 2013

Alphabet Challenge: T is for... Twinkly Tips

Hello my friends! Only six letters left! This has been fun :D

Today's letter is T!

BLURRY AT THIS SIZE WAT (click to enlarge)

Gradient glitter tips are so easy and fun and pretty :D And all the polishes start with T to boot!

I couldn't decide which combination I wanted to use, so I decided "ah, what the hey" and did one on each hand! Because #yolo and all that >.>

This is by far my favourite of the two hands :D

I love this combination on my right hand! The lovely bronze base colour is Soulstice Spa Tokyo, and this is two coats. I absolutely adore it, not that this is any surprise to any regular readers here who know I have a massive girlboner for Soulstice Spa.

It was just pointed out to me that it looks rather reddish in these photos. It is more true-coppery-bronze in real life.

The tips are the bottle in the shot and one of my favourite glitters, China Glaze Tinsel Town. I was able to just use the brush that came with the bottle and do a few thin coats. This polish worked really well for this look, and it feels so posh! I want to wear it as a full mani soon!

Also pretty :D

Right hand! The silver base is by Petites and is called Twilight. It's a bit thin, but this is three layers and it does look nice, if a bit too frosty to be a favourite. You could see the brushstrokes a bit more than I prefer. But overall, a good polish.

The tips are the bottle in the photo--it is Milani Twinkle. It doesn't look as blue IRL as it appears in this photo--the primary hue is violet. This is one of their "one coat glitters" (although it really needs two for full opacity). It's packed with warm purple microglitters and small cerulean-blue hexes. The purple is that colour that is famous for not photographing properly. So pretty in real life!

It also, unlike the other glitter, is impossible to use the brush for anything remotely resembling smooth application. I used a makeup sponge to build up this gradient, and it worked wonderfully. :D

Topcoated with Seche Vite and done!

Not the best pic at all, but you can actually see the purple properly, whee :D

Okie, that's all for now! I'm getting this post up late, hope anybody actually sees it >.>
See you next time! xoxo

29 January 2013

Dollicious Polish by Frederick's of Hollywood -- swatches and review

Hello everyone! Today I have a different kind of post, something new for Glittericity--my very first swatch-and-review post! I'm pretty excited about it, because 1) the polishes were a Christmas gift from my mother, and 2) I've never seen them on any other nail blog so far!

I'm posting this now because these colours are perfect for Valentine's Day--I want to do some cute nail art with them at the start of February--and while supplies last, it looks like they are on clearance for a mere $3. Whaaaaaat? (Only available in the US though...) :(

The polishes are sold in a trio and the collection is called Dollicious. They come in a cute box like this:


This is longer and more pic-heavy than usual, so the rest of the review will be after the jump! Keep reading to see the rest!

23 January 2013

Teal Swirly Nails

Hiya me lovelies! I'm back with some nails that ended up more wintery and appropriate than I expected. I quite like them!

Subtle stamping, always great :)

Base colour is Sinful Colors Mint Apple, which is the perfect cyan I needed in my Pac-Man design for one of the ghosts... lol! I bought it after that, when I realised I didn't have anything like it, and THAT WAS UNACCEPTABLE. (own ALL the polishes!)

I then stamped the swirls from Mash plate #40 and Zoya Zuza. Zuza is a lovely metallic teal shade that stamped well and went perfectly with Mint Apple. Next, I added a coat of a fun new polish I got recently by Confetti, called Ice Ice Baby. It's a clear base with lots of iridescent, teal, and electric blue sparkles. They catch the light and reflect SUPER bright blue! Plus, I love the name :D

Finally, I added a coat of Hard Candy Matte-ly In Love matte topcoat over the index and middle fingers, just to see how it looked. It brought out the glitter in a different way as well as making the metallic stamping look nice.

Tip wear, oh god. IGNORE.

As I said, it seems all wintery and nice with the pretty blue glitter and fanciful swirls.

Hope you're all having a great week :) See you next time! xoxo

31 December 2012

New Year's Eve Nails!

2012 is almost over! It's been an exciting year for me--lots of travelling, lots of new experiences, and I've met some folks I believe will be important parts of my life in the following years :) I hope 2013 brings us all better things than any other before!

But you can't end the year without a great party, and I've got some awesome plans. I needed awesome nails to match, so I busted out silver foil polishes, glitter, glitter, glitter, and more glitter. And this is what happened!

Sorry, what did you say? Cannot hear you over the SHINY!

I started with two Wet n' Wild polishes--from the Fergie collection, to be precise. First two coats of Going Platinum, a warm-toned shiny silver foil with the tiniest hint of golden shimmer. I then added two coats of New Years Kiss (couldn't resist!) which is has densely-packed silver glitter and holographic bar glitters in it. Atop that, one coat of Essie Set in Stones, my all-time favourite silver glitter--it's full of chunky and SUPER reflective hexes. While that was wet, I added some bigger silver individual bits of glitter as well as the star-shaped ones. Two thick coats of Seche Vite for that mirror-like shine, and... aahhh, they're SO BRIGHT! :D

This a really picture-heavy post--I couldn't stop taking photos! So... I'll add the rest of the photos after the jump--click below to see them!

02 December 2012

From the Vault #3: Two of my favourites!

Quick post today! Wanted to share a couple more from my "vault". I've got a rather simple manicure on at the moment and am still deciding if it's worth sharing, so in the meantime... Here you go.

Up first, a fun red + zebra print look:

My photo taking/cropping skills were not as good then.

I don't remember the exact polishes I used, except that the black was Konad special stamping polish, and the silver glitter was one of my Stripe Rite striping polishes. Just painted red and then taped off the tips to add the white, stamp on the stripes, then remove and add the silver glitter and topcoat. Easy and really stylish!

And another, which is actually one of the nicest I've ever come up with (IMHO):

:D

I think the gradient was made with Sally Hansen Xtreme Wear Blue It and Emerald City, and then some matching shimmery polishes put over that for extra sparkle. The green overlay was Zoya Ivanka, and the blue *might* have been Sally Hansen HD in Spectrum. Not sure. I know the stamps are Revlon #932 Copper Penny (yes, again) and the flowers are from Bundle Monster plate BM06.

Can't believe we're in December already. Finally I can pull out all the snowflake designs I've had in mind! Hope you all have a nice weekend :) xoxo

29 October 2012

Halloween: Bats and Spiderwebs!

Hello errrbody! Today I'm going to give the challenge a miss and show you a couple of Halloween-inspired manicures I've worn lately! I love Halloween--yummy candy, fun spooky things like bats and ghosts, the colours, and dressing up in costume is really fun! And, of course, the chance to use some of my Halloween nail stamping plates! Warning, this is sort of a longer post, and has more pics than usual since I'm showing you two designs in one :)

The first one is inspired by this video by JaeMarie2008 on YouTube! She's got lots of cute designs, but this one really stuck out to me, because I super love bats! I think they're so adorable, even though most people seem to think they're gross or scary. I've always dreamed of having a pet bat that would sit on my shoulder and follow me around and stuff, like a parrot. Or a falcon. And I could hand-feed him fruits and berries and insects, and it would be the cutest thing evaaarrrr!

*ahem* Anyway. Right. Onto the nails:

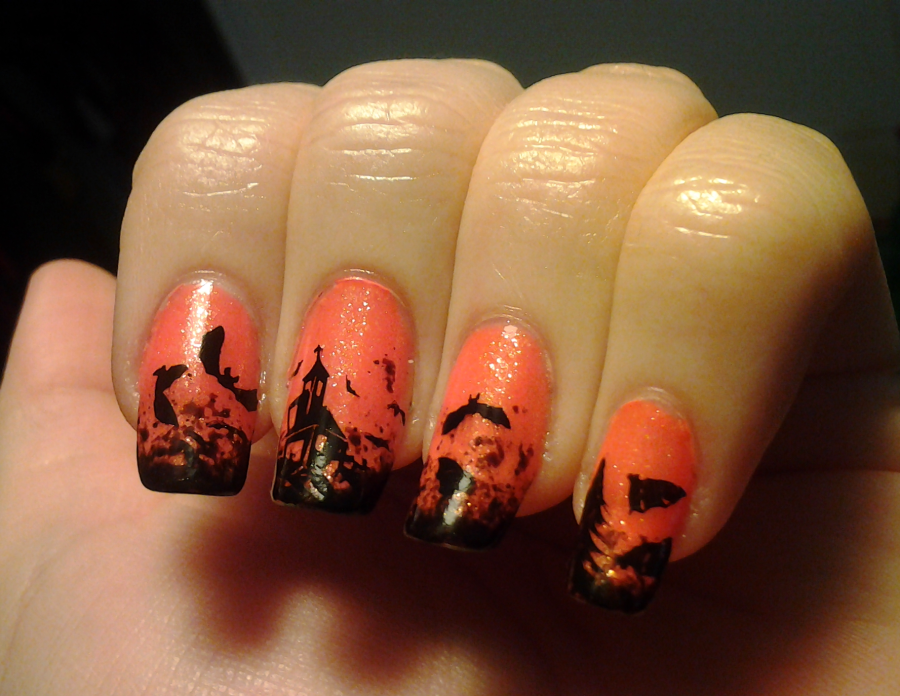
Bats! Haunted house! Scary tree! Orange shimmer! :D

Spooky yet cute! I started with two coats of Orly Melt Your Popsicle, which is actually a very neon orange that came out this summer. It's super bright and fun, but I wanted to make it a little more Halloween orange, plus add shimmer, so I added a coat of Zoya Gabrielle. Gabrielle is a very sheer orange polish with tiny orange and yellowy-orange glassfleck shimmers. It's really gorgeous, but would take a LOT of coats to wear alone. I like layering it over things :D

I then grabbed some black polish (Soulstice Spa's Gotham, to be precise--it seemed appropriate for this mani!) and sponged a bit on the tips with a little piece of an old washing-up/kitchen sponge. Then I used black Konad special stamping polish to stamp on the some images from a couple of Bundle Monster plates--the bats are on plate BM13, and the haunted house is on BM-305. I then used black Stripe Rite striping polish to draw on a few more smaller bats freehand, and some spooky tree silhouettes. Finished it all with Cult Nails Wicked Fast topcoat.

A whole Halloweeny haunted forest scene at my fingertips!

Managed to get a pic of both hands, thanks to some creative holding of my tablet and the "delayed shutter" feature. Word up to that. Also, the orange looks more colour-accurate here, it's not as melony as it looks in the first two pics.


The second design is darker--silver spiderwebs on dark purple:

Forgive the messy cuticles. I'll explain :P

First, a quick moan about the purple: this is Cult Nails Spontaneous, which I fell in love with at first sight and HAD to buy when it first came out. Yummy dark grapey purple with sparse bright purple microglitter? Yes please! And it really is a beautiful polish, but oh my lord, it is a nightmare to work with. Cult Nails polishes are generally absolutely perfect to apply, nice creamy formulas, but this? Ugh. Not sure if I got a bad bottle, or if this colour just didn't work the same. It's thick and meh and would be bald in some places and thick and clumpy in others, no matter how carefully I applied it. I normally really enjoy painting my nails, but I was so fed up with it after finally getting this to look right that it took a while before I came back to them and added the webs. This is like 3 or 4 coats of Spontaneous, coats where I'm dabbing in some places and removing excess in others and ARGH.

...Buuutttt I did eventually come around, and used Sally Hansen Silver Sweep to stamp on the spiderweb image from plate BM13, just in random places on the nails. I absolutely loathe spiders, and didn't want to add any of them to the design, but these pretty silver webs over the purple were both delicate and spooky :) Topped it off with Orly Sec 'N Dry topcoat.

Yeah, I was so fed up by the time I got to this stage I didn't even bother trying to get the cuticles perfect. This was the best I could do. It just would not cooperate. But, look how bright and shiny the webs are!

With flash, so you can see just how magnificently shiny these are :D They were flashing and catching the light every time I moved my hands!

Whew, long post! That's all for now, though. I'm going to post my artwork-inspired nails soon, and then hopefully get another Halloween design or two in before the 31st.

See you next time--hope the start of your week is delightful! xoxo

19 October 2012

Challenge Day #25: Inspired by FASHION

Hallo! Welcome to day 25 of the challenge. This was the hardest one for me so far: inspired by fashion. I am not a very fashionable person. I am a stylish person, although my style is all over the place (pink top and long frilly skirt one day, black bondage pants and a Black Sabbath shirt the next, etc). But fashionable? Trendy? In tune with "what's in season"? Heeeeeelllll naw. So I did what a lot of nail bloggers did for day 25: turned to my best friend Google for some inspiration, and found this hot little number from a designer called Alexander McQueen:

Look at those beautiful gold and copper dragonflies! And the chain! On that black! I want this dress, nao plz. (Image found on style.com)

Isn't that just lush? I love metallic + black, and I just happened to have image plates with dragonflies and chains. So I came up with a manicure that looked awesome in person, but of which I could NOT get a decent pic to save my life:

I swear it was so nice in real life. Blah.

I started with one easy coat of Piggy Polish's Right BLACK At Ya. I really like this brand--they're all one-coaters and dry super fast, making them perfect base colours for stamping. I then used two Revlon metallic polishes (yes, again. because they're awesome, that's why) in gold (#925 Gold Coin) and copper (#932 Copper Penny) to make the design. I used my trusty detail brush to make small strokes of the colours near the base of the nail at first, to represent the areas where the dragonflies are more concentrated at the top of the dress. I then used the dragonfly image from Mash plate #41 to stamp them several times in the same two polishes, dabbing both colours on the plate randomly for the two-toned effect. On the accent nail, I used the chains from Bundle Monster plate BM12, then sealed it all in with Seche Vite topcoat.

The only other half-decent pic I could get. This one's clearer, at least. It was so shiny, my camera had trouble focusing on them!

If I were doing this one again, I'd probably be less lazy and actually fill it totally in with the dragonflies instead of "cheating" on the bottom part. But I like this look too, even if it was more elegant in my imagination.

Oh well. Moving onward! I'm already wearing the next design, inspired by a pattern. Can't wait to show you--this has been popular with my co-workers; we'll see what you think. See you soon! xoxo

16 October 2012

Challenge Day #24: Inspired by a BOOK

Hi everyone! Day 24 of the challenge: inspired by a book! I'm super excited about this one!

*Warning, this post is a bit more picture-heavy than usual. I got carried away with my "photo shoot", lol*

I chose to do a Harry Potter-themed manicure:

And yes, that IS Hermione's Time-Turner! Was perfect for these photos! Even though my camera was freaking out about how shiny these Revlon metallics are.

I really, really love the Harry Potter series. I read each book as it came out, and then read them again before each film came out, and then dressed up in robes and a tie and the Time-Turner replica necklace and a hat and a wand to go see each film the day it was released, and then read the books again... you get the idea. I think Rowling is a really talented author, and the way she made her writing style grow and develop along with Harry and his friends to match the way their perspective would change with each year is just phenomenal.

So... On to the nails! Each of my four fingers is painted with the colours of one of Hogwarts' four houses, and the thumbs are black with the iconic, magical-lightning-font "H" and "P" in gold.

I'm getting better with that detail brush, I think. Even on the right hand!

As usual with these multicoloured manis, I'll go through and explain each finger and the polish I used! For the four houses, I painted with a creme polish for the "primary" colour, and then freehanded half the nail in some "swoops" of the metallic/shiny polish for the accent.

Thumbs--the HP 'logo': Started with a base of Wet N' Wild Black Creme, and painted the letters on with a small detail brush and Revlon #925 Gold Coin.

Index fingers--Gryffindor: Revlon #120 Red Carpet and Revlon #925 Gold Coin.

Middle fingers--Slytherin: China Glaze Starboard (green) and Revlon #928 Silver Dollar.

Ring fingers--Ravenclaw: I didn't quite have the right shade of blue for this, so I made it: I first painted a coat of Revlon #730 Royal (which is yummy on its own, btw), and then on top of that, a thin layer of Soulstice Spa Monterey (which is just sheer enough for this to work). The former was too dark and the latter too light, but together it looks pretty close. The official colours are blue and bronze, but copper was the closest I had, so the accent is done with Revlon #932 Copper Penny. Why yes, I *did* use a crap ton of Revlon polishes for this design.

Small fingers--Hufflepuff: The yellow is my usual, Sally Hansen Xtreme Wear Mellow Yellow, and the black is OPI Baby It's "Coal" Outside! That OPI is *such* a pretty shade. Black glittery polish that's opaque in one coat, and yet very sparkly. I'm a fan.

Better shot of the green and blue especially. I'm pleased with how I was able to make the right shade of blue even if I didn't have it alone.


I could not stop posing with the Time-Turner. SHINY. Also, the "P" came out a little wonky... painting those lightning zig-zags with my left hand was challenging... But I think the H looks pretty good!

Just a couple more pics... I told you I got carried away...


In some of the pics, the gold and silver look very similar, but you can tell the difference here.


Elegant? I think so. :D

I know Harry Potter nails are not exactly unheard-of, but as I think I made clear before, I really enjoyed the series and wanted to do these as a tribute.

7 more challenge days! I'm going to squeeze in some fall/Halloween designs too, so the blog will be busy for the next few weeks. Gonna be fun! Hope you'll hang on for the ride. Au revoir for now! xoxo

24 September 2012

Challenge Day #15: DELICATE PRINT

Ooh la la, delicate print day. And day 15, which means we are pretty much halfway through the challenge list! I'm enjoying these, although I can't wait to do my own thing again after this is over. But I'm getting ahead of myself...

Pretty and delicate? Yes, I think this is acceptable. :D

I started with two coats of this nice shimmery pick by Petites, called #298 Rock n' Roll. It's a nice bubblegum-pink colour with pinkish-silver shimmer. I wore it alone for a day first:

With my leopard print jacket--rawr!

I then stamped with Sally Hansen Insta Dri in #230 Silver Sweep, and the flowing vines image from Mash plate #50. This polish is great for stamping! I tried lots of silvers, but this is by far the best. (Big thanks to Gina for extolling the virtues of this polish and convincing me to go buy it! Go check her out on YouTube--she's a master at stamping and comes up with some beautiful designs!)

After stamping, I added a coat of Seche Vite to protect the design. I could have sworn I got a photo of it at this stage, but I can't seem to find the shiny version. All I have is the photos from my last step, which was to add a coat of Hard Candy Matte-ly In Love, a great matte topcoat. I love matte-ifying metallic colours, and the soft look and feel really contributed to the "delicate" theme! I felt so pretty wearing these :)

Still shiny, even with the matte finish. Love! This was taken indoors with flash...


...and this was in the same place but with no flash. Amazing how different they look in ambient light versus direct!

Hope you all enjoyed this one as much as I did! See you next time for tribal print day. Until then, enjoy the rest of your weekend and good luck Monday morning! xoxo

03 September 2012

Challenge Day #8: METALLIC nails

"hush little baby, don't say a word
and never mind that noise you heard
it's just the beasts under your bed
in your closet, and in your head..."
-metallica, enter sandman, 1991

Metallic nails today! I had every intention of doing something related to Metallica, as I love metal music and they at least used to be freaking amazing. But then I was randomly poking about the internet and ended up staring at Godiva chocolate boxes, and was embraced by the warm brown, gold, and bronze colours. And thus, this manicure was born:

Outdoors in sunlight. Mmmm... want to nibble.

Isn't it elegant? <3 I started with two coats of CQ 455 Chocolate Plum (how apropos!), which is, as the name suggests, a warm chocolatey brown that leans ever-so-slightly into plummy purple, especially in the shimmer. I don't know much about this brand as a whole--I'm not even sure how I acquired this bottle--but I will say the formula is great and the colour is rich and lovely.

I then stamped with Revlon 932 Copper Penny and the interlocking hearts pattern from Red Angel plate RA-114. I've been wanting to use that design ever since I bought the set, and it seemed perfect for this. The Revlon metallics, by the way, are hands-down my favourites of all the metallic-finish polishes I own. They cover well in one coat, they stamp beautifully, and are extremely shiny and glowy. (Any stamping flaws you see are user error, definitely not a problem with the polish nor the plates.)

Indoors with flash. Not as great for colour-accuracy, but it shows how bright and shiny they are!

I decided, as usual, that I wanted to kick it up a notch. And then I remembered these gorgeous bronze stones that Marta of ChitChatNails used and that I had to buy from Cult Nails as soon as I saw them. They were perfect for just a wee accent along the cuticle of my ring finger. Atop that a generous coat of Seche Vite was blanketed, and thus my chocolate-box nails were complete.

Obligatory artsy photo... I sorta love this shot.

That's all for now! I would love to say "I'm off to enjoy this long Labour Day weekend!" but in truth, I'm doing laundry and unpacking and getting settled in after having been gone. (The weather is scheisse anyway.) Off to do something productive, and try not to nibble my yummy nails :D xoxo