Showing posts with label mash. Show all posts

26 April 2016

Czech Out These Birds!

Good day! I hope your week has started off well. Mine has been a little stressful, so I decided to do a relaxing, calming nail design. :)

(click to enlarge)

I just love birds! I think they're beautiful, and can be so cute, and I've always been jealous of their ability to fly and go anywhere they want. I don't believe in reincarnation, but if it is a thing, I'd really like to be a bird next time around.
Click the jump to see how I did these :)

10 September 2014

#31DC2014 - Day 10 - GRADIENT nails

Hiya! Day 10 means gradient nails :)

Sunlight, woo

Atop a white base, I sponged a gradient of three Orly polishes: Fresh (green), Blue Collar (blue), and Frolic (fuchsia). I wish I'd gotten a photo of the gradient alone! It turned out nicely. But I couldn't leave it alone, so I stamped the tartan pattern from Mash plate 39 with both white and black Konad stamping polishes.

I didn't really want to add the flower decal, but I messed up the stamping a little on that finger... so I hid the wonky bit. It's actually not a decal--it's part of one of those sheets of stick-on gems for mobile phones. Cheap and pretty!

Topcoated with Seche Vite, as usual.

Indoors with flash
Outdoors in shade

I love the look! But I also kind of wish I hadn't added quite so much over the gradient. What do you think?

See you tomorrow for day 11! xoxo

29 January 2014

Coffee Love Swirls

Hello boys and girls :)

Before we get into the nail art, I have one quick announcement--I have finally gotten around to registering my own domain for the blog! You may have noticed the redirect. *points to your address bar* See? :D

I am still happy to be hosting with Blogger, but the URL is now http://www.glittericity.com  :)  feel free to update your bookmarks, although the blogspot address will redirect here as well. I'll be updating my watermark next time I edit photos to match the new site!

Today I have a quick design for you from the vault--I am enjoying my previous mani so much (and it's staying on so well!) that I haven't taken it off yet. But here is a design I wore a month or so ago, featuring Layla Coffee Love (which I've shown off before!) and some simple stamping.

yep, we are back to holos :D

I used Konad black stamping polish and Mash plate 40 for the swirls. Topcoat is Orly Sec N' Dry.

You can see how the image wasn't quite big enough for the nail, and I had to try and fill in the gap on my middle nail. Kind of failed. Oopsie :)

Coffee Love is such a pretty polish!

Just a quick post today, but I hope you liked this combination. Thanks for checking out my blog today! Stay tuned for more tomorrow :) xoxo

18 January 2014

Jinxing Pixies -- Textured Gradient + Stamping

Hello hello! Today I want to show you a fun gradient look featuring two Zoya Pixie Dusts and one OPI Liquid Sand. :)

I love these rich colours :D

The two Zoyas were from the 2013 Fall PixieDust collection. The darker purple is Carter, and the fuchsia middle shade (and the bottle I am holding) is Arabella. These are lovely, well-pigmented with the most gorgeous silver sparkle :D I've said it before and I'll say it again--I didn't expect to love the textured polishes, but Zoya made it happen! As soon as I saw these two I knew I wanted to do a gradient with them together. Not only do they look stunning together, but Carter has hints of pink sparkle here and there, and Arabella appears to have purple glimmers, so they really compliment one another perfectly!

I started off sponging these two together for the gradient, and did some more blending with the brush. These are mostly opaque, but juuuust sheer enough for this technique to manage.

However, I can never seem to just do two-colour gradients.. I always want three.. and I realised OPI Jinx would work well with these, so I added her to the tips :) Jinx is such an awesome orangey-coral with a sizzling gold shimmer, and the texture matched the other two very well.


I love the final look, although I have to say Arabella kind of gets lost there in the middle, doesn't she? It's arguably the prettiest shade, so this is a shame. I'll have to use her again soon.

Indirect light, to see the colours better.

After a day or two like this, I decided to try stamping over it. It kind of worked. I could see the pattern clearly at some angles, but couldn't get it to photograph very well. I used Revlon #925 Gold Coin and the interlocked "wheat tips" image from Mash plate 44 (not that you'd be able to tell by these pics... but I thought the wheat image seemed just right for these autumn-like colours. and yes, I know it's not autumn anywhere right now. wearing only season-appropriate shades is for squares.)

You can kinda see it..

The pattern really disappears in direct light! But there is a pretty golden shimmer, so that's something.

Well, I hope you liked this one and are having a lovely weekend so far! (Or will do soon. It's midday on Saturday here down under!) See you next time! xoxo

29 March 2013

Easter Egg Skittle Nails: Easter Nail Design #2

Hello lovelies! Super quick post today! I'm heading to the beach for the weekend! I am creating a really special manicure for this trip, one I have been wanting to do for a while. I collected some materials last year and with the release of the new Zoya Pixie Dust shades, I have everything I need to make it amazing! That's all I'll say for now ;) you'll have to wait and see. For now, have a look at the easter-egg nails I wore this week!

Do they look like multicoloured eggs? :)

I used lots of polishes and stamps for this, obviously. Let's go down the list!

Thumb: Base colour is Orly Snowcone. Stamping is from Bundle Monster plate BM-302 in Konad white and Sally Hansen Insta-Dri #220 Flashy Fuschia. Grass painted on with a small brush and Orly Fresh.

Index finger: Base of Zoya Jolene. Stamping with Bundle Monster plate BM-323 in Sally Hansen Insta-Dri #230 Silver Sweep.

Middle finger: Base of Sinful Colors #947 Mint Apple. Stamping with Bundle Monster plate BM-314 in Konad white .

Ring finger: Base of Revlon #325 Gumdrop (scented polish!). Stamping with Mash plate 43 in OPI Gift Cards For Everyone.

Small finger: Base of Sally Hansen Xtreme Wear #360 Mellow Yellow. Stamping with Mash plate 45 and Sally Hansen Insta-Dri #220 Flashy Fuschia.

As you can see, the stamping wasn't perfect :( small and ring fingers smudged near the tip... But I still thought these were cute and I had a lot of fun wearing them.

Close-up of the bunny on the thumb. Isn't he just precious? :D

Have a fun, safe, and happy Easter. See you next week! xoxo

13 March 2013

March Polish Days: Vintage!

Hullo there! Time for another episode of Polish Days! This month's theme is Vintage:

Maybe you’re one of those annoyingly lucky people who own some heavenly vintage polishes that you want to crack open (not literally) and make the rest of us jealous, or maybe you too have a soft spot for doilies. Perhaps you’re inspired by a particular decade or trend. As long as there’s some connection to the past it’ll fit right in with this months theme!

As soon as I saw this prompt, I knew just what I wanted to do...

ah, how romantic.

I know this idea isn't entirely original, but it came to mind as soon as I saw the text image on the latest set of Bundle Monster plates. I was disappointed (though not surprised) to see a few girls do nearly identical designs with it earlier in the year, and never made it myself. But I decided that, with apologies to them, it was just perfect for this theme and I was dying to wear this look! So after lots of mental debating, I went for it, and am really happy I did. :)

The base polish is everyone's favourite off-white polish, OPI My Boyfriend Scales Walls. I then used yellow and brown polishes, some acetone, and a small brush to make a muddy, thin wash, which I dabbed around the edges to give it that old-paper look. Next, I stamped the love-text image from the aforementioned Bundle Monster plate BM-311 with Wet N' Wild Black Creme. I intentionally made this a bit messy and not-fully-transferred in some places, again to give the aged and weathered look. Then, I used Sally Hansen Insta-Dri #220 Flashy Fuchsia (fuchsia, duh) and Revlon #571 Posh (green) to stamp the rose from Mash plate #36 onto the thumbs and ring fingers, and sealed it in with Seche Vite to protect the stamping. Finally, a coat of Hard Candy Matte-ly In Love topcoat to further enhance the "paper" look.

Here's a photo before the last step, so you can see it shiny. Not much different, but...

Still nice, I think. It feels so classy.

I hope you enjoyed my take on the "vintage" theme. Keep reading below the jump to see the other ladies' (and maybe even a gentleman or two's) entries!


23 February 2013

Fishnets & Flowers

Hello again! I have a bit of a fancy design to show you today!

SHINY! :D

Yay! I know I always say this, but srsly u gais I loooove this mani :D

I started with two coats of the polish you see in the photo--Sally Hansen Diamond Strength #150 Glass Slipper. It's a clearish base with tiny tiny tiny silver microglitter and then those lovely white-silver flakes! Most of the polishes like this have iridescent flakies, which are also beautiful, but the pure shimmery white of these really caught my eye. It reminds me of like, angel wings :D

Anyway, after that was dry, I stamped the fishnet pattern from Konad plate m57 across the tips with black Konad special polish, and added the strip across the tip with my black Stripe Rite striper polish. I was pleased with how this looked like fishnet stockings. Racy! I used white Konad special polish to add the pretty flowers from Mash plate 43, and then put some tiny rhinestones in the centres (duh... I guess you can see that, eh?) to make them super-fabulous. Careful topcoat of Seche Vite, and, voilá!

less shiny, more.. details.

I was playing Xbox with my super sweet blue Afterglow controller and got a few fun pics with it too. I liked them, so I'm putting them here:

with flash, covering most of the blue glow

in the dark, with the blue glowing through them! I love this one xD

Well, that's all for now I suppose. Gotta go make something interesting of my Friday night--it's still young! See you all next time xoxo

23 January 2013

Teal Swirly Nails

Hiya me lovelies! I'm back with some nails that ended up more wintery and appropriate than I expected. I quite like them!

Subtle stamping, always great :)

Base colour is Sinful Colors Mint Apple, which is the perfect cyan I needed in my Pac-Man design for one of the ghosts... lol! I bought it after that, when I realised I didn't have anything like it, and THAT WAS UNACCEPTABLE. (own ALL the polishes!)

I then stamped the swirls from Mash plate #40 and Zoya Zuza. Zuza is a lovely metallic teal shade that stamped well and went perfectly with Mint Apple. Next, I added a coat of a fun new polish I got recently by Confetti, called Ice Ice Baby. It's a clear base with lots of iridescent, teal, and electric blue sparkles. They catch the light and reflect SUPER bright blue! Plus, I love the name :D

Finally, I added a coat of Hard Candy Matte-ly In Love matte topcoat over the index and middle fingers, just to see how it looked. It brought out the glitter in a different way as well as making the metallic stamping look nice.

Tip wear, oh god. IGNORE.

As I said, it seems all wintery and nice with the pretty blue glitter and fanciful swirls.

Hope you're all having a great week :) See you next time! xoxo

19 October 2012

Challenge Day #25: Inspired by FASHION

Hallo! Welcome to day 25 of the challenge. This was the hardest one for me so far: inspired by fashion. I am not a very fashionable person. I am a stylish person, although my style is all over the place (pink top and long frilly skirt one day, black bondage pants and a Black Sabbath shirt the next, etc). But fashionable? Trendy? In tune with "what's in season"? Heeeeeelllll naw. So I did what a lot of nail bloggers did for day 25: turned to my best friend Google for some inspiration, and found this hot little number from a designer called Alexander McQueen:

Look at those beautiful gold and copper dragonflies! And the chain! On that black! I want this dress, nao plz. (Image found on style.com)

Isn't that just lush? I love metallic + black, and I just happened to have image plates with dragonflies and chains. So I came up with a manicure that looked awesome in person, but of which I could NOT get a decent pic to save my life:

I swear it was so nice in real life. Blah.

I started with one easy coat of Piggy Polish's Right BLACK At Ya. I really like this brand--they're all one-coaters and dry super fast, making them perfect base colours for stamping. I then used two Revlon metallic polishes (yes, again. because they're awesome, that's why) in gold (#925 Gold Coin) and copper (#932 Copper Penny) to make the design. I used my trusty detail brush to make small strokes of the colours near the base of the nail at first, to represent the areas where the dragonflies are more concentrated at the top of the dress. I then used the dragonfly image from Mash plate #41 to stamp them several times in the same two polishes, dabbing both colours on the plate randomly for the two-toned effect. On the accent nail, I used the chains from Bundle Monster plate BM12, then sealed it all in with Seche Vite topcoat.

The only other half-decent pic I could get. This one's clearer, at least. It was so shiny, my camera had trouble focusing on them!

If I were doing this one again, I'd probably be less lazy and actually fill it totally in with the dragonflies instead of "cheating" on the bottom part. But I like this look too, even if it was more elegant in my imagination.

Oh well. Moving onward! I'm already wearing the next design, inspired by a pattern. Can't wait to show you--this has been popular with my co-workers; we'll see what you think. See you soon! xoxo

26 September 2012

Challenge Day #16: TRIBAL

Aloha! Just a quick one today! Challenge #16 is tribal print, and I had a tough time coming up with something for it. I'm quite familiar with the typical "tribal-print" manicures (Google image search will show you loads of lovely designs, if you're so inclined), but I just don't like them and didn't want to wear one. I started trying to think outside the box. My mother's side of the family is significantly Cherokee Native American, so I thought maybe I'd do something related to that, but... no joy. Lots of good information, but just wasn't feeling inspired. Tribal-tattoo style? I have several stamping plates with images that look like those, but then I decided I didn't want my nails to look like the biceps of a douchebag frat boy that made a bad decision, even if it is only for a day.

I went back to my first idea, the Native American one, and just browsed random pictures. A common (generic) theme is campfires, teepees/wigwams, and feathered headdresses. The idea I ended up with is simple, and far from what people expect from "tribal", but strangely, I like it:

If the stamping had been straight on the ring finger, it'd be even better! But never mind that. FIRE. :D

I wanted to try the two-colour stamping, and then the other image reminded me of three things that I see in the photos a lot: mountains, campsites, and feathers. But I'm getting ahead of myself! The yellow base is a new one (omg, something besides Mellow Yellow? nowai) I found at CVS recently. The brand is Confetti, and this shade is #008 Margarita Senorita. I was impressed with the quality! It's a lighter yellow, more banana or lemon-esque, and was opaque in two coats. It's good to have another high-quality yellow polish in my collection! I then used the flame image from Mash plate #48, and painted the two colours directly onto the image, just one stripe above the other--the red is Revlon Colorstay: #120 Red Carpet, and the orange is Orly's Melt Your Popsicle. I was SUPER pleased with how that came out and will totally do that on its own sometime!

Last, I used the polish you see in the bottle shot above, OPI's Suzi Loves Cowboys to stamp on the row-of-triangle-thingys from Mash plate #28. It's a nice brown--I don't often wear plain brown creme polish, but I bought it to use in nail art, and it came in handy here! A quick coat of Cult Nails Wicked Fast sealed it all in, and I was good to go.

The brown is much richer normally, but in a thin stamping-coat, it matched my nice taupe-ish sheets pretty well, eh?

This may not be a typical "tribal" design, but I like the earthy colour pallette and the imagery it evokes when I look at these. It works for me. And luckily, this is my blog ;)

Th-th-th-that's all, folks! See you next time for challenge day 17, and my ridiculous glitter nails! xoxo

24 September 2012

Challenge Day #15: DELICATE PRINT

Ooh la la, delicate print day. And day 15, which means we are pretty much halfway through the challenge list! I'm enjoying these, although I can't wait to do my own thing again after this is over. But I'm getting ahead of myself...

Pretty and delicate? Yes, I think this is acceptable. :D

I started with two coats of this nice shimmery pick by Petites, called #298 Rock n' Roll. It's a nice bubblegum-pink colour with pinkish-silver shimmer. I wore it alone for a day first:

With my leopard print jacket--rawr!

I then stamped with Sally Hansen Insta Dri in #230 Silver Sweep, and the flowing vines image from Mash plate #50. This polish is great for stamping! I tried lots of silvers, but this is by far the best. (Big thanks to Gina for extolling the virtues of this polish and convincing me to go buy it! Go check her out on YouTube--she's a master at stamping and comes up with some beautiful designs!)

After stamping, I added a coat of Seche Vite to protect the design. I could have sworn I got a photo of it at this stage, but I can't seem to find the shiny version. All I have is the photos from my last step, which was to add a coat of Hard Candy Matte-ly In Love, a great matte topcoat. I love matte-ifying metallic colours, and the soft look and feel really contributed to the "delicate" theme! I felt so pretty wearing these :)

Still shiny, even with the matte finish. Love! This was taken indoors with flash...


...and this was in the same place but with no flash. Amazing how different they look in ambient light versus direct!

Hope you all enjoyed this one as much as I did! See you next time for tribal print day. Until then, enjoy the rest of your weekend and good luck Monday morning! xoxo
21 August 2012

Alabama Crimson Tide Nails

Howdy! Oh my stars and garters, I've been busy lately. Getting ready to travel again on Wednesday, and I was hoping to have my purple post up before then. Maybe I can squeeze it in tomorrow night!

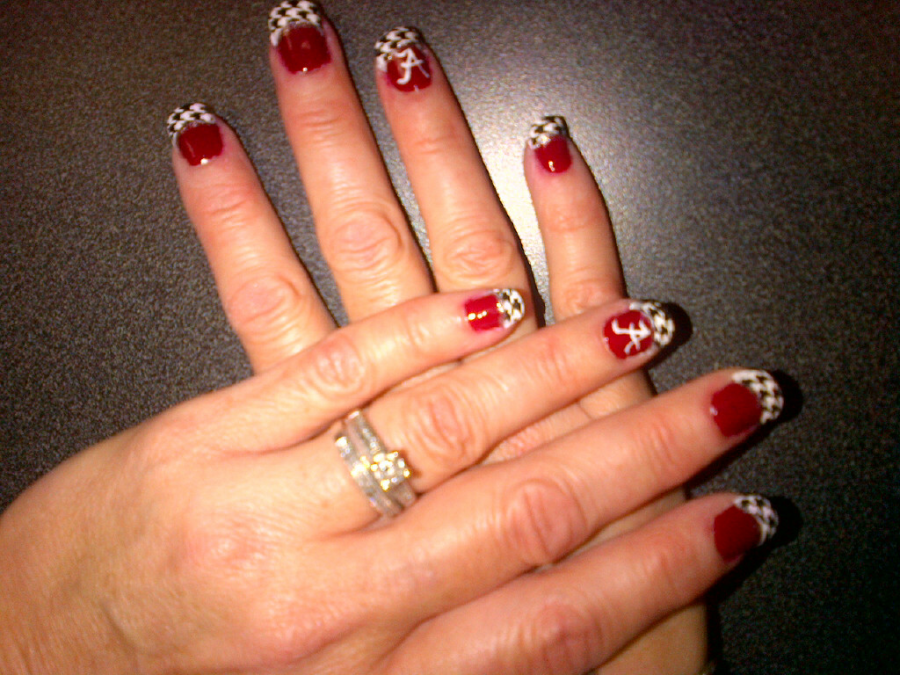
However, it just so happens that I did a special nail design for a co-worker last week and wanted to share it with you! She's a big Alabama football fan, and my houndstooth image plate from MASH (Mash-47) inspired me to create this:

So sorry for blurryness... all I had with me at the time was my camera phone, which takes awful close-up photos.

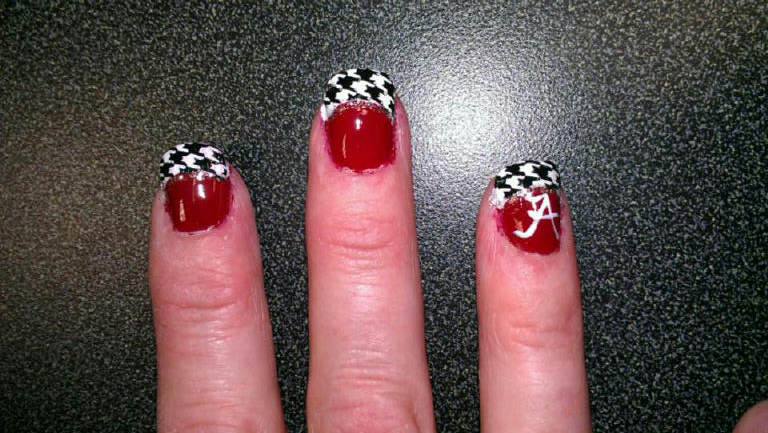
She started with a coat of China Glaze Adventure Red-y, from the Safari collection. Perfect shade of red for this design--it's a great match for the Alabama crimson colour. I then added the french tip with Orly Pointe Blanche, and also used it and a tiny detail brush to paint the A on the ring fingers for an accent. I then stamped the houndstooth design onto the white tips with Konad special black polish, using round paper hole reinforcement stickers to shield the rest of the nail. We topped it all off with a coat of INM Out The Door fast-drying topcoat, being super careful not to smear the black. It worked pretty well; only a tiny smudge on one of her nails.

One more pic: she got a closer, clearer shot with her phone:

Eeek, so messy! It was after 5pm and we were in a hurry, so I didn't have time to clean up her cuticles! She'd painted the red on in the car and then I slapped on the white. Haha, oh well. A shower or two later and they look totally neat again ;)

Hope you enjoyed this one--I had a lot of fun doing it! xoxo
09 August 2012

Challenge Day #2: ORANGE nails

Today's challenge--orange! When I think of that colour, I can only think of one thing--especially since football season is almost upon us: the Clemson Tigers! So, I painted all nails with Sally Hansen X-Treme Wear polishes--the orange is Sun Kissed and the white is White On. I then stamped tiger stripes onto the orange with Konad Special Polish in black and MASH plate #41, and the orange tiger paw onto the white nail with NYC 112A - Times Square Tangerine Creme (a surprisingly good stamping polish!) and MASH plate #36. Oh, it doesn't look too nice here though, I know. I'm cringing at how well all my stamping fails came across in this lovely high-def photo. I was kind of in a hurry, and it shows...

A+ for idea, D for execution. Rawr?

I hope you like it anyway! The idea was fun, at least--I'm going to wear this again sometime during the season for a big game. C-L-E-M-S-OOOOOOOOO-N!

See you all next time for day 3: yellow! xoxo